Up to date
This page is up to date for Godot 4.2.
If you still find outdated information, please open an issue.
Створення сцени гравця
Підготувавши параметри проекта ми можемо почати працювати над персонажем, керованим гравцем.
Перша сцена визначає об'єкт Player (Гравець). Однією з переваг створення окремої сцени гравця є те, що ми можемо протестувати її окремо, ще до того, як створили інші частини гри.
Структура вузлів
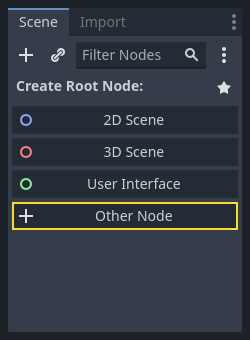
Для початку нам потрібно вибрати кореневої вузол [Root Node] для об'єкта player. У загальному випадку, кореневий вузол сцени повинен відображати бажану функціональність об'єкта - чим об'єкт є. Натисніть кнопку "Other Node" (Інший вузол) і додайте вузол Area2D в сцену.
Godot виведе попереджувальний значок поруч із вузлом у дереві сцени. Ви можете проігнорувати його наразі. Ми розглянемо цей значок пізніше.
За допомогою Area2D ми можемо виявляти об'єкти, які перекривають або стикаються з гравцем. Змініть ім'я вузла на Player, двічі клацнувши по ньому. Тепер, коли ми встановили кореневий вузол сцени, ми можемо додавати додаткові вузли, щоб додати більше функціоналу.
Before we add any children to the Player node, we want to make sure we don't
accidentally move or resize them by clicking on them. Select the node and click
the icon to the right of the lock. Its tooltip says "Make selected node's
children not selectable."

Збережіть сцену. Клацніть Сцена -> Зберегти, або натисніть Ctrl+S на Windows/Linux, або Cmd + S на macOS.
Примітка
У цьому проєкті ми будемо дотримуватися правил іменування Godot.
GDScript: Класи (вузли) використовують PascalCase, змінні та функції використовують snake_case, а константи використовують ALL_CAPS (Дивіться Посібник зі стилю GDScript ).
C#: Класи, експортовані змінні та методи використовують PascalCase, приватні поля використовують _camelCase, локальні змінні та параметри використовують camelCase (Дивіться Настанови по стилю C# ). Будьте обережні, вводячи назви методів саме під час підключення сигналів.
Анімація спрайта
Click on the Player node and add (Ctrl + A on Windows/Linux or
Cmd + A on macOS) a child node AnimatedSprite2D. The AnimatedSprite2D will handle the
appearance and animations for our player. Notice that there is a warning symbol
next to the node. An AnimatedSprite2D requires a SpriteFrames resource, which is a list of the animations it can
display. To create one, find the Sprite Frames property under the Animation tab in the Inspector and click
"[empty]" -> "New SpriteFrames". Click again to open the "SpriteFrames" panel:
On the left is a list of animations. Click the "default" one and rename it to
"walk". Then click the "Add Animation" button to create a second animation named
"up". Find the player images in the "FileSystem" tab - they're in the art
folder you unzipped earlier. Drag the two images for each animation, named
playerGrey_up[1/2] and playerGrey_walk[1/2], into the "Animation Frames"
side of the panel for the corresponding animation:
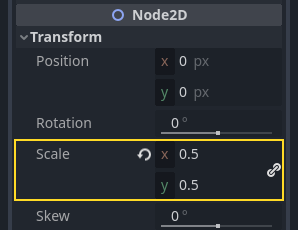
The player images are a bit too large for the game window, so we need to scale
them down. Click on the AnimatedSprite2D node and set the Scale property
to (0.5, 0.5). You can find it in the Inspector under the Node2D
heading.
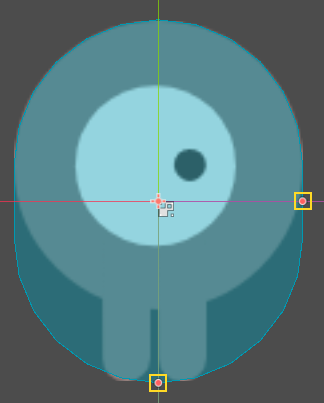
Finally, add a CollisionShape2D as a child of
Player. This will determine the player's "hitbox", or the bounds of its
collision area. For this character, a CapsuleShape2D node gives the best
fit, so next to "Shape" in the Inspector, click "[empty]" -> "New
CapsuleShape2D". Using the two size handles, resize the shape to cover the
sprite:
Коли ви закінчите, ваша сцена Player повинна виглядати так:
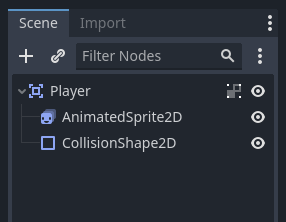
Не забудьте зберегти сцену знову після цих змін.
У наступній частині ми додамо скрипт до вузла гравця для переміщення та анімації. Потім ми налаштуємо виявлення зіткнень, щоб знати, коли гравець зіткнувся з чимось.