Up to date
This page is up to date for Godot 4.2.
If you still find outdated information, please open an issue.
Using CharacterBody2D/3D
Introducción
Godot offers several collision objects to provide both collision detection and response. Trying to decide which one to use for your project can be confusing. You can avoid problems and simplify development if you understand how each of them works and what their pros and cons are. In this tutorial, we'll look at the CharacterBody2D node and show some examples of how to use it.
Nota
While this document uses CharacterBody2D in its examples, the same
concepts apply in 3D as well.
What is a character body?
CharacterBody2D is for implementing bodies that are controlled via code.
Character bodies detect collisions with other bodies when moving, but are not affected by
engine physics properties, like gravity or friction. While this means that you
have to write some code to create their behavior, it also means you have more
precise control over how they move and react.
Nota
This document assumes you're familiar with Godot's various physics bodies. Please read Introducción a la física first, for an overview of the physics options.
Truco
A CharacterBody2D can be affected by gravity and other forces, but you must calculate the movement in code. The physics engine will not move a CharacterBody2D.
Movimiento y Colisión
When moving a CharacterBody2D, you should not set its position property
directly. Instead, you use the move_and_collide() or move_and_slide() methods.
These methods move the body along a given vector and detect collisions.
Advertencia
You should handle physics body movement in the _physics_process() callback.
Ambos métodos de movimiento tienen diferentes propósitos, y más adelante se mostrarán ejemplos de cómo funcionan.
move_and_collide
This method takes one required parameter: a Vector2 indicating
the body's relative movement. Typically, this is your velocity vector multiplied by the
frame timestep (delta). If the engine detects a collision anywhere along
this vector, the body will immediately stop moving. If this happens, the
method will return a KinematicCollision2D object.
KinematicCollision2D es un objeto que contiene datos sobre la colisión y el objeto con el cual se colisiona. Utiliza estos datos para calcular la respuesta a la colisión.
move_and_collide is most useful when you just want to move the body and
detect collision, but don't need any automatic collision response. For example,
if you need a bullet that ricochets off a wall, you can directly change the angle
of the velocity when you detect a collision. See below for an example.
move_and_slide
El método move_and_slide() tiene como objetivo simplificar la respuesta a colisiones en el caso común donde quieres que un cuerpo se deslice sobre otro. Este es particularmente útil en juegos de plataformas o de vista superior, por ejemplo.
When calling move_and_slide(), the function uses a number of node properties
to calculate its slide behavior. These properties can be found in the Inspector,
or set in code.
velocity- default value:Vector2( 0, 0 )This property represents the body's velocity vector in pixels per second.
move_and_slide()will modify this value automatically when colliding.motion_mode- default value:MOTION_MODE_GROUNDEDThis property is typically used to distinguish between side-scrolling and top-down movement. When using the default value, you can use the
is_on_floor(),is_on_wall(), andis_on_ceiling()methods to detect what type of surface the body is in contact with, and the body will interact with slopes. When usingMOTION_MODE_FLOATING, all collisions will be considered "walls".up_direction- default value:Vector2( 0, -1 )This property allows you to define what surfaces the engine should consider being the floor. Its value lets you use the
is_on_floor(),is_on_wall(), andis_on_ceiling()methods to detect what type of surface the body is in contact with. The default value means that the top side of horizontal surfaces will be considered "ground".floor_stop_on_slope- default value:trueEste parámetro evita que un cuerpo se deslice por las pendientes cuando está detenido.
wall_min_slide_angle- default value:0.261799(in radians, equivalent to15degrees)This is the minimum angle where the body is allowed to slide when it hits a slope.
floor_max_angle- valor por defecto:0.785398(en radianes, equivalente a45grados)Es el ángulo máximo antes de que una superficie deje de ser considerada un "suelo."
There are many other properties that can be used to modify the body's behavior under specific circumstances. See the CharacterBody2D docs for full details.
Detectando colisiones
Al usar move_and_collide() la función retorna un KinematicCollision2D directamente, y puedes usarlo en tu código.
When using move_and_slide() it's possible to have multiple collisions occur,
as the slide response is calculated. To process these collisions, use get_slide_collision_count()
and get_slide_collision():
# Using move_and_collide.
var collision = move_and_collide(velocity * delta)
if collision:
    print("I collided with ", collision.get_collider().name)

# Using move_and_slide.
move_and_slide()
for i in get_slide_collision_count():
    var collision = get_slide_collision(i)
    print("I collided with ", collision.get_collider().name)
// Using MoveAndCollide.
var collision = MoveAndCollide(Velocity * (float)delta);
if (collision != null)
{
    GD.Print("I collided with ", ((Node)collision.GetCollider()).Name);
}

// Using MoveAndSlide.
MoveAndSlide();
for (int i = 0; i < GetSlideCollisionCount(); i++)
{
    var collision = GetSlideCollision(i);
    GD.Print("I collided with ", ((Node)collision.GetCollider()).Name);
}
Nota
get_slide_collision_count() only counts times the body has collided and changed direction.
Mira KinematicCollision2D para más detalles sobre que datos de colisión son retornados.
¿Cuál método de movimiento hay que usar?
A common question from new Godot users is: "How do you decide which movement
function to use?" Often, the response is to use move_and_slide() because
it seems simpler, but this is not necessarily the case. One way to think of it
is that move_and_slide() is a special case, and move_and_collide()
is more general. For example, the following two code snippets result in
the same collision response:

# using move_and_collide
var collision = move_and_collide(velocity * delta)
if collision:
    velocity = velocity.slide(collision.get_normal())

# using move_and_slide
move_and_slide()
// using MoveAndCollide
var collision = MoveAndCollide(Velocity * (float)delta);
if (collision != null)
{
    Velocity = Velocity.Slide(collision.GetNormal());
}

// using MoveAndSlide
MoveAndSlide();
Cualquier cosa hecha con move_and_slide() se puede hacer también con move_and_collide(), pero puede requerir un poco más de código. Sin embargo, como veremos en los siguientes ejemplos, hay casos en los que move_and_slide() no provee la respuesta deseada.
In the example above, move_and_slide() automatically alters the velocity
variable. This is because when the character collides with the environment,
the function recalculates the speed internally to reflect
the slowdown.
Por ejemplo, si tu personaje se cae al suelo, no quieres que este acumule velocidad vertical por efecto de la gravedad. En vez de eso, quieres que su velocidad vertical sea restablecida a cero.
move_and_slide() may also recalculate the kinematic body's velocity several
times in a loop as, to produce a smooth motion, it moves the character and
collides up to five times by default. At the end of the process, the character's
new velocity is available for use on the next frame.
Ejemplos
To see these examples in action, download the sample project: character_body_2d_starter.zip
Movimiento y paredes
If you've downloaded the sample project, this example is in "basic_movement.tscn".
For this example, add a CharacterBody2D with two children: a Sprite2D and a
CollisionShape2D. Use the Godot "icon.svg" as the Sprite2D's texture (drag it
from the Filesystem dock to the Texture property of the Sprite2D). In the
CollisionShape2D's Shape property, select "New RectangleShape2D" and
size the rectangle to fit over the sprite image.
Nota
Ver Movimiento en 2D para más ejemplos de técnicas para implementar movimiento en 2D.
Attach a script to the CharacterBody2D and add the following code:
extends CharacterBody2D

var speed = 300

func get_input():
    var input_dir = Input.get_vector("ui_left", "ui_right", "ui_up", "ui_down")
    velocity = input_dir * speed

func _physics_process(delta):
    get_input()
    move_and_collide(velocity * delta)
using Godot;

public partial class MyCharacterBody2D : CharacterBody2D
{
    private int _speed = 300;

    public void GetInput()
    {
        Vector2 inputDir = Input.GetVector("ui_left", "ui_right", "ui_up", "ui_down");
        Velocity = inputDir * _speed;
    }

    public override void _PhysicsProcess(double delta)
    {
        GetInput();
        MoveAndCollide(Velocity * (float)delta);
    }
}
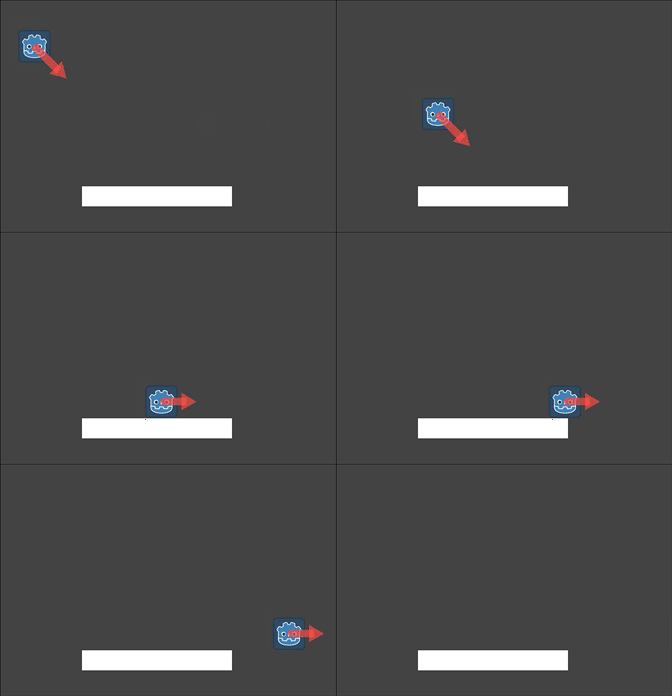
Run this scene and you'll see that move_and_collide() works as expected, moving
the body along the velocity vector. Now let's see what happens when you add
some obstacles. Add a StaticBody2D with a
rectangular collision shape. For visibility, you can use a Sprite2D, a
Polygon2D, or turn on "Visible Collision Shapes" from the "Debug" menu.
Run the scene again and try moving into the obstacle. You'll see that the CharacterBody2D
can't penetrate the obstacle. However, try moving into the obstacle at an angle and
you'll find that the obstacle acts like glue - it feels like the body gets stuck.
Esto sucede porque no hay respuesta a la colisión, move_and_collide() detiene el movimiento cuando ocurre una colisión. Tenemos que programar la respuesta que queremos cuando eso sucede.
Try changing the function to move_and_slide() and running again.
move_and_slide() provee una respuesta a colisión por defecto haciendo que el cuerpo se deslice a lo largo del objeto impactado. Esto es útil para muchos tipos de juegos y puede que sea todo lo necesario para obtener el comportamiento deseado.
Rebote/reflejo
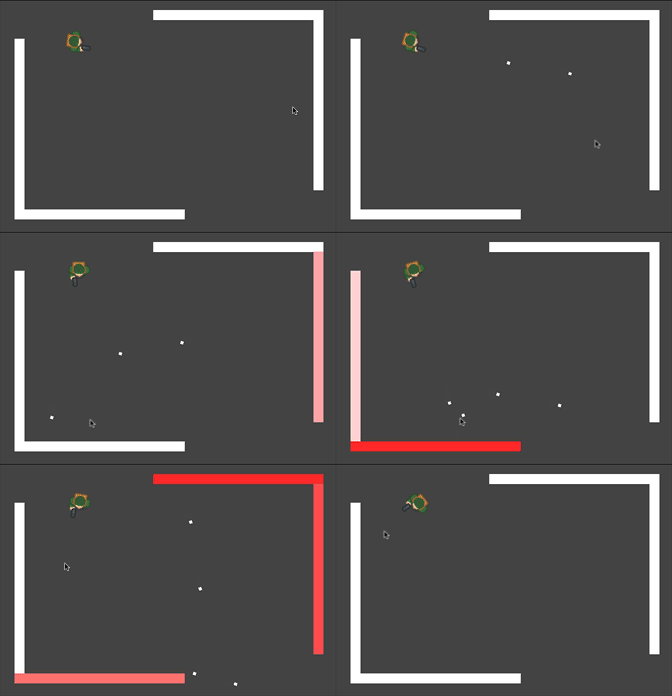
What if you don't want a sliding collision response? For this example ("bounce_and_collide.tscn" in the sample project), we have a character shooting bullets and we want the bullets to bounce off the walls.
Este ejemplo utiliza tres escenas, la escena principal contiene el Player (jugador) y las Walls (paredes), las Bullet (balas) y paredes son escenas separadas que pueden ser instanciadas.
The Player is controlled by the w and s keys for forward and back. Aiming
uses the mouse pointer. Here is the code for the Player, using move_and_slide():
extends CharacterBody2D

var Bullet = preload("res://bullet.tscn")
var speed = 200

func get_input():
    # Add these actions in Project Settings -> Input Map.
    var input_dir = Input.get_axis("backward", "forward")
    velocity = transform.x * input_dir * speed
    if Input.is_action_just_pressed("shoot"):
        shoot()

func shoot():
    # "Muzzle" is a Marker2D placed at the barrel of the gun.
    var b = Bullet.instantiate()
    b.start($Muzzle.global_position, rotation)
    get_tree().root.add_child(b)

func _physics_process(delta):
    get_input()
    var dir = get_global_mouse_position() - global_position
    # Don't move if too close to the mouse pointer.
    if dir.length() > 5:
        rotation = dir.angle()
        move_and_slide()
using Godot;

public partial class MyCharacterBody2D : CharacterBody2D
{
    private PackedScene _bullet = GD.Load<PackedScene>("res://Bullet.tscn");
    private int _speed = 200;

    public void GetInput()
    {
        // Add these actions in Project Settings -> Input Map.
        float inputDir = Input.GetAxis("backward", "forward");
        Velocity = Transform.X * inputDir * _speed;
        if (Input.IsActionPressed("shoot"))
        {
            Shoot();
        }
    }

    public void Shoot()
    {
        // "Muzzle" is a Marker2D placed at the barrel of the gun.
        var b = (Bullet)_bullet.Instantiate();
        b.Start(GetNode<Node2D>("Muzzle").GlobalPosition, Rotation);
        GetTree().Root.AddChild(b);
    }

    public override void _PhysicsProcess(double delta)
    {
        GetInput();
        var dir = GetGlobalMousePosition() - GlobalPosition;
        // Don't move if too close to the mouse pointer.
        if (dir.Length() > 5)
        {
            Rotation = dir.Angle();
            MoveAndSlide();
        }
    }
}
Y el código para Bullet:
extends CharacterBody2D

var speed = 750

func start(_position, _direction):
    rotation = _direction
    position = _position
    velocity = Vector2(speed, 0).rotated(rotation)

func _physics_process(delta):
    var collision = move_and_collide(velocity * delta)
    if collision:
        velocity = velocity.bounce(collision.get_normal())
        if collision.get_collider().has_method("hit"):
            collision.get_collider().hit()

func _on_VisibilityNotifier2D_screen_exited():
    # Deletes the bullet when it exits the screen.
    queue_free()
using Godot;

public partial class Bullet : CharacterBody2D
{
    public int _speed = 750;

    public void Start(Vector2 position, float direction)
    {
        Rotation = direction;
        Position = position;
        Velocity = new Vector2(speed, 0).Rotated(Rotation);
    }

    public override void _PhysicsProcess(double delta)
    {
        var collision = MoveAndCollide(Velocity * (float)delta);
        if (collision != null)
        {
            Velocity = Velocity.Bounce(collision.GetNormal());
            if (collision.GetCollider().HasMethod("Hit"))
            {
                collision.GetCollider().Call("Hit");
            }
        }
    }

    private void OnVisibilityNotifier2DScreenExited()
    {
        // Deletes the bullet when it exits the screen.
        QueueFree();
    }
}
The action happens in _physics_process(). After using move_and_collide(), if a
collision occurs, a KinematicCollision2D object is returned (otherwise, the return
is null).
Si retorna un objeto, usaremos la normal de la colisión para reflejar la velocity de Bullet con le método Vector2.bounce().
Si el objeto que colisiona tiene un método hit también lo llamaremos. En el proyecto agregamos un efecto de destello de color a Wall para demostrar esto.

Movimiento de juego de plataformas
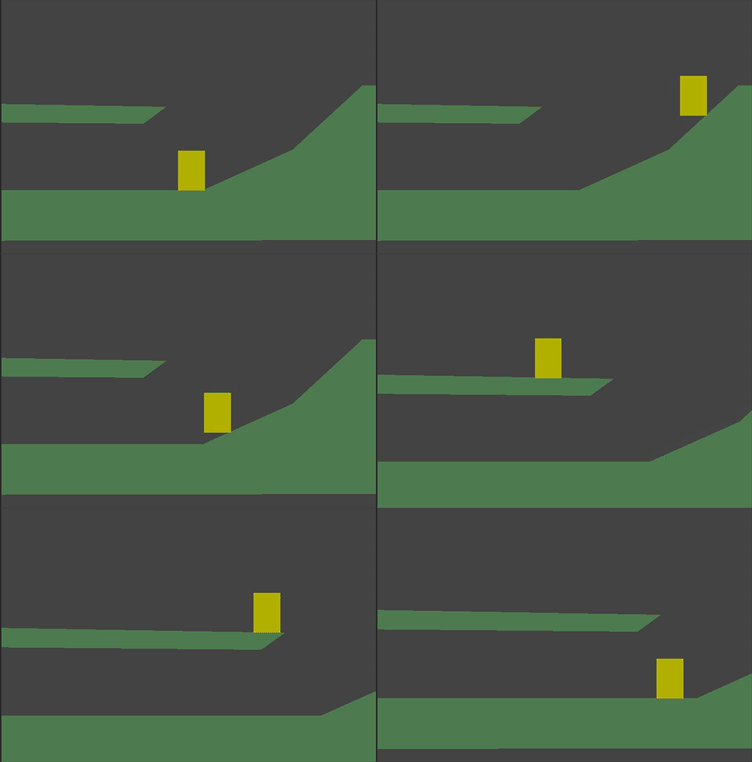
Let's try one more popular example: the 2D platformer. move_and_slide()
is ideal for quickly getting a functional character controller up and running.
If you've downloaded the sample project, you can find this in "platformer.tscn".
For this example, we'll assume you have a level made of one or more StaticBody2D
objects. They can be any shape and size. In the sample project, we're using
Polygon2D to create the platform shapes.
Este es el código para el jugador:
extends CharacterBody2D

var speed = 300.0
var jump_speed = -400.0

# Get the gravity from the project settings so you can sync with rigid body nodes.
var gravity = ProjectSettings.get_setting("physics/2d/default_gravity")


func _physics_process(delta):
    # Add the gravity.
    velocity.y += gravity * delta

    # Handle Jump.
    if Input.is_action_just_pressed("jump") and is_on_floor():
        velocity.y = jump_speed

    # Get the input direction.
    var direction = Input.get_axis("ui_left", "ui_right")
    velocity.x = direction * speed

    move_and_slide()
using Godot;

public partial class MyCharacterBody2D : CharacterBody2D
{
    private float _speed = 100.0f;
    private float _jumpSpeed = -400.0f;

    // Get the gravity from the project settings so you can sync with rigid body nodes.
    public float Gravity = ProjectSettings.GetSetting("physics/2d/default_gravity").AsSingle();

    public override void _PhysicsProcess(double delta)
    {
        Vector2 velocity = Velocity;

        // Add the gravity.
        velocity.Y += Gravity * (float)delta;

        // Handle jump.
        if (Input.IsActionJustPressed("jump") && IsOnFloor())
            velocity.Y = _jumpSpeed;

        // Get the input direction.
        float direction = Input.GetAxis("ui_left", "ui_right");
        velocity.X = direction * _speed;

        Velocity = velocity;
        MoveAndSlide();
    }
}

In this code we're using move_and_slide() as described above - to move the body
along its velocity vector, sliding along any collision surfaces such as the ground
or a platform. We're also using is_on_floor() to check if a jump should be
allowed. Without this, you'd be able to "jump" in midair; great if you're making
Flappy Bird, but not for a platformer game.
There is a lot more that goes into a complete platformer character: acceleration, double-jumps, coyote-time, and many more. The code above is just a starting point. You can use it as a base to expand into whatever movement behavior you need for your own projects.