Up to date
This page is up to date for Godot 4.2.
If you still find outdated information, please open an issue.
Standard Material 3D and ORM Material 3D
Introducción
StandardMaterial3D and ORMMaterial3D (Occlusion, Roughness, Metallic)
are default 3D materials that aim to provide most of the features artists look
for in a material, without the need for writing shader code. However, they can
be converted to shader code if additional functionality is needed.
This tutorial explains the parameters present in both materials.
There are 4 ways to add these materials to an object. A material can be added in the Material property of the mesh. It can be added in the Material property of the node using the mesh (such as a MeshInstance3D node), the Material Override property of the node using the mesh, and the Material Overlay.
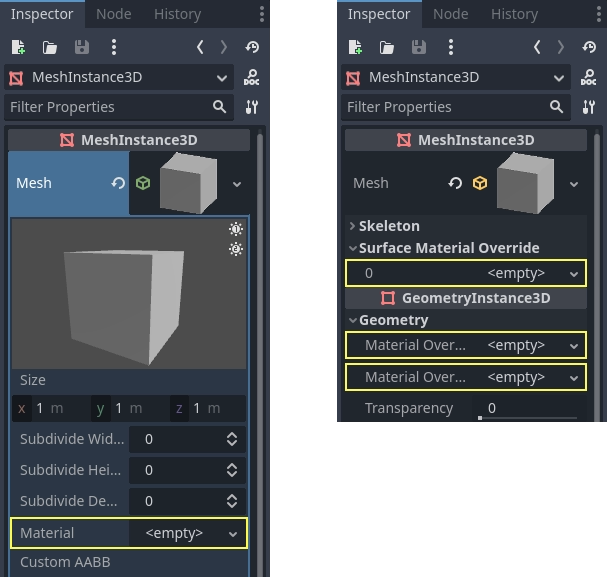
Si se añade un material a la propia malla, cada vez que se utilice esa malla tendrá ese material. Si añade un material al nodo usando la malla, el material sólo será usado por ese nodo, también anulará la propiedad de material de la malla. Si se añade un material en la propiedad Material Override del nodo, sólo será usado por ese nodo. También anulará la propiedad material regular del nodo y la propiedad material de la malla.
La propiedad Material Overlay permite renderizar un material sobre el que actualmente se está utilizando en el malla. Por ejemplo, esto se puede utilizar para aplicar un efecto de escudo transparente en una malla.
BaseMaterial 3D settings
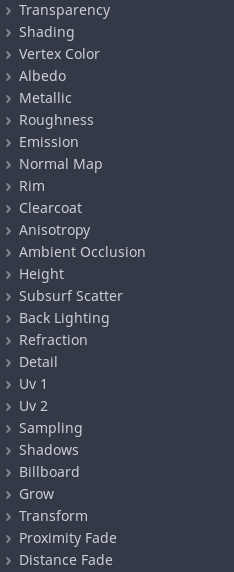
StandardMaterial3D has many settings that determine the look of a material. All of these are under the BaseMaterial3D category
ORM materials are almost exactly the same with one difference. Instead of separate settings and textures for occlusion, roughness, and metallic, there is a single ORM texture. The different color channels of that texture are used for each parameter. Programs such as Substance Painter and Armor Paint will give you the option to export in this format, for these two programs it's with the export preset for unreal engine, which also uses ORM textures.
Transparency
By default, materials in Godot are opaque. This is fast to render, but it means the material can't be seen through even if you use a transparent texture in the Albedo > Texture property (or set Albedo > Color to a transparent color).
To be able to see through a material, the material needs to be made transparent. Godot offers several transparency modes:
Disabled: Material is opaque. This is the fastest to render, with all rendering features supported.
Alpha: Material is transparent. Semi-transparent areas are drawn with blending. This is slow to render, but it allows for partial transparency (also known as translucency). Materials using alpha blending also can't cast shadows, and are not visible in screen-space reflections.
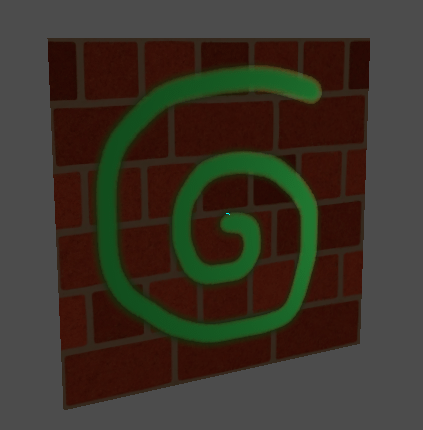
Alpha is a good fit for particle effects and VFX.
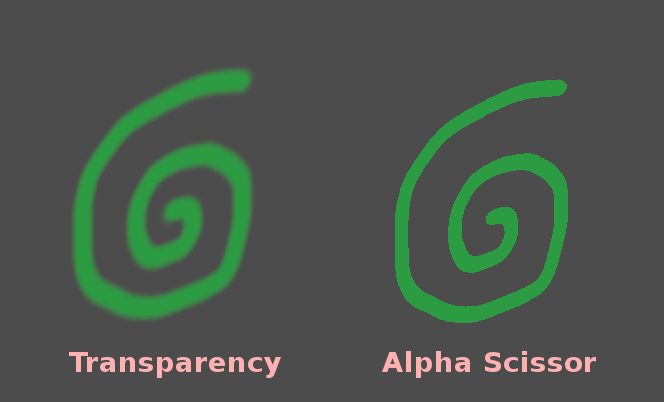
Alpha Scissor: Material is transparent. Semi-transparent areas whose opacity is below Alpha Scissor Threshold are not drawn (above this opacity, these are drawn as opaque). This is faster to render than Alpha and doesn't exhibit transparency sorting issues. The downside is that this results in "all or nothing" transparency, with no intermediate values possible. Materials using alpha scissor can cast shadows.
Alpha Scissor is ideal for foliage and fences, since these have hard edges and require correct sorting to look good.
Alpha Hash: Material is transparent. Semi-transparent areas are drawn using dithering. This is also "all or nothing" transparency, but dithering helps represent partially opaque areas with limited precision depending on viewport resolution. Materials using alpha hash can cast shadows.
Alpha Hash is suited for realistic-looking hair, although stylized hair may work better with alpha scissor.
Depth Pre-Pass: This renders the object's fully opaque pixels via the opaque pipeline first, then renders the rest with alpha blending. This allows transparency sorting to be mostly correct (albeit not fully so, as partially transparent regions may still exhibit incorrect sorting). Materials using depth prepass can cast shadows.
Nota
Godot will automatically force the material to be transparent with alpha blending if any of these conditions is met:
Setting the transparency mode to Alpha (as described here).
Setting a blend mode other than the default Mix
Enabling Refraction, Proximity Fade, or Distance Fade.
Comparison between alpha blending (left) and alpha scissor (right) transparency:
Advertencia
Alpha-blended transparency has several limitations:
Alpha-blended materials are significantly slower to render, especially if they overlap.
Alpha-blended materials may exhibit sorting issues when transparent surfaces overlap each other. This means that surfaces may render in the incorrect order, with surfaces in the back appearing to be in front of those which are actually closer to the camera.
Alpha-blended materials don't cast shadows, although they can receive shadows.
Alpha-blended materials don't appear in any reflections (other than reflection probes).
Screen-space reflections and sharp SDFGI reflections don't appear on alpha-blended materials. When SDFGI is enabled, rough reflections are used as a fallback regardless of material roughness.
Before using the Alpha transparency mode, always consider whether another transparency mode is more suited for your needs.
Alpha Antialiasing
Nota
This property is only visible when the transparency mode is Alpha Scissor or Alpha Hash.
While alpha scissor and alpha hash materials are faster to render than alpha-blended materials, they exhibit hard edges between opaque and transparent regions. While it's possible to use post-processing-based antialiasing techniques such as FXAA and TAA, this is not always desired as these techniques tend to make the final result look blurrier or exhibit ghosting artifacts.
There are 3 alpha antialiasing modes available:
Disabled: No alpha antialiasing. Edges of transparent materials will appear aliased unless a post-processing-based antialiasing solution is used.
Alpha Edge Blend: Results in a smooth transition between opaque and transparent areas. Also known as "alpha to coverage".
Alpha Edge Clip: Results in a sharp, but still antialiased transition between opaque and transparent areas. Also known as "alpha to coverage + alpha to one".
When the alpha antialiasing mode is set to Alpha Edge Blend or Alpha Edge
Clip, a new Alpha Antialiasing Edge property becomes visible below in the
inspector. This property controls the threshold below which pixels should be
made transparent. While you've already defined an alpha scissor threshold (when
using Alpha Scissor only), this additional threshold is used to smoothly
transition between opaque and transparent pixels. Alpha Antialiasing Edge
must always be set to a value that is strictly below the alpha scissor
threshold. The default of 0.3 is a sensible value with an alpha scissor of
threshold of 0.5, but remember to adjust this alpha antialiasing edge when
modifying the alpha scissor threshold.
If you find the antialiasing effect not effective enough, try increasing Alpha Antialiasing Edge while making sure it's below Alpha Scissor Threshold (if the material uses alpha scissor). On the other hand, if you notice the texture's appearance visibly changing as the camera moves closer to the material, try decreasing Alpha Antialiasing Edge.
Importante
For best results, MSAA 3D should be set to at least 2× in the Project Settings when using alpha antialiasing. This is because this feature relies on alpha to coverage, which is a feature provided by MSAA.
Without MSAA, a fixed dithering pattern is applied on the material's edges, which isn't very effective at smoothing out edges (although it can still help a little).
Modo de Fusión
Controla el modo de mezcla para el material. Hay que tener en cuenta que cualquier otro modo que no sea Mix obliga al objeto a pasar por el pipeline transparente.
Mix: Modo de mezcla por defecto, alpha controla cuánto es visible el objeto.
Add: The final color of the object is added to the color of the screen, nice for flares or some fire-like effects.
Sub: The final color of the object is subtracted from the color of the screen.
Mul: The final color of the object is multiplied with the color of the screen.

Modo de Sacrificio
Determina qué lado del objeto no se dibuja cuando se procesan las backfaces:
Back: La parte posterior del objeto no es dibujada cuando no es visible (por defecto).
Front: La parte frontal del objeto no es dibujada cuando no es visible.
Disabled: Utilizado para objetos de doble cara (no se realiza ningún proceso de culling).
Nota
Por defecto, Blender tiene la opción de culling (ocultación de caras posteriores) desactivada en los materiales y exportará los materiales para que coincidan con cómo se renderizan en Blender. Esto significa que los materiales en Godot tendrán su modo de culling establecido en Disabled. Esto puede disminuir el rendimiento ya que las caras posteriores se renderizarán incluso cuando estén siendo ocultadas por otras caras. Para resolver esto, habilita Backface Culling (ocultación de caras posteriores) en la pestaña de Materiales de Blender y luego exporta la escena nuevamente a glTF.
Modo de Dibujo Profundo
Especifica cuándo se debe realizar el renderizado de profundidad.
Opaque Only (predeterminado): Sólo se dibuja la profundidad en objetos opacos.
Always: El dibujo de profundidad se realiza tanto para objetos opacos como transparentes.
Never: No depth draw takes place (do not confuse this with the No Depth Test option below).
Depth Pre-Pass: En el caso de los objetos transparentes, primero se hace un pase opaco con las partes opacas y luego se dibuja la transparencia por encima. Esta opción se puede utilizar con césped transparente o follaje de árboles.

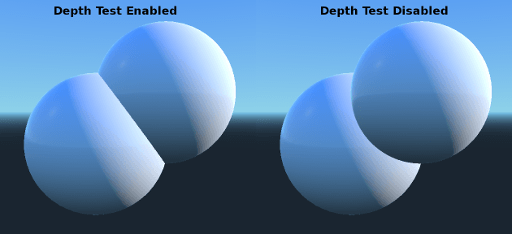
Sin prueba de profundidad
Para que los objetos cercanos aparezcan sobre objetos lejanos, se realiza una prueba de profundidad. Deshabilitarlo tiene como resultado que los objetos aparezcan por encima (o por debajo) de todo lo demás.
Desactivar esto tiene más sentido para dibujar indicadores en el espacio del mundo (world space), y funciona muy bien con la propiedad "Render Priority" de Material (ver abajo).
Sombreado
Shading mode
Godot tiene un coste por píxel más o menos constante (gracias al paso previo de profundidad o depth pre-pass). Todos los cálculos de iluminación se realizan ejecutando el shader de iluminación en cada píxel.
Dado que estos cálculos son costosos, el rendimiento puede reducirse considerablemente en algunos casos particulares, como el dibujo de varias capas de transparencia (común en los sistemas de partículas). Cambiar a iluminación por vértice (per-vertex) puede ayudar en estos casos.
Además, en dispositivos móviles o de gama baja, el cambio a vertex lighting puede aumentar considerablemente el rendimiento del renderizado.
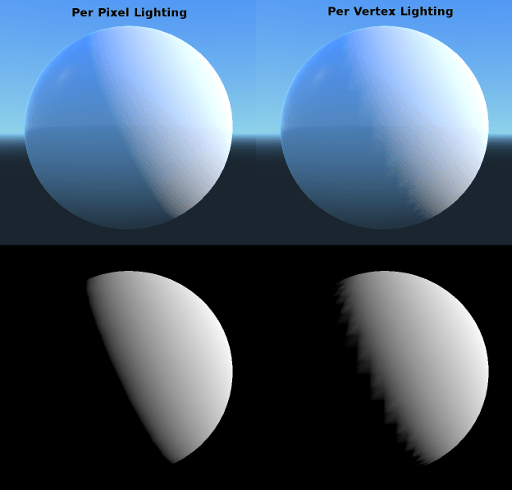
Hay que tener en cuenta que cuando la vertex lighting está activado, sólo directional lighting (iluminación direccional) puede producir sombras (por razones de rendimiento).
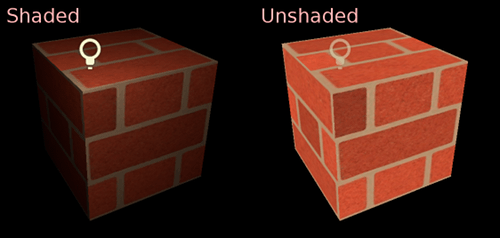
Sin embargo, en algunos casos se puede querer mostrar sólo el albedo (color) e ignorar el resto. Para lograr esto se puede cambiar el modo de shading a unshaded
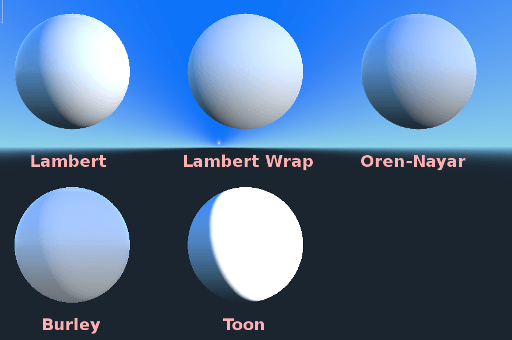
Diffuse Mode (Modo difuso)
Especifica el algoritmo utilizado por la dispersión difusa de la luz al golpear el objeto. El predeterminado es Burley. También hay otros modos disponibles:
Burley: Modo predeterminado, el algoritmo difuso original de Disney Principled PBS.
Lambert: No se ve afectado por la rugosidad.
Lambert Wrap: Extiende Lambert para cubrir más de 90 grados cuando la rugosidad es mayor. Funciona muy bien para el cabello y simula la dispersión a bajo costo de la superficie. Esta implementación es para conservar energía.
Oren Nayar: El objetivo de esta implementación es tener en cuenta el microsurfacing (a través de la rugosidad). Funciona bien con materiales similares a la arcilla y algunos tipos de tela.
Toon: Provides a hard cut for lighting, with smoothing affected by roughness. It is recommended you disable sky contribution from your environment's ambient light settings or disable ambient light in the StandardMaterial3D to achieve a better effect.
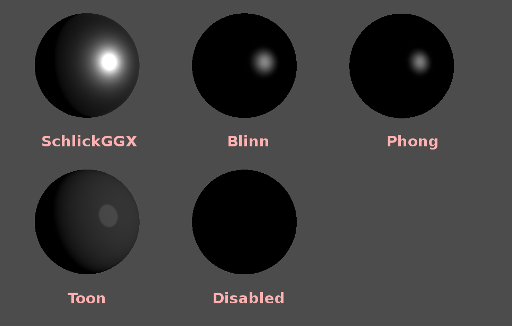
Specular Mode (Modo Specular)
Especifica cómo se renderizará el specular blob. El specular blob representa la forma de una fuente de luz reflejada en el objeto.
SchlickGGX: The most common blob used by PBR 3D engines nowadays.
Blinn: Común en motores de generaciones anteriores. No vale la pena usarlo hoy en día, pero lo hemos dejado por motivos de compatibilidad.
Phong: Igual que arriba.
Toon: Crea un blob toon, que cambia de tamaño dependiendo de la rugosidad.
Disabled: A veces, el reflejo molesta. ¡Desaparece!
Desactivar Luz Ambiental
Hace que el objeto no reciba ningún tipo de luz ambiental que de otro modo sería lo iluminaría.
Disable Fog
Makes the object unaffected by depth-based or volumetric fog. This is useful for particles or other additively blended materials that would otherwise show the shape of the mesh (even in places where it would be invisible without the fog).
Color del vértice
This setting allows choosing what is done by default to vertex colors that come from your 3D modeling application. By default, they are ignored.
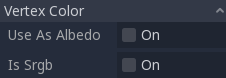
Use as Albedo (Usar como Albedo)
Esta opción hace que el color del vértice se utiliza como color del albedo.
Es sRGB
Most 3D modeling software will likely export vertex colors as sRGB, so toggling this option on will help them look correct.
Albedo
Albedo es el color base del material, sobre lo que trabaja todo lo demás. Cuando se establece en Unshaded, este es el único color que es visible. En versiones anteriores de Godot, este canal se llamaba Diffuse. El cambio de nombre se produjo principalmente porque, en PBR (Physically Based Rendering), este color afecta a muchos más cálculos que sólo la ruta de iluminación difusa.
El color y la textura del albedo se pueden utilizar juntos a medida que se multiplican.
El Alpha channel en el color y la textura del albedo también se utiliza para la transparencia del objeto. Si se utiliza un color o una textura con alpha channel, asegúrate de habilitar la transparencia o alpha scissoring para que funcione.
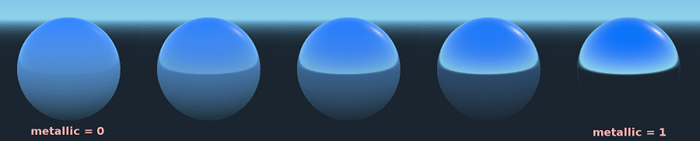
Metálico
Godot utiliza un modelo metálico en lugar de otros conocidos, por su simplicidad. Este parámetro define qué tan reflectantes son los materiales. Cuanto más reflectante es, menos es afectado por la luz difusa/ambiental y mayor es el reflejo. Este modelo se llama "energy-conserving" (conservador de energía).
El parámetro Specular es sólo una cantidad general para la reflectividad (a diferencia de Metallic, éste no ahorra energía, así que simplemente déjalo en 0.5 y no lo toques a menos que lo necesites).
El mínimo de reflectividad interna es de 0.04, por lo que (al igual que en la vida real) es imposible hacer un material completamente antirreflectante.
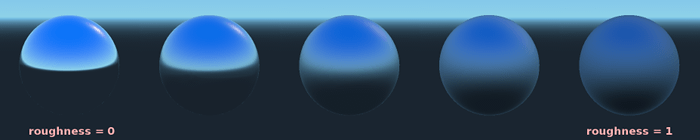
Rugosidad
Roughness (rugosidad) afecta principalmente a la forma en que se produce el reflejo. Un valor de 0 lo convierte en un espejo perfecto, mientras que un valor de 1 difumina completamente el reflejo (simulando una microsuperficie natural). Los tipos más comunes de materiales se pueden lograr con la combinación correcta de Metallic y Roughness.
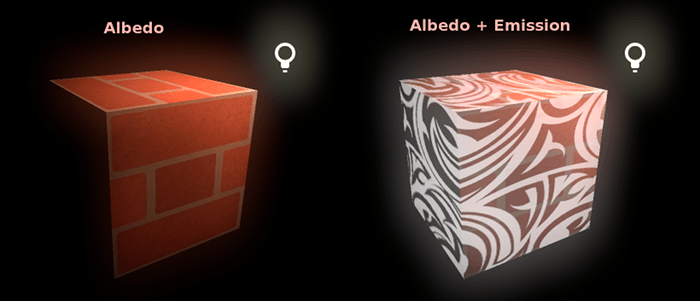
Emisión
Emission specifies how much light is emitted by the material (keep in mind this does not include light surrounding geometry unless VoxelGI or SDFGI are used). This value is added to the resulting final image and is not affected by other lighting in the scene.
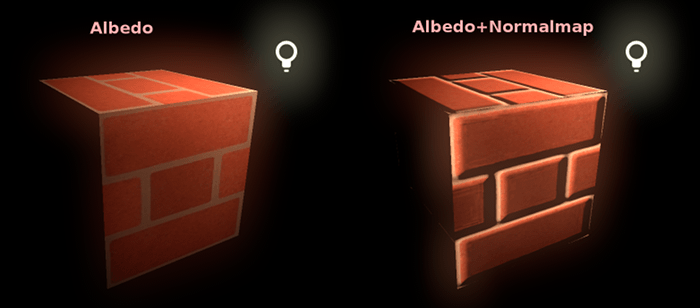
Normal map
El mapeo de normales (normal mapping) permite establecer una textura que representa detalles de forma más precisos. Esto no modifica la geometría, sólo el ángulo de incidencia de la luz. En Godot, sólo los canales rojo (red) y verde (green) se utilizan para mapas normales, con el fin de lograr una mayor compatibilidad.
Nota
Godot requiere que el mapa de normales (normal map) utilice las coordenadas X+, Y+ y Z+ (estilo OpenGL). Esto se conoce como estilo OpenGL. Si has importado un material creado para ser utilizado con otro motor, es posible que esté en estilo DirectX, en cuyo caso el mapa de normales necesita ser convertido para que su eje Y esté invertido.
Más información sobre mapa de normales (incluyendo la tabla de orden de coordenadas para motores populares) se puede encontrar aquí.
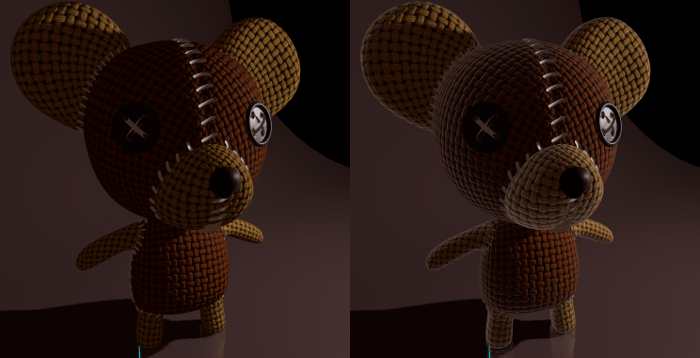
Rim
Algunos tejidos tienen micropelículas que hacen que la luz se disperse a su alrededor. Godot emula esto con el parámetro Rim. A diferencia de otras implementaciones de iluminación de bordes que sólo utilizan el canal de emisión, éste en realidad tiene en cuenta la luz (si no hay luz, no hay borde). Esto hace que el efecto sea mucho más creíble.
El tamaño del Rim depende de Roughness, y hay un parámetro especial para especificar cómo debe ser coloreado. Si Tint es 0, el color de la luz se utiliza para el Rim. Si tint es 1, entonces se utiliza el albedo del material. El uso de valores intermedios generalmente funciona mejor.
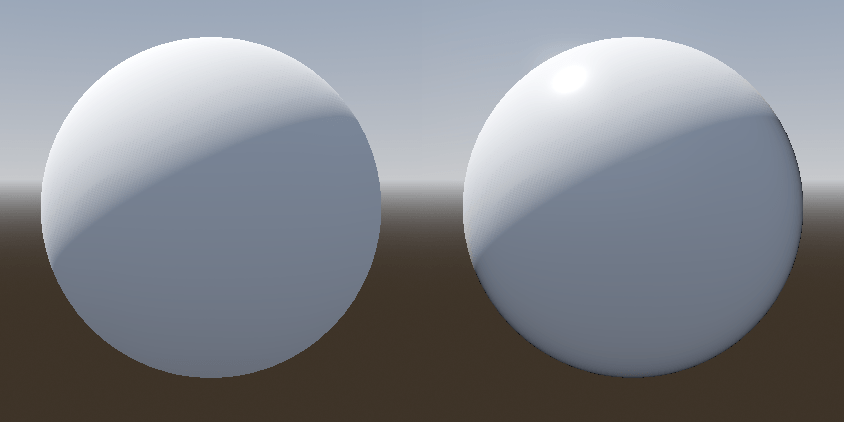
Clearcoat
El parámetro Clearcoat se utiliza principalmente para añadir una pasada secundaria de recubrimiento transparente al material. Esto es común en la pintura de automóviles y juguetes. En la práctica, es un specular blob más pequeño añadido sobre el material existente.
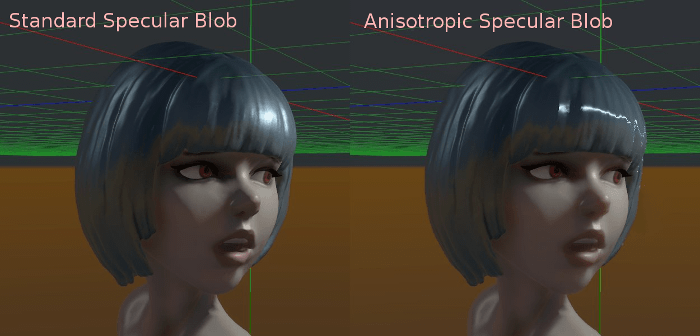
Anisotrópico
Esto cambia la forma del specular blob y lo alinea con el espacio tangencial. Anisotropy se utiliza comúnmente con cabello, o para hacer que materiales como el aluminio pulido sean más realistas. Funciona especialmente bien cuando se combina con flowmaps.
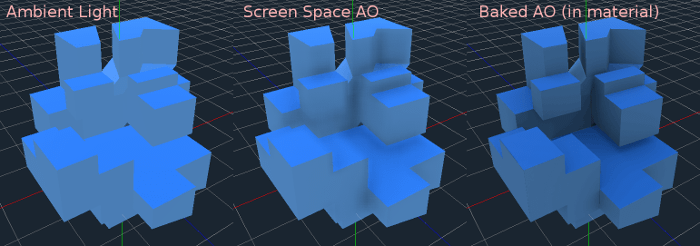
Oclusión Ambiental
Es posible especificar un mapa de oclusión ambiental bakeado. Este mapa afecta la cantidad de luz ambiental que llega a cada superficie del objeto (no afecta la luz directa por defecto). Si bien es posible utilizar la oclusión ambiental en el espacio de la pantalla (SSAO) para generar Ambient Occlusion, nada superará la calidad de un mapa de AO bien bakeado. Se recomienda prebakear Ambient Occlusion siempre que sea posible.
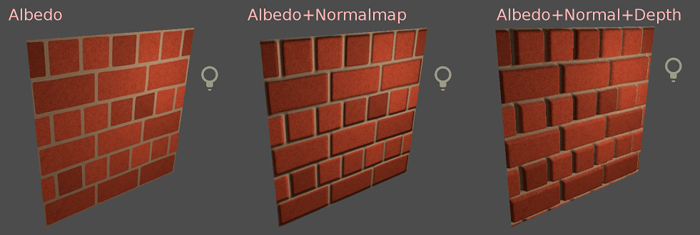
Height
Establecer un mapa de profundidad a un material genera una búsqueda ray-marched para emular el desplazamiento adecuado de las cavidades a lo largo de la dirección de la vista. Esto no es una verdadera geometría añadida, sino una ilusión de profundidad. Puede que no funcione para objetos complejos pero produce un efecto de profundidad realista para texturas. Para obtener mejores resultados, se debe utilizar Depth junto con normal mapping.
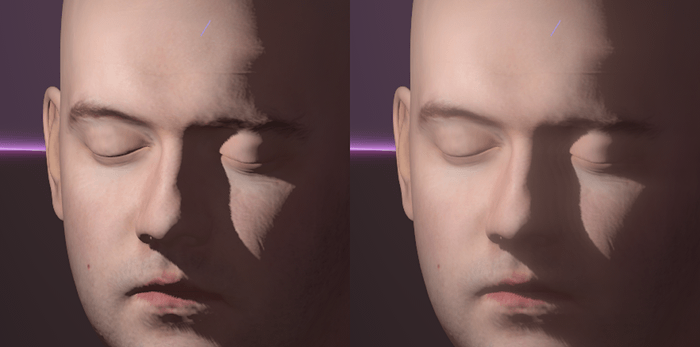
Dispersión Subsuperficial
Este efecto emula la luz que penetra la superficie de un objeto, se dispersa y luego sale. Es útil para hacer pieles realistas, mármol, líquidos de colores, etc.
Back Lighting
Controla cuánta luz del lado iluminado (visible a la luz) se transfiere al lado oscuro (lado opuesto a la luz). Esto funciona bien para objetos delgados como hojas de árboles/plantas, césped, orejas humanas, etc.
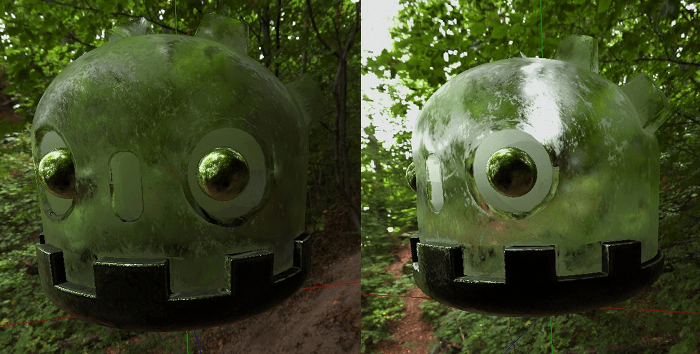
Refracción
When refraction is enabled, Godot attempts to fetch information from behind the object being rendered. This allows distorting the transparency in a way similar to refraction in real life.
Remember to use a transparent albedo texture (or reduce the albedo color's alpha channel) to make refraction visible, as refraction relies on transparency to have a visible effect.
A normal map can optionally be specified in the Refraction Texture property to allow distorting the refraction's direction on a per-pixel basis.
Nota
Refraction is implemented as a screen-space effect and forces the material to be transparent. This makes the effect relatively fast, but this results in some limitations:
Transparency sorting issues may occur.
The refractive material cannot refract onto itself, or onto other transparent materials. A refractive material behind another transparent material will be invisible.
Off-screen objects cannot appear in the refraction. This is most noticeable with high refraction strength values.
Opaque materials in front of the refractive material will appear to have "refracted" edges, even though they shouldn't.
Detail
Godot permite usar un albedo y normal map secundarios para generar texturas detalladas, las cuales pueden ser mezcladas de muchas maneras. Combinado con UV secundario o modo triplanar, se pueden lograr muchas texturas interesantes.
Hay varios ajustes que controlan el uso de los detalles.
Máscara: La máscara de detalle es una imagen en blanco y negro que se utiliza para controlar dónde tiene lugar la mezcla en una textura. El blanco es para las texturas de detalle, el negro es para las texturas materiales regulares, los diferentes tonos de gris son para la mezcla parcial de las texturas materiales y las texturas de detalle.
Modo de fusión: Estos cuatro modos controlan cómo se mezclan las texturas.
Mezclar: Combina los valores de los píxeles de ambas texturas. En negro, sólo muestra la textura del material, en blanco, sólo muestra la textura del detalle. Los valores de gris crean una mezcla suave entre los dos.
Add: Añade los valores de los píxeles de una textura con la otra. A diferencia del modo mix, ambas texturas se mezclan completamente en las partes blancas de una máscara y no en las partes grises. La textura original es mayormente sin cambios en el negro
Sustracción: resta los valores de los píxeles de una textura con la otra. La segunda textura se sustrae completamente en las partes blancas de una máscara con sólo una pequeña sustracción en las partes negras, siendo las partes grises diferentes niveles de sustracción basados en la textura exacta.
Mul: Multiplica los números de canal RGB de cada píxel de la textura superior por los valores del píxel correspondiente de la textura inferior.
Albedo: Aquí es donde pones una textura de albedo que quieres mezclar. Si no hay nada en esta ranura se interpretará como blanco por defecto.
Normal: Aquí es donde pones una textura normal que quieres mezclar. Si no hay nada en esta ranura se interpretará como un mapa plano normal. Esto puede ser usado incluso si el material no tiene el mapa normal habilitado.
UV1 y UV2
Godot soporta dos canales UV por material. Los UV secundarios son a menudo útiles para ambient occlusion o emission (baked light). Los UVs pueden ser escalados y desplazados, lo que es útil en texturas con repetición.
Mapeado Triplanar
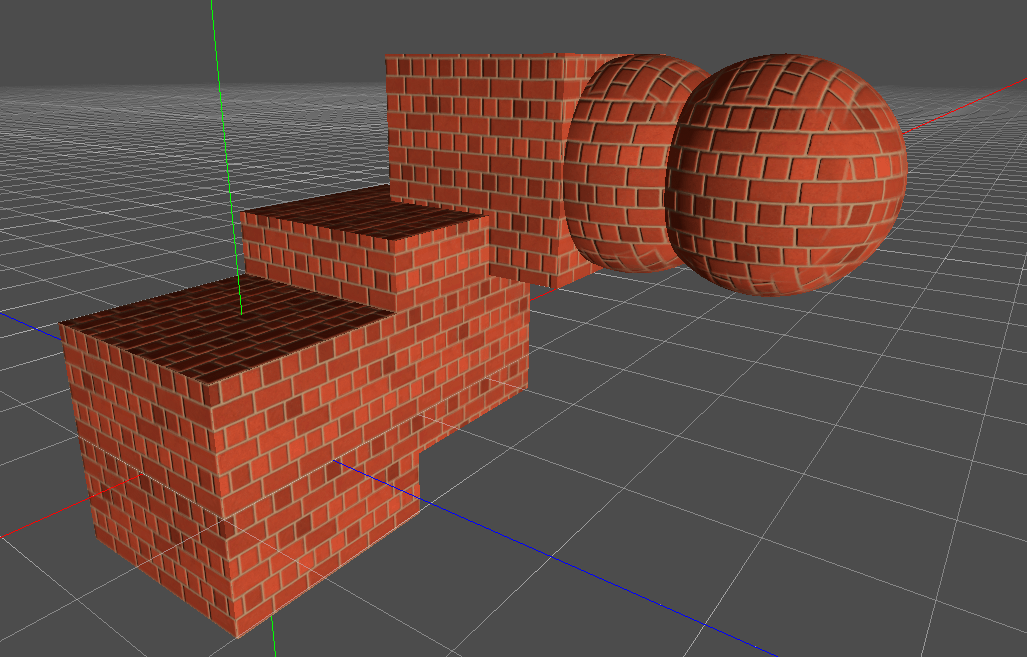
El mapeo triplanar es compatible tanto para UV1 como para UV2. Esta es una forma alternativa de obtener coordenadas de textura, a menudo llamada "Autotexture". Las texturas son muestreadas en X, Y y Z y mezcladas por la normal. El mapeo triplanar puede ser espacio de mundo o espacio de objeto.
En la imagen de abajo, puedes ver cómo todos los primitivos comparten el mismo material con el triplanar del mundo, para que los la textura pueda continuar con suavidad entre las partes.
World Triplanar (Mundo Triplanar)
When using triplanar mapping, it is computed in object local space. This option makes it use world space instead.
Sampling
Filtro
The filtering method for the textures used by the material. See this page for a full list of options and their description.
Repetición
if the textures used by the material repeat, and how they repeat. See this page for a full list of options and their description.
Sombras
Do Not Receive Shadows (No recibir sombras)
Hace que el objeto no reciba ningún tipo de sombra que de otro modo sería proyectada sobre él.
Usar la sombra para la opacidad
La iluminación modifica el alfa para que las áreas sombreadas sean opacas y las no sombreadas sean transparentes. Útil para superponer sombras a una cámara en AR.
Billboard
Modo Billboard
Activa billboard mode para materiales de dibujo. Esto controla la forma en que el objeto mira hacia la cámara:
Disabled: Billboard mode está desactivado.
Enabled: Billboard mode is enabled. The object's -Z axis will always face the camera's viewing plane.
Y-Billboard: The object's X axis will always be aligned with the camera's viewing plane.
Particle Billboard: Most suited for particle systems, because it allows specifying flipbook animation.
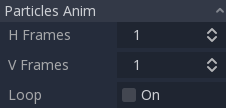
The Particles Anim section is only visible when the billboard mode is Particle Billboard.
Cartel Mantiene la Escala
Permite escalar una malla en modo cartelera.
Crece
Hace que los vértices del objeto crezcan en la dirección señalada por sus normales:
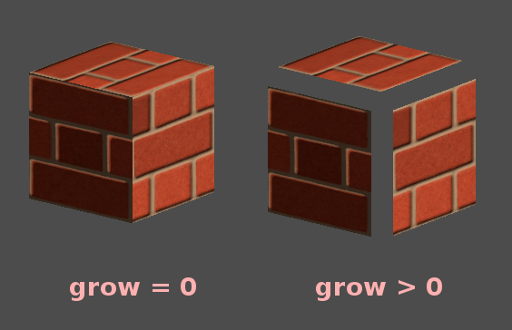
Esto se utiliza comúnmente para crear contornos de bajo costo. Añade una segunda pasada al material, hazlo negro y sin sombrear, invierte el desechado de caras (Cull Front), y añade algo de tamaño:
Transformar
Fixed Size (Tamaño fijo)
Esto hace que el objeto renderizado tenga el mismo tamaño sin importar la distancia. Es especialmente útil para indicadores (sin prueba de profundidad y alta prioridad de renderizado) y algunos tipos de billboards.
Usar Point Size (Tamaño de punto)
This option is only effective when the geometry rendered is made of points (generally it's made of triangles when imported from 3D modeling software). If so, then those points can be resized (see below).
Point Size (Tamaño de puntos)
Cuando se dibujen puntos, hay que especificar el tamaño del punto en píxeles.
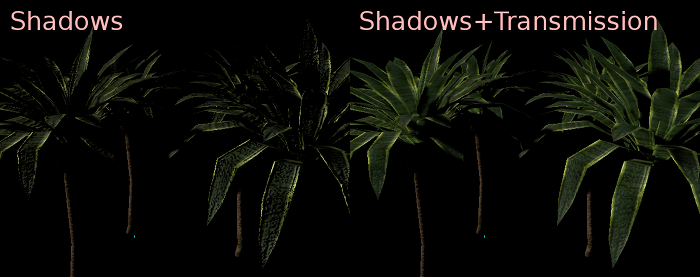
Transmisión
Controla cuánta luz del lado iluminado (visible a la luz) se transfiere al lado oscuro (lado opuesto a la luz). Esto funciona bien para objetos delgados como hojas de árboles/plantas, césped, orejas humanas, etc.
Proximity and Distance Fade
Godot allows materials to fade by proximity to each other as well as depending on the distance from the viewer. Proximity fade is useful for effects such as soft particles or a mass of water with a smooth blending to the shores.
Distance fade is useful for light shafts or indicators that are only present after a given distance.
Keep in mind enabling proximity fade or distance fade with Pixel Alpha mode enables alpha blending. Alpha blending is more GPU-intensive and can cause transparency sorting issues. Alpha blending also disables many material features such as the ability to cast shadows. To hide a character when they get too close to the camera, consider using Pixel Dither or better, Object Dither (which is even faster than Pixel Dither).
Material Settings
Prioridad de Renderización
El orden de renderizado de los objetos se puede cambiar, esto es útil sobre todo para los objetos transparentes (u objetos opacos que dibujan en profundidad pero no en color, como grietas en el suelo).
Next Pass
Sets the material to be used for the next pass. This renders the object again with a different material.