Up to date
This page is up to date for Godot 4.3.
If you still find outdated information, please open an issue.
在编辑器中运行代码
@tool 是什么?
@tool 是一行强大的代码,添加到脚本的顶部后,脚本就会在编辑器中执行。你还可以决定脚本的哪些部分在编辑器中执行、哪些部分在游戏中执行、哪部分在两者中均执行。
你可以使用它来做很多事情, 它在层次设计中非常有用, 可以直观地呈现难以预测的事物. 以下是一些用例:
如果你有一门发射受物理学(重力)影响的炮弹的大炮, 你可以在编辑器中画出炮弹的轨迹, 使关卡设计容易得多.
如果你有不同跳跃高度的跳线, 你可以绘制游戏角色能跳过的最大跳跃高度, 也可以让关卡设计变得更容易.
如果你的游戏角色不使用精灵, 却使用代码来绘制, 你可以在编辑器中执行该绘图代码以查看你的游戏角色.
危险
@tool scripts run inside the editor, and let you access the scene tree
of the currently edited scene. This is a powerful feature which also comes
with caveats, as the editor does not include protections for potential
misuse of @tool scripts.
Be extremely cautious when manipulating the scene tree, especially via
Node.queue_free, as it can cause
crashes if you free a node while the editor runs logic involving it.
如何使用 @tool
要把脚本变成工具脚本,请在代码顶部添加 @tool 注解。
要检查你当前是否在编辑器中,请使用:Engine.is_editor_hint()。
例如, 如果你想只在编辑器中执行一些代码, 可以使用:
if Engine.is_editor_hint():
    # Code to execute when in editor.
if (Engine.IsEditorHint())
{
    // Code to execute when in editor.
}
另一方面, 如果你想只在游戏中执行代码, 只需否定相同的语句:
if not Engine.is_editor_hint():
    # Code to execute when in game.
if (!Engine.IsEditorHint())
{
    // Code to execute when in game.
}
没有上述两个条件之一的代码片段将可在编辑器和游戏中运行。
以下是 _process() 函数的示例:
func _process(delta):
    if Engine.is_editor_hint():
        # Code to execute in editor.

    if not Engine.is_editor_hint():
        # Code to execute in game.

    # Code to execute both in editor and in game.
public override void _Process(double delta)
{
    if (Engine.IsEditorHint())
    {
        // Code to execute in editor.
    }

    if (!Engine.IsEditorHint())
    {
        // Code to execute in game.
    }

    // Code to execute both in editor and in game.
}
重要信息
你的工具脚本使用的任何其他 GDScript 也必须是一个工具脚本。编辑器使用的任何没有 @tool 的 GDScript 都将像一个空文件一样!
扩展一个 @tool 脚本不会自动使扩展的脚本成为 @tool脚本。从扩展的脚本中省略 @tool 将禁用父类中的工具行为。因此扩展的脚本还应该指定 @tool 注解。
编辑器中的修改是永久性的。例如,在下一节中,当我们移除脚本时,节点将保持其旋转。要注意避免进行不必要的修改。
试试 @tool
在场景中添加一个 Sprite2D 节点,并将纹理设置为 Godot 图标。附加并打开一个脚本,将其更改为:
@tool
extends Sprite2D

func _process(delta):
    rotation += PI * delta
using Godot;

[Tool]
public partial class MySprite : Sprite2D
{
    public override void _Process(double delta)
    {
        Rotation += Mathf.Pi * (float)delta;
    }
}
保存脚本并返回编辑器. 现在你应该看到你的对象在旋转. 如果你运行游戏, 它也会旋转.
备注
如果你没有看到变化, 请重新加载场景(关闭它并再次打开).
现在让我们选择何时运行代码. 将 _process() 函数修改为:
func _process(delta):
    if Engine.is_editor_hint():
        rotation += PI * delta
    else:
        rotation -= PI * delta
public override void _Process(double delta)
{
    if (Engine.IsEditorHint())
    {
        Rotation += Mathf.Pi * (float)delta;
    }
    else
    {
        Rotation -= Mathf.Pi * (float)delta;
    }
}
保存脚本. 现在, 对象将在编辑器中顺时针旋转, 但如果你运行游戏, 它将逆时针旋转.
编辑变量
添加并导出一个变量 speed 到脚本。要更新 speed 并重置旋转角度,请添加一个设值函数 set(new_speed),该函数使用检查器的输入执行。修改 _process() 以包含旋转速度。
@tool
extends Sprite2D


@export var speed = 1:
    # Update speed and reset the rotation.
    set(new_speed):
        speed = new_speed
        rotation = 0


func _process(delta):
    rotation += PI * delta * speed
using Godot;

[Tool]
public partial class MySprite : Sprite2D
{
    private float _speed = 1;

    [Export]
    public float Speed
    {
        get => _speed;
        set
        {
            // Update speed and reset the rotation.
            _speed = value;
            Rotation = 0;
        }
    }

    public override void _Process(double delta)
    {
        Rotation += Mathf.Pi * (float)delta * speed;
    }
}
备注
其他节点的代码无法在编辑器中运行。你对其他节点的访问受到限制。你可以访问树和节点及其默认属性,但无法访问用户变量。如果要这样做,其他节点也必须在编辑器中运行。自动加载节点是根本无法在编辑器中访问的。
资源变化时获取通知
Sometimes you want your tool to use a resource. However, when you change a
property of that resource in the editor, the set() method of your tool will
not be called.
@tool
class_name MyTool
extends Node

@export var resource: MyResource:
    set(new_resource):
        resource = new_resource
        _on_resource_set()

# This will only be called when you create, delete, or paste a resource.
# You will not get an update when tweaking properties of it.
func _on_resource_set():
    print("My resource was set!")
using Godot;

[Tool]
public partial class MyTool : Node
{
    private MyResource _resource;

    [Export]
    public MyResource Resource
    {
        get => _resource;
        set
        {
            _resource = value;
            OnResourceSet();
        }
    }
}

// This will only be called when you create, delete, or paste a resource.
// You will not get an update when tweaking properties of it.
private void OnResourceSet()
{
    GD.Print("My resource was set!");
}
要解决这个问题,首先必须将资源变成一个工具脚本,并使其在设置属性时发出 changed 信号:
# Make Your Resource a tool.
@tool
class_name MyResource
extends Resource

@export var property = 1:
    set(new_setting):
        property = new_setting
        # Emit a signal when the property is changed.
        changed.emit()
using Godot;

[Tool]
public partial class MyResource : Resource
{
    private float _property = 1;

    [Export]
    public float Property
    {
        get => _property;
        set
        {
            _property = value;
            // Emit a signal when the property is changed.
            EmitChanged();
        }
    }
}
然后,你需要在设置新资源时连接该信号:
@tool
class_name MyTool
extends Node

@export var resource: MyResource:
    set(new_resource):
        resource = new_resource
        # Connect the changed signal as soon as a new resource is being added.
        resource.changed.connect(_on_resource_changed)

func _on_resource_changed():
    print("My resource just changed!")
using Godot;

[Tool]
public partial class MyTool : Node
{
    private MyResource _resource;

    [Export]
    public MyResource Resource
    {
        get => _resource;
        set
        {
            _resource = value;
            // Connect the changed signal as soon as a new resource is being added.
            _resource.Changed += OnResourceChanged;
        }
    }
}

private void OnResourceChanged()
{
    GD.Print("My resource just changed!");
}
最后,记住断开信号,因为在其他地方使用和更改旧资源会导致不必要的更新。
@export var resource: MyResource:
    set(new_resource):
        # Disconnect the signal if the previous resource was not null.
        if resource != null:
            resource.changed.disconnect(_on_resource_changed)
        resource = new_resource
        resource.changed.connect(_on_resource_changed)
[Export]
public MyResource Resource
{
    get => _resource;
    set
    {
        // Disconnect the signal if the previous resource was not null.
        if (_resource != null)
        {
            _resource.Changed -= OnResourceChanged;
        }
        _resource = value;
        _resource.Changed += OnResourceChanged;
    }
}
报告节点配置警告
Godot 使用 节点配置警告 系统来警告用户有关配置错误的节点。当某个节点配置不正确时,场景面板中该节点名称旁边会出现黄色警告标志。当你悬停在该图标上或点击该图标时,会弹出警告标志。脚本中可以使用这一特性来帮助你和你的团队避免在设定场景过程中出现错误。
使用节点配置警告时,如果能够影响警告或移除警告的值发生了变化,那么你就需要调用 update_configuration_warnings。默认只会在关闭并重新打开场景时才会更新警告。
# Use setters to update the configuration warning automatically.
@export var title = "":
    set(p_title):
        if p_title != title:
            title = p_title
            update_configuration_warnings()

@export var description = "":
    set(p_description):
        if p_description != description:
            description = p_description
            update_configuration_warnings()


func _get_configuration_warnings():
    var warnings = []

    if title == "":
        warnings.append("Please set `title` to a non-empty value.")

    if description.length() >= 100:
        warnings.append("`description` should be less than 100 characters long.")

    # Returning an empty array means "no warning".
    return warnings
使用 EditorScript 运行一次性脚本
有时,你只需运行一次代码,以自动执行编辑器中未提供的特定任务。一些示例可能是:
无需运行项目即可用作 GDScript 或 C# 脚本的游乐场。
print()输出显示在编辑器输出面板中。缩放当前编辑的场景内的所有灯光节点,因为你会注意到在将灯光放置在所需的位置后,你的关卡最终看起来太暗或太亮。
用场景实例替换复制粘贴的节点,以便以后更容易修改。
这可以在 Godot 内通过扩展脚本中的 EditorScript 来实现。这提供了一种在编辑器中运行单个脚本而无需创建编辑器插件的方法。
要创建一个 EditorScript,请右键单击文件系统面板中的文件夹或空白处,然后选择新建 > 脚本...。在脚本创建对话框中,点击树图标以选择要扩展的对象(或直接在左侧字段中输入 EditorScript,但请注意区分大小写):
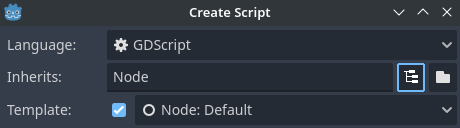
在脚本编辑器创建对话框中创建一个编辑器脚本
这将自动选择适合 EditorScript 的脚本模板,其中已插入 _run() 方法:
@tool
extends EditorScript

# Called when the script is executed (using File -> Run in Script Editor).
func _run():
    pass
当你使用文件 > 运行或键盘快捷键 Ctrl + Shift + X 且 EditorScript 是脚本编辑器中当前打开的脚本时,将执行该 _run() 方法。该键盘快捷键仅在当前聚焦于脚本编辑器时有效。
扩展 EditorScript 的脚本必须是 @tool 脚本才能运行。
警告
EditorScripts 没有撤消/重做功能,因此如果脚本旨在修改任何数据,请确保在运行场景之前保存场景。
要访问当前编辑场景中的节点,请使用 EditorScript.get_scene 方法,该方法返回当前编辑场景的根节点。下面是一个示例,它递归地获取当前编辑场景中的所有节点,并将所有 OmniLight3D 节点的范围加倍:
@tool
extends EditorScript

func _run():
    for node in get_all_children(get_scene()):
        if node is OmniLight3D:
            # Don't operate on instanced subscene children, as changes are lost
            # when reloading the scene.
            # See the "Instancing scenes" section below for a description of `owner`.
            var is_instanced_subscene_child = node != get_scene() and node.owner != get_scene()
            if not is_instanced_subscene_child:
                node.omni_range *= 2.0

# This function is recursive: it calls itself to get lower levels of child nodes as needed.
# `children_acc` is the accumulator parameter that allows this function to work.
# It should be left to its default value when you call this function directly.
func get_all_children(in_node, children_acc = []):
    children_acc.push_back(in_node)
    for child in in_node.get_children():
        children_acc = get_all_children(child, children_acc)

    return children_acc
小技巧
即使在脚本视图打开时,你也可以在编辑器顶部更改当前编辑的场景。这将影响 EditorScript.get_scene 的返回值,因此请确保在运行脚本之前选择了要迭代的场景。
实例化场景
在编辑器中,你可以正常实例化打包场景,并将它们添加到当前打开的场景中。默认情况下,使用 Node.add_child(node) 添加的节点或场景在“场景”树面板中是不可见的,也不会持久化到磁盘上。如果你希望节点和场景在场景树面板中可见,并在保存场景时持久化到磁盘上,则需要将这些子节点的 owner 属性设为当前编辑场景的根节点。
如果你使用的是 @tool:
func _ready():
    var node = Node3D.new()
    add_child(node) # Parent could be any node in the scene

    # The line below is required to make the node visible in the Scene tree dock
    # and persist changes made by the tool script to the saved scene file.
    node.owner = get_tree().edited_scene_root
public override void _Ready()
{
    var node = new Node3D();
    AddChild(node); // Parent could be any node in the scene

    // The line below is required to make the node visible in the Scene tree dock
    // and persist changes made by the tool script to the saved scene file.
    node.Owner = GetTree().EditedSceneRoot;
}
如果你使用 EditorScript:
func _run():
    # `parent` could be any node in the scene.
    var parent = get_scene().get_node("Parent")
    var node = Node3D.new()
    parent.add_child(node)

    # The line below is required to make the node visible in the Scene tree dock
    # and persist changes made by the tool script to the saved scene file.
    node.owner = get_scene()
public override void _Run()
{
    // `parent` could be any node in the scene.
    var parent = GetScene().GetNode("Parent");
    var node = new Node3D();
    parent.AddChild(node);

    // The line below is required to make the node visible in the Scene tree dock
    // and persist changes made by the tool script to the saved scene file.
    node.Owner = GetScene();
}
警告
不适当地使用 @tool 会产生许多错误。建议先按需要编写代码,然后再将 @tool 注解添加到顶部。此外,请确保将在编辑器中运行的代码与在游戏中运行的代码分开。这样,你可以更轻松地找到错误。