Up to date
This page is up to date for Godot 4.3.
If you still find outdated information, please open an issue.
设置 XR
Godot 的 XR 系统简介
Godot provides a modular XR system that abstracts many of the different XR platform specifics away from the user. At the core sits the XRServer which acts as a central interface to the XR system that allows users to discover interfaces and interact with the components of the XR system.
支持的 XR 平台都实现为一个 XRInterface 类。平台支持的接口会在 XRServer 中注册,并可通过 XRServer 的 find_interface 方法查找到,还可通过调用该接口的 initialize 方法来初始化它。
警告
已注册的接口仅意味着该接口可用,如果主机系统不支持接口,初始化可能会失败并返回 false。不幸的是,初始化失败的原因在不同平台上各不相同:可能是因为用户没有安装所需软件,或者是根本没插入头戴设备。作为开发者,你必须对接口初始化失败的情况准备好应对措施。
由于 XR 对输出有特殊要求——尤其是头戴设备要为双眼提供不同的图像输出,Godot 中的 XRServer 将覆盖渲染系统的大部分功能。对于独立设备来说,最终输出由 XRInterface 处理,而 Godot 的常规输出系统将被禁用。对于作为第二屏幕使用的桌面 XR 设备来说,可以使用独立的 Viewport 来处理 XR 输出,从而使 Godot 的主窗口能显示其他内容。
备注
请注意,只能有一个主接口负责处理输出到 XR 设备,默认情况下它将是第一个被初始化的接口。 Godot 目前仅支持单个头戴设备的实现。不过,也有可能存在第二个接口(比如为仅支持 3DOF 的设备添加跟踪功能),但这种情况已经愈发少见。
There are three XR specific node types that you will find in nearly all XR applications:
XROrigin3D 在所有意图和目的上都代表了游戏空间的中心点。这是一个过于简单的说法,但我们稍后会更详细地解释。XR 平台在物理空间中跟踪的所有对象都相对于此点定位。
XRCamera3D 代表着在为 XR 设备渲染输出时使用的(立体)摄像机。该节点的定位由 XR 系统控制,并基于 XR 平台提供的跟踪信息自动更新。
XRController3D 代表玩家使用的控制器,通常有两个:左右手各一个。该节点提供对控制器上各种状态的访问,并在玩家按下按钮时发送信号。节点的定位由 XR 系统控制,并基于 XR 平台提供的跟踪信息自动更新。
还有其他与 XR 相关的节点,并且关于这三个节点还有更多内容可以讨论,具体将稍后再谈。
在 Godot 4 中使用 XR 的先决条件
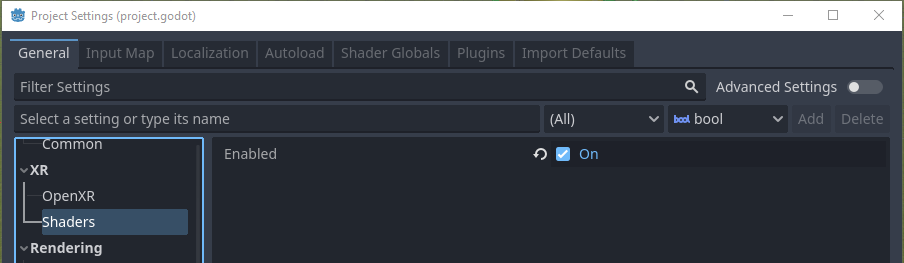
While in Godot 3 most things worked out of the box, Godot 4 needs a little more setup. This is mainly due to the more advanced nature of the Vulkan renderer. There are many rendering features in Vulkan the XR system uses that aren't enabled by default. They are very easy to turn on, simply open up your project settings and tick the XR shaders tickbox in the XR section:
警告
由于 Godot 4 仍在开发中,许多后期处理效果尚未更新以支持立体渲染。使用这些效果将产生不良影响。
备注
Godot 4 有三种渲染器选项:Compatibility、Mobile 和 Forward+。将来,XR 桌面项目应该使用 Forward+,而独立头戴设备的项目应该使用 Mobile。然而目前推荐使用 Compatibility 作为渲染器,因为它的 XR 性能最佳。
OpenXR
OpenXR 是由 Khronos Group 维护的 XR 行业开放标准,其目的是允许不同的 XR 平台通过共用一套标准化 API,为 XR 应用程序的开发提供便利。该标准与 Godot 的利益非常吻合。
OpenXR 的 Vulkan 实现与 Vulkan 紧密集成,并接管了 Vulkan 系统的一部分。这就要求在设置 XR 系统之前,需要对 Vulkan 渲染器中的某些核心图形功能先行集成。这是将 OpenXR 包含为核心接口的主要决定因素之一。
这也意味着需要在 Godot 启动时启用 OpenXR,以便正确设置。启动页面可在项目设置中找到:
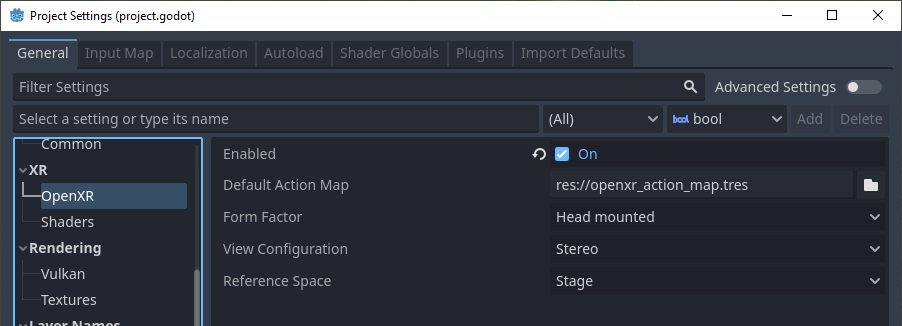
你还可以在这里找到与 OpenXR 相关的其他设置。这些设置在应用程序运行时无法更改。默认设置即可让我们开始工作,并且我们将在文档的另一部分详细介绍这些设置。
设置 XR 场景
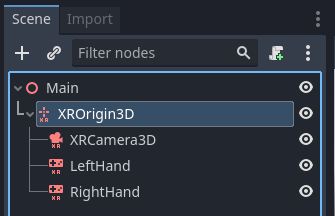
Every XR application needs at least an XROrigin3D and an XRCamera3D node. Most will have two XRController3D, one for the left hand and one for the right. Keep in mind that the camera and controller nodes should be children of the origin node. Add these nodes to a new scene and rename the controller nodes to LeftHand and RightHand, your scene should look something like this:
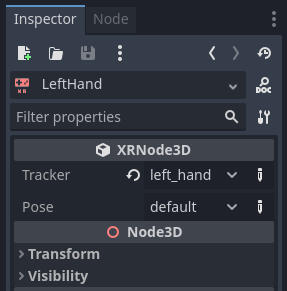
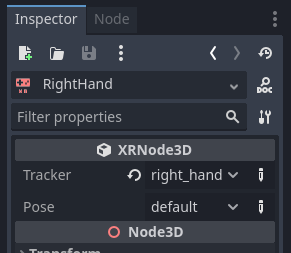
接下来,你需要配置控制器。选择左手控制器,并按如下方式进行设置:
将脚本添加到节点:
现在,所有节点都在场景的平面上,它们将在运行时自动正确定位。为了帮助开发期间的调试,可以将相机向上移动,再把 y 轴设置为 1.7,并将控制器节点分别移动到 -0.5, 1.0, -0.5(左手)和 0.5, 1.0, -0.5(右手)。
Next we need to add a script to our root node. Add the following code into this script:
extends Node3D

var xr_interface: XRInterface

func _ready():
    xr_interface = XRServer.find_interface("OpenXR")
    if xr_interface and xr_interface.is_initialized():
        print("OpenXR initialized successfully")

        # Turn off v-sync!
        DisplayServer.window_set_vsync_mode(DisplayServer.VSYNC_DISABLED)

        # Change our main viewport to output to the HMD
        get_viewport().use_xr = true
    else:
        print("OpenXR not initialized, please check if your headset is connected")
using Godot;

public partial class MyNode3D : Node3D
{
    private XRInterface _xrInterface;

    public override void _Ready()
    {
        _xrInterface = XRServer.FindInterface("OpenXR");
        if(_xrInterface != null && _xrInterface.IsInitialized())
        {
            GD.Print("OpenXR initialized successfully");

            // Turn off v-sync!
            DisplayServer.WindowSetVsyncMode(DisplayServer.VSyncMode.Disabled);

            // Change our main viewport to output to the HMD
            GetViewport().UseXR = true;
        }
        else
        {
            GD.Print("OpenXR not initialized, please check if your headset is connected");
        }
    }
}
上述代码片段假设我们正在使用 OpenXR,如果你希望使用其他接口,可以更改``find_interface`` 调用。
警告
正如你看到的,我们在代码中关闭了垂直同步(DisplayServer.VSYNC_DISABLED)。在使用 OpenXR 时,将渲染结果输出到一个头戴显示器(HMD)通常需要以 90Hz 或更高的频率运行。如果你的显示器是 60Hz 且开启了垂直同步,那么输出将限制在每秒 60 帧。
像 OpenXR 这样的 XR 接口会执行它们自己的同步。
同时请注意,默认情况下物理引擎以 60Hz 运行,渲染和物理帧数不一致可能会导致物理效果不流畅。你应该将 Engine.physics_ticks_per_second 设置为更高的值。
If you run your project at this point in time, everything will work but you will be in a dark world. So to finish off our starting point add a DirectionalLight3D and a WorldEnvironment node to your scene. You may wish to also add a mesh instance as a child to each controller node just to temporarily visualise them. Make sure you configure a sky in your world environment.
完成配置后运行项目,你应该会漂浮在某个空间中,并能够四处观察。
备注
While traditional level switching can definitely be used with XR applications, where this scene setup is repeated in each level, most find it easier to set this up once and loading levels as a subscene. If you do switch scenes and replicate the XR setup in each one, do make sure you do not run initialize multiple times. The effect can be unpredictable depending on the XR interface used.
在接下来的基础教程中,我们将创建一个只使用单场景的游戏作为练习。