Work in progress
The content of this page was not yet updated for Godot
4.2
and may be outdated. If you know how to improve this page or you can confirm
that it's up to date, feel free to open a pull request.
Animation de personnage
Dans cette dernière leçon, nous utiliserons les outils d'animation intégrés de Godot pour faire flotter et battre nos personnages. Vous apprendrez à concevoir des animations dans l'éditeur et à utiliser le code pour donner vie à votre jeu.

Nous commencerons par une introduction à l'utilisation de l'éditeur d'animation.
Utilisation de l'éditeur d'animation
Le moteur est livré avec des outils permettant de créer des animations dans l'éditeur. Vous pouvez ensuite utiliser le code pour les jouer et les contrôler au moment de l'exécution.
Open the player scene, select the Player node, and add an AnimationPlayer node.
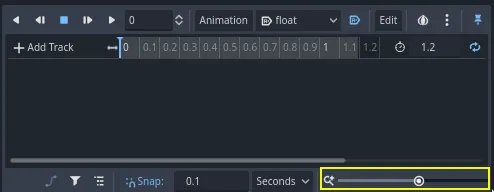
Le dock Animation apparaît dans le panneau inférieur.

Il comporte une barre d'outils et le menu déroulant de l'animation en haut, un éditeur de piste au milieu qui est actuellement vide, et des options de filtre, d'accrochage et de zoom en bas.
Créons une animation. Cliquez sur Animation -> Nouveau.
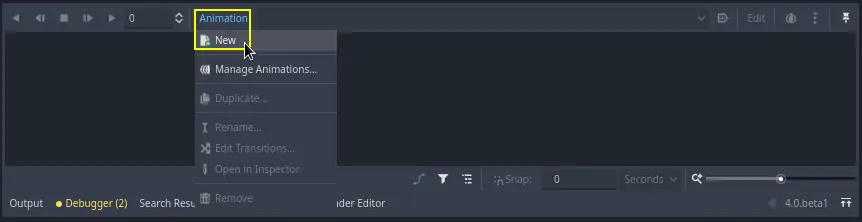
Nommez l'animation "float".
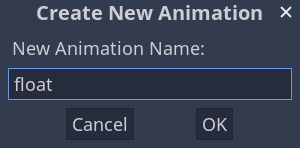
Once you've created the animation, the timeline appears with numbers representing time in seconds.

Nous voulons que l'animation commence à être lue automatiquement au début du jeu. Elle doit également tourner en boucle.
Pour ce faire, vous pouvez cliquer sur le bouton avec une icône "A+" dans la barre d'outils d'animation et sur les flèches de bouclage, respectivement.
Vous pouvez également épingler l'éditeur d'animation en cliquant sur l'icône d'épinglage en haut à droite. Cela permet d'éviter qu'il ne se replie lorsque vous cliquez sur la fenêtre d'affichage et désélectionnez les nœuds.
![]()
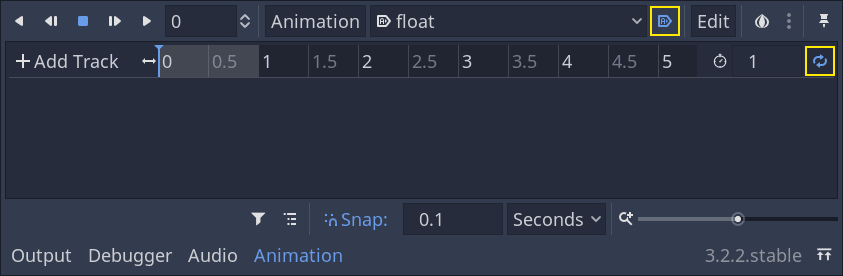
Définissez la durée de l'animation à "1,2" seconde dans le coin supérieur droit du dock.

Vous devriez voir le ruban gris s'élargir un peu. Il vous montre le début et la fin de votre animation et la ligne bleue verticale est votre curseur temporel.
Vous pouvez cliquer et faire glisser le curseur en bas à droite pour effectuer un zoom avant ou arrière sur la ligne de temps.
L'animation du flottant
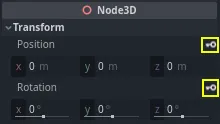
Avec le nœud animation player, vous pouvez animer la plupart des propriétés sur autant de nœuds que vous le souhaitez. Remarquez l'icône clé à côté des propriétés dans l'Inspecteur. Vous pouvez cliquer sur l'une d'entre elles pour créer une clé d'animation, une paire temps-valeur pour la propriété correspondante. La clé d'animation est insérée à l'endroit où se trouve votre curseur temporel dans la ligne de temps.
Let's insert our first keys. Here, we will animate both the position and the
rotation of the Character node.
Select the Character and in the Inspector expand the Transform section. Click the key icon next to Position, and Rotation.
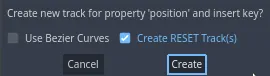
For this tutorial, just create RESET Track(s) which is the default choice
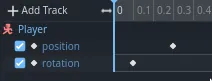
Deux pistes apparaissent dans l'éditeur avec une icône en forme de diamant représentant chaque clés d'animation.
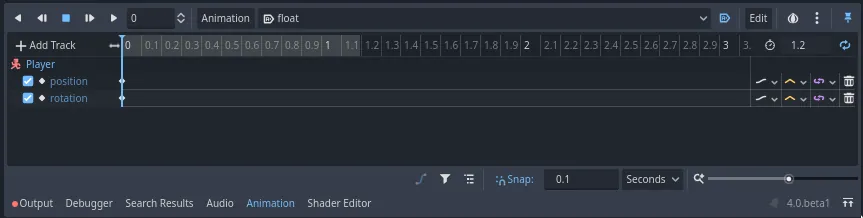
You can click and drag on the diamonds to move them in time. Move the
position key to 0.3 seconds and the rotation key to 0.1 seconds.
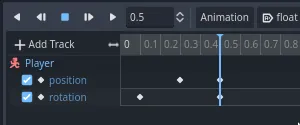
Move the time cursor to 0.5 seconds by clicking and dragging on the gray
timeline.

In the Inspector, set the Position's Y axis to 0.65 meters and the Rotation' X axis to 8.
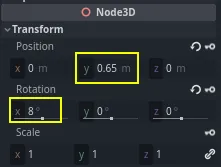
Create a keyframe for both properties
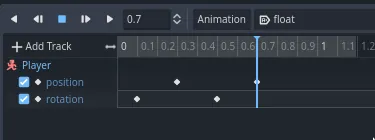
Now, move the position keyframe to 0.7
seconds by dragging it on the timeline.
Note
Un exposé sur les principes de l'animation dépasse le cadre de ce tutoriel. Notez simplement que vous ne voulez pas tout chronométrer et espacer uniformément. Les animateurs jouent plutôt avec le timing et l'espacement, deux principes fondamentaux de l'animation. Vous voulez décaler et contraster les mouvements de votre personnage pour qu'il semblent vivant.
Move the time cursor to the end of the animation, at 1.2 seconds. Set the Y
position to about 0.35 and the X rotation to -9 degrees. Once again,
create a key for both properties.

Vous pouvez prévisualiser le résultat en cliquant sur le bouton lecture ou en appuyant sur Shift + D. Cliquez sur le bouton arrêt ou appuyez sur S pour arrêter la lecture.

Vous pouvez voir que le moteur interpole entre vos clés d'animation pour produire une animation continue. Pour le moment, cependant, le mouvement semble très robotique. Cela est dû au fait que l'interpolation par défaut est linéaire, ce qui entraîne des transitions constantes, contrairement à la façon dont les êtres vivants se déplacent dans le monde réel.
Nous pouvons contrôler la transition entre les clés d'animation à l'aide de courbes d'assouplissement.
Cliquez et faites glisser autour des deux premières clés dans la ligne de temps pour les sélectionner.
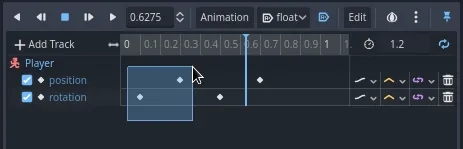
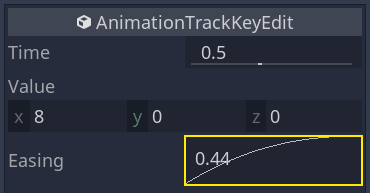
Vous pouvez modifier les propriétés des deux clés simultanément dans l'Inspecteur, où vous pouvez voir une propriété Easing.
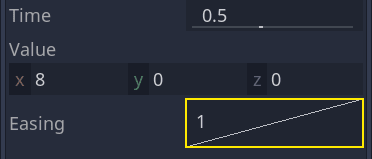
Cliquez et faites glisser sur la courbe, en la tirant vers la gauche. Cela cela fera un ease-out, c'est-à-dire un assouplissement rapide au départ qui ralentira lorsque le curseur temporel atteindra la clé d'animation suivante.

Jouer l'animation pour voir la différence. La première moitié devrait déjà donner l'impression d'être un peu plus dynamique.
Appliquez un ease-out à la deuxième clé d'animation de la piste de la rotation.
Do the opposite for the second position keyframe, dragging it to the right.
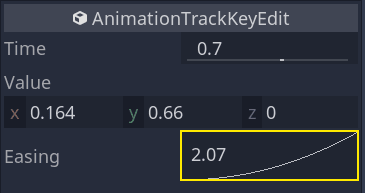
Votre animation devrait ressembler à quelque chose comme ceci.
Note
Les animations mettent à jour les propriétés des nœuds animés à chaque image, en remplaçant les valeurs initiales. Si nous animions directement le nœud Player, cela nous empêcherait de le déplacer dans le code. C'est là que le nœud Pivot s'avère utile : même si nous avons animé le Character, nous pouvons toujours déplacer et faire pivoter le Pivot et superposer les modifications à l'animation dans un script.
Maintenant si vous lancez au jeu, la créature du joueur flottera !
If the creature is a little too close to the floor, you can move the Pivot up
to offset it.
Contrôler l'animation par le code
Nous pouvons utiliser du code pour contrôler la lecture de l'animation en fonction des entrées du joueur. Modifions la vitesse de l'animation lorsque le personnage se déplace.
Open the Player's script by clicking the script icon next to it.
![]()
Dans _physics_process(), après la ligne où nous vérifions le vecteur direction, ajoutez le code suivant.
func _physics_process(delta):
    #...
    if direction != Vector3.ZERO:
        #...
        $AnimationPlayer.speed_scale = 4
    else:
        $AnimationPlayer.speed_scale = 1
public override void _PhysicsProcess(double delta)
{
    // ...
    if (direction != Vector3.Zero)
    {
        // ...
        GetNode<AnimationPlayer>("AnimationPlayer").SpeedScale = 4;
    }
    else
    {
        GetNode<AnimationPlayer>("AnimationPlayer").SpeedScale = 1;
    }
}
Ce code fait en sorte que lorsque le joueur se déplace, nous multiplions la vitesse de lecture par 4. Lorsqu'il s'arrête, nous la remettons à la normale.
We mentioned that the Pivot could layer transforms on top of the animation. We
can make the character arc when jumping using the following line of code. Add it
at the end of _physics_process().
func _physics_process(delta):
    #...
    $Pivot.rotation.x = PI / 6 * velocity.y / jump_impulse
public override void _PhysicsProcess(double delta)
{
    // ...
    var pivot = GetNode<Node3D>("Pivot");
    pivot.Rotation = new Vector3(Mathf.Pi / 6.0f * Velocity.Y / JumpImpulse, pivot.Rotation.Y, pivot.Rotation.Z);
}
Animer les mobs
Voici une autre astuce intéressante avec les animations dans Godot : tant que vous utilisez une structure de nœuds similaire, vous pouvez les copier dans différentes scènes.
For example, both the Mob and the Player scenes have a Pivot and a
Character node, so we can reuse animations between them.
Open the Player scene, select the AnimationPlayer node and open the "float"
animation. Next, click on Animation > Copy. Then open mob.tscn,
create an AnimationPlayer child node and select it. Click Animation > Paste
and make sure that the button with an "A+" icon (Autoplay on Load) and the
looping arrows (Animation looping) are also turned on in the animation editor
in the bottom panel. That's it; all monsters will now play the float animation.
Nous pouvons modifier la vitesse de lecture en fonction de la random_speed de la créature. Ouvrez le script du Mob et à la fin de la fonction initialize(), ajoutez la ligne suivante.
func initialize(start_position, player_position):
    #...
    $AnimationPlayer.speed_scale = random_speed / min_speed
public void Initialize(Vector3 startPosition, Vector3 playerPosition)
{
    // ...
    GetNode<AnimationPlayer>("AnimationPlayer").SpeedScale = randomSpeed / MinSpeed;
}
Et avec cela, vous avez fini de coder votre premier jeu 3D complet.
Félicitations !
Dans la prochaine partie, nous récapitulerons rapidement ce que vous avez appris et vous donnerons quelques liens pour continuer à en apprendre davantage. Mais pour l'instant, voici l'intégralité des Player.gd et Mob.gd afin que vous puissiez vérifier votre code par rapport à eux.
Voici le script Player.
extends CharacterBody3D

signal hit

# How fast the player moves in meters per second.
@export var speed = 14
# The downward acceleration while in the air, in meters per second squared.
@export var fall_acceleration = 75
# Vertical impulse applied to the character upon jumping in meters per second.
@export var jump_impulse = 20
# Vertical impulse applied to the character upon bouncing over a mob
# in meters per second.
@export var bounce_impulse = 16

var target_velocity = Vector3.ZERO


func _physics_process(delta):
    # We create a local variable to store the input direction
    var direction = Vector3.ZERO

    # We check for each move input and update the direction accordingly
    if Input.is_action_pressed("move_right"):
        direction.x = direction.x + 1
    if Input.is_action_pressed("move_left"):
        direction.x = direction.x - 1
    if Input.is_action_pressed("move_back"):
        # Notice how we are working with the vector's x and z axes.
        # In 3D, the XZ plane is the ground plane.
        direction.z = direction.z + 1
    if Input.is_action_pressed("move_forward"):
        direction.z = direction.z - 1

    # Prevent diagonal movement being very fast
    if direction != Vector3.ZERO:
        direction = direction.normalized()
        $Pivot.look_at(position + direction,Vector3.UP)
        $AnimationPlayer.speed_scale = 4
    else:
        $AnimationPlayer.speed_scale = 1

    # Ground Velocity
    target_velocity.x = direction.x * speed
    target_velocity.z = direction.z * speed

    # Vertical Velocity
    if not is_on_floor(): # If in the air, fall towards the floor
        target_velocity.y = target_velocity.y - (fall_acceleration * delta)

    # Jumping.
    if is_on_floor() and Input.is_action_just_pressed("jump"):
        target_velocity.y = jump_impulse

    # Iterate through all collisions that occurred this frame
    # in C this would be for(int i = 0; i < collisions.Count; i++)
    for index in range(get_slide_collision_count()):
        # We get one of the collisions with the player
        var collision = get_slide_collision(index)

        # If the collision is with ground
        if collision.get_collider() == null:
            continue

        # If the collider is with a mob
        if collision.get_collider().is_in_group("mob"):
            var mob = collision.get_collider()
            # we check that we are hitting it from above.
            if Vector3.UP.dot(collision.get_normal()) > 0.1:
                # If so, we squash it and bounce.
                mob.squash()
                target_velocity.y = bounce_impulse
                # Prevent further duplicate calls.
                break

    # Moving the Character
    velocity = target_velocity
    move_and_slide()

    $Pivot.rotation.x = PI / 6 * velocity.y / jump_impulse

# And this function at the bottom.
func die():
    hit.emit()
    queue_free()

func _on_mob_detector_body_entered(body):
    die()
using Godot;

public partial class Player : CharacterBody3D
{
    // Emitted when the player was hit by a mob.
    [Signal]
    public delegate void HitEventHandler();

    // How fast the player moves in meters per second.
    [Export]
    public int Speed { get; set; } = 14;
    // The downward acceleration when in the air, in meters per second squared.
    [Export]
    public int FallAcceleration { get; set; } = 75;
    // Vertical impulse applied to the character upon jumping in meters per second.
    [Export]
    public int JumpImpulse { get; set; } = 20;
    // Vertical impulse applied to the character upon bouncing over a mob in meters per second.
    [Export]
    public int BounceImpulse { get; set; } = 16;

    private Vector3 _targetVelocity = Vector3.Zero;

    public override void _PhysicsProcess(double delta)
    {
        // We create a local variable to store the input direction.
        var direction = Vector3.Zero;

        // We check for each move input and update the direction accordingly.
        if (Input.IsActionPressed("move_right"))
        {
            direction.X += 1.0f;
        }
        if (Input.IsActionPressed("move_left"))
        {
            direction.X -= 1.0f;
        }
        if (Input.IsActionPressed("move_back"))
        {
            // Notice how we are working with the vector's X and Z axes.
            // In 3D, the XZ plane is the ground plane.
            direction.Z += 1.0f;
        }
        if (Input.IsActionPressed("move_forward"))
        {
            direction.Z -= 1.0f;
        }

        // Prevent diagonal movement being very fast.
        if (direction != Vector3.Zero)
        {
            direction = direction.Normalized();
            GetNode<Node3D>("Pivot").LookAt(Position + direction, Vector3.Up);
            GetNode<AnimationPlayer>("AnimationPlayer").PlaybackSpeed = 4;
        }
        else
        {
            GetNode<AnimationPlayer>("AnimationPlayer").PlaybackSpeed = 1;
        }

        // Ground velocity
        _targetVelocity.X = direction.X * Speed;
        _targetVelocity.Z = direction.Z * Speed;

        // Vertical velocity
        if (!IsOnFloor())
        {
            _targetVelocity.Y -= FallAcceleration * (float)delta;
        }

        // Jumping.
        if (IsOnFloor() && Input.IsActionJustPressed("jump"))
        {
            _targetVelocity.Y += JumpImpulse;
        }

        // Iterate through all collisions that occurred this frame.
        for (int index = 0; index < GetSlideCollisionCount(); index++)
        {
            // We get one of the collisions with the player.
            KinematicCollision3D collision = GetSlideCollision(index);

            // If the collision is with a mob.
            if (collision.GetCollider() is Mob mob)
            {
                // We check that we are hitting it from above.
                if (Vector3.Up.Dot(collision.GetNormal()) > 0.1f)
                {
                    // If so, we squash it and bounce.
                    mob.Squash();
                    _targetVelocity.Y = BounceImpulse;
                    // Prevent further duplicate calls.
                    break;
                }
            }
        }

        // Moving the character
        Velocity = _targetVelocity;
        MoveAndSlide();

        var pivot = GetNode<Node3D>("Pivot");
        pivot.Rotation = new Vector3(Mathf.Pi / 6.0f * Velocity.Y / JumpImpulse, pivot.Rotation.Y, pivot.Rotation.Z);
    }

    private void Die()
    {
        EmitSignal(SignalName.Hit);
        QueueFree();
    }

    private void OnMobDetectorBodyEntered(Node body)
    {
        Die();
    }
}
Et le script Mob.
extends CharacterBody3D

# Minimum speed of the mob in meters per second.
@export var min_speed = 10
# Maximum speed of the mob in meters per second.
@export var max_speed = 18

# Emitted when the player jumped on the mob
signal squashed

func _physics_process(_delta):
    move_and_slide()

# This function will be called from the Main scene.
func initialize(start_position, player_position):
    # We position the mob by placing it at start_position
    # and rotate it towards player_position, so it looks at the player.
    look_at_from_position(start_position, player_position, Vector3.UP)
    # Rotate this mob randomly within range of -90 and +90 degrees,
    # so that it doesn't move directly towards the player.
    rotate_y(randf_range(-PI / 4, PI / 4))

    # We calculate a random speed (integer)
    var random_speed = randi_range(min_speed, max_speed)
    # We calculate a forward velocity that represents the speed.
    velocity = Vector3.FORWARD * random_speed
    # We then rotate the velocity vector based on the mob's Y rotation
    # in order to move in the direction the mob is looking.
    velocity = velocity.rotated(Vector3.UP, rotation.y)

    $AnimationPlayer.speed_scale = random_speed / min_speed

func _on_visible_on_screen_notifier_3d_screen_exited():
    queue_free()

func squash():
    squashed.emit()
    queue_free() # Destroy this node
using Godot;

public partial class Mob : CharacterBody3D
{
    // Emitted when the played jumped on the mob.
    [Signal]
    public delegate void SquashedEventHandler();

    // Minimum speed of the mob in meters per second
    [Export]
    public int MinSpeed { get; set; } = 10;
    // Maximum speed of the mob in meters per second
    [Export]
    public int MaxSpeed { get; set; } = 18;

    public override void _PhysicsProcess(double delta)
    {
        MoveAndSlide();
    }

    // This function will be called from the Main scene.
    public void Initialize(Vector3 startPosition, Vector3 playerPosition)
    {
        // We position the mob by placing it at startPosition
        // and rotate it towards playerPosition, so it looks at the player.
        LookAtFromPosition(startPosition, playerPosition, Vector3.Up);
        // Rotate this mob randomly within range of -90 and +90 degrees,
        // so that it doesn't move directly towards the player.
        RotateY((float)GD.RandRange(-Mathf.Pi / 4.0, Mathf.Pi / 4.0));

        // We calculate a random speed (integer).
        int randomSpeed = GD.RandRange(MinSpeed, MaxSpeed);
        // We calculate a forward velocity that represents the speed.
        Velocity = Vector3.Forward * randomSpeed;
        // We then rotate the velocity vector based on the mob's Y rotation
        // in order to move in the direction the mob is looking.
        Velocity = Velocity.Rotated(Vector3.Up, Rotation.Y);

        GetNode<AnimationPlayer>("AnimationPlayer").SpeedScale = randomSpeed / MinSpeed;
    }

    public void Squash()
    {
        EmitSignal(SignalName.Squashed);
        QueueFree(); // Destroy this node
    }

    private void OnVisibilityNotifierScreenExited()
    {
        QueueFree();
    }
}