Up to date
This page is up to date for Godot 4.2.
If you still find outdated information, please open an issue.
Création de plugins
A propos des plugins
Un plugin est un excellent moyen d'étendre l'éditeur avec des outils utiles. Il peut être réalisé entièrement avec GDScript et des scènes standard, sans même recharger l'éditeur. Contrairement aux modules, vous n'avez pas besoin de créer du code C++ ni de recompiler le moteur. Bien que cela rende les plugins moins puissants, il y a encore beaucoup de choses que vous pouvez faire avec eux. Notez qu'un plugin est similaire à toute scène que vous pouvez déjà faire, sauf qu'il est créé à l'aide d'un script pour ajouter une fonctionnalité à l'éditeur.
This tutorial will guide you through the creation of two plugins so you can understand how they work and be able to develop your own. The first is a custom node that you can add to any scene in the project, and the other is a custom dock added to the editor.
Créer un plugin
Avant de commencer, créez un nouveau projet vide où vous voulez. Cela servira de base pour développer et tester les plugins.
La première chose dont vous avez besoin pour que l'éditeur identifie un nouveau plugin est de créer deux fichiers : un plugin.cfg pour la configuration et un script outil avec la fonctionnalité. Les plugins ont un chemin standard comme addons/plugin_name dans le dossier du projet. Godot fournit un dialogue pour générer ces fichiers et les placer là où ils doivent être.
In the main toolbar, click the Project dropdown. Then click
Project Settings.... Go to the Plugins tab and then click
on the Create New Plugin button in the top-right.
Vous verrez le dialogue s'afficher, comme ceci :
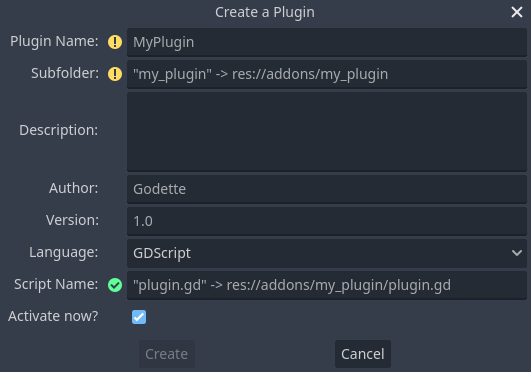
Le texte à remplacer de chaque champ décrit comment il affecte la création des fichiers par le plugin et les valeurs du fichier de configuration.
To continue with the example, use the following values:
Plugin Name: My Custom Node
Subfolder: my_custom_node
Description: A custom node made to extend the Godot Engine.
Author: Your Name Here
Version: 1.0.0
Language: GDScript
Script Name: custom_node.gd
Activate now: No
Plugin Name: My Custom Node
Subfolder: MyCustomNode
Description: A custom node made to extend the Godot Engine.
Author: Your Name Here
Version: 1.0.0
Language: C#
Script Name: CustomNode.cs
Activate now: No
Avertissement
Unchecking the Activate now? option in C# is always required because,
like every other C# script, the EditorPlugin script needs to be compiled which
requires building the project. After building the project the plugin can be
enabled in the Plugins tab of Project Settings.
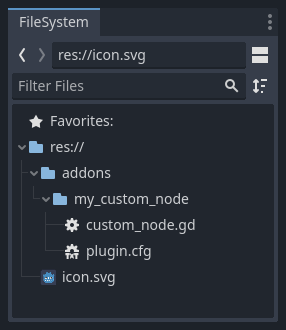
Vous devriez vous retrouver avec une structure de répertoire comme celle-ci :
plugin.cfg is an INI file with metadata about your plugin.
The name and description help people understand what it does.
Your name helps you get properly credited for your work.
The version number helps others know if they have an outdated version;
if you are unsure on how to come up with the version number, check out Semantic Versioning.
The main script file will instruct Godot what your plugin does in the editor
once it is active.
Le fichier script
Upon creation of the plugin, the dialog will automatically open the
EditorPlugin script for you. The script has two requirements that you cannot
change: it must be a @tool script, or else it will not load properly in the
editor, and it must inherit from EditorPlugin.
Avertissement
In addition to the EditorPlugin script, any other GDScript that your plugin uses
must also be a tool. Any GDScript without @tool imported into the editor
will act like an empty file!
It's important to deal with initialization and clean-up of resources. A good practice is to use the virtual function _enter_tree() to initialize your plugin and _exit_tree() to clean it up. Thankfully, the dialog generates these callbacks for you. Your script should look something like this:
@tool
extends EditorPlugin


func _enter_tree():
    # Initialization of the plugin goes here.
    pass


func _exit_tree():
    # Clean-up of the plugin goes here.
    pass
#if TOOLS
using Godot;

[Tool]
public partial class CustomNode : EditorPlugin
{
    public override void _EnterTree()
    {
        // Initialization of the plugin goes here.
    }

    public override void _ExitTree()
    {
        // Clean-up of the plugin goes here.
    }
}
#endif
C'est un bon modèle à utiliser lors de la création de nouveaux plugins.
Un nœud personnalisé
Parfois, vous souhaitez un certain comportement dans de nombreux nœuds, comme une scène ou un contrôle personnalisé qui peut être réutilisé. L'instanciation est utile dans de nombreux cas, mais elle peut parfois être lourde, surtout si vous l'utilisez dans de nombreux projets. Une bonne solution consiste à créer un plugin qui ajoute un nœud avec un comportement personnalisé.
Avertissement
Les nœuds ajoutés via un EditorPlugin sont des nœuds "CustomType". Bien qu'ils fonctionnent avec n'importe quel langage de script, ils ont moins de fonctionnalités que le système Script Class. Si vous écrivez en GDScript ou NativeScript, nous vous recommandons d'utiliser Script Classes à la place.
To create a new node type, you can use the function
add_custom_type() from the
EditorPlugin class. This function can add new types to the editor
(nodes or resources). However, before you can create the type, you need a script
that will act as the logic for the type. While that script doesn't have to use
the @tool annotation, it can be added so the script runs in the editor.
For this tutorial, we'll create a button that prints a message when clicked. For that, we'll need a script that extends from Button. It could also extend BaseButton if you prefer:
@tool
extends Button


func _enter_tree():
    pressed.connect(clicked)


func clicked():
    print("You clicked me!")
using Godot;

[Tool]
public partial class MyButton : Button
{
    public override void _EnterTree()
    {
        Pressed += Clicked;
    }

    public void Clicked()
    {
        GD.Print("You clicked me!");
    }
}
That's it for our basic button. You can save this as my_button.gd inside the
plugin folder. You'll also need a 16×16 icon to show in the scene tree. If you
don't have one, you can grab the default one from the engine and save it in your
addons/my_custom_node folder as icon.png, or use the default Godot logo
(preload("res://icon.svg")).
Maintenant, nous devons l'ajouter comme type personnalisé pour qu'il apparaisse dans le dialogue Create New Node. Pour cela, modifiez le script custom_node.gd comme il suit :
@tool
extends EditorPlugin


func _enter_tree():
    # Initialization of the plugin goes here.
    # Add the new type with a name, a parent type, a script and an icon.
    add_custom_type("MyButton", "Button", preload("my_button.gd"), preload("icon.png"))


func _exit_tree():
    # Clean-up of the plugin goes here.
    # Always remember to remove it from the engine when deactivated.
    remove_custom_type("MyButton")
#if TOOLS
using Godot;

[Tool]
public partial class CustomNode : EditorPlugin
{
    public override void _EnterTree()
    {
        // Initialization of the plugin goes here.
        // Add the new type with a name, a parent type, a script and an icon.
        var script = GD.Load<Script>("res://addons/MyCustomNode/MyButton.cs");
        var texture = GD.Load<Texture2D>("res://addons/MyCustomNode/Icon.png");
        AddCustomType("MyButton", "Button", script, texture);
    }

    public override void _ExitTree()
    {
        // Clean-up of the plugin goes here.
        // Always remember to remove it from the engine when deactivated.
        RemoveCustomType("MyButton");
    }
}
#endif
Une fois cela fait, le plugin devrait déjà être disponible dans la liste des plugins dans les Paramètres du projet, donc activez-le comme expliqué dans Checking the results.
Essayez ensuite en ajoutant votre nouveau nœud :

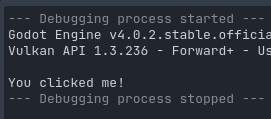
Lorsque vous ajoutez le nœud, vous pouvez voir que le script que vous avez créé y est déjà attaché. Définissez un texte sur le bouton, enregistrez et lancez la scène. Lorsque vous cliquez sur le bouton, vous pouvez voir du texte dans la console :
Un dock personnalisé
Parfois, vous devez étendre l'éditeur et ajouter des outils qui sont toujours disponibles. Une façon simple de le faire est d'ajouter un nouveau dock avec un plugin. Les docks ne sont que des scènes basées sur Control, elles sont donc créées d'une manière similaire aux scènes habituelles d'interface graphique.
La création d'un dock personnalisé se fait tout comme un nœud personnalisé. Créez un nouveau fichier plugin.cfg dans le dossier addons/mon_dock_custom, puis ajoutez-y le contenu suivant :
[plugin]

name="My Custom Dock"
description="A custom dock made so I can learn how to make plugins."
author="Your Name Here"
version="1.0"
script="custom_dock.gd"
[plugin]

name="My Custom Dock"
description="A custom dock made so I can learn how to make plugins."
author="Your Name Here"
version="1.0"
script="CustomDock.cs"
Créez ensuite le script custom_dock.gd dans le même dossier. Remplissez-le avec le modèle que nous avons vu auparavant pour bien démarrer.
Puisque nous essayons d'ajouter un nouveau dock personnalisé, nous devons créer le contenu du dock. Ce n'est rien d'autre qu'une scène Godot standard : il suffit de créer une nouvelle scène dans l'éditeur puis de la modifier.
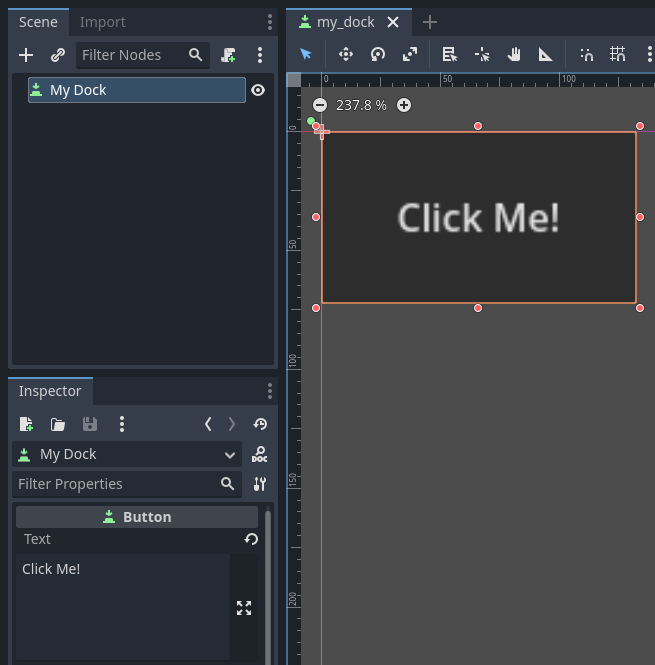
Pour un dock d'éditeur, le nœud racine doit être un Control ou une de ses classes enfant. Pour ce tutoriel, vous pouvez créer un seul bouton. Le nom du nœud racine sera également le nom qui apparaît sur l'onglet dock, donc assurez-vous de lui donner un nom court et descriptif. N'oubliez pas non plus d'ajouter du texte à votre bouton.
Enregistrez cette scène sous le nom de my_dock.tscn. Maintenant, nous devons prendre la scène que nous avons créée puis l'ajouter comme dock dans l'éditeur. Pour cela, vous pouvez utiliser la fonction add_control_to_dock() de la classe EditorPlugin.
Vous devez sélectionner une position de dock et définir le contrôle à ajouter (qui est la scène que vous venez de créer). N'oubliez pas de remove the dock lorsque le plugin est désactivé. Le script pourrait ressembler à ceci :
@tool
extends EditorPlugin


# A class member to hold the dock during the plugin life cycle.
var dock


func _enter_tree():
    # Initialization of the plugin goes here.
    # Load the dock scene and instantiate it.
    dock = preload("res://addons/my_custom_dock/my_dock.tscn").instantiate()

    # Add the loaded scene to the docks.
    add_control_to_dock(DOCK_SLOT_LEFT_UL, dock)
    # Note that LEFT_UL means the left of the editor, upper-left dock.


func _exit_tree():
    # Clean-up of the plugin goes here.
    # Remove the dock.
    remove_control_from_docks(dock)
    # Erase the control from the memory.
    dock.free()
#if TOOLS
using Godot;

[Tool]
public partial class CustomDock : EditorPlugin
{
    private Control _dock;

    public override void _EnterTree()
    {
        _dock = GD.Load<PackedScene>("res://addons/MyCustomDock/MyDock.tscn").Instantiate<Control>();
        AddControlToDock(DockSlot.LeftUl, _dock);
    }

    public override void _ExitTree()
    {
        // Clean-up of the plugin goes here.
        // Remove the dock.
        RemoveControlFromDocks(_dock);
        // Erase the control from the memory.
        _dock.Free();
    }
}
#endif
Notez que, bien que le dock apparaisse initialement à sa position spécifiée, l'utilisateur peut librement changer sa position et enregistrer la disposition résultante.
Vérifier le résultat
It's now time to check the results of your work. Open the Project Settings and click on the Plugins tab. Your plugin should be the only one on the list.

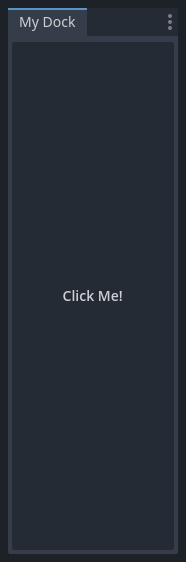
You can see the plugin is not enabled. Click the Enable checkbox to activate the plugin. The dock should become visible before you even close the settings window. You should now have a custom dock:
Aller plus loin
Maintenant que vous avez appris à créer des plugins de base, vous pouvez étendre l'éditeur de plusieurs façons. GDScript permet d'ajouter de nombreuses fonctionnalités à l'éditeur ; c'est un moyen puissant de créer des éditeurs spécialisés sans avoir se plonger dans les modules C++.
Vous pouvez créer vos propres plugins pour vous aider et les partager dans l'Asset Library afin que tous puissent bénéficier de votre travail.
Registering autoloads/singletons in plugins
It is possible for editor plugins to automatically register autoloads when the plugin is enabled. This also includes unregistering the autoload when the plugin is disabled.
This makes setting up plugins faster for users, as they no longer have to manually add autoloads to their project settings if your editor plugin requires the use of an autoload.
Use the following code to register a singleton from an editor plugin:
@tool
extends EditorPlugin

# Replace this value with a PascalCase autoload name, as per the GDScript style guide.
const AUTOLOAD_NAME = "SomeAutoload"


func _enter_tree():
    # The autoload can be a scene or script file.
    add_autoload_singleton(AUTOLOAD_NAME, "res://addons/my_addon/some_autoload.tscn")


func _exit_tree():
    remove_autoload_singleton(AUTOLOAD_NAME)
#if TOOLS
using Godot;

[Tool]
public partial class MyEditorPlugin : EditorPlugin
{
    // Replace this value with a PascalCase autoload name.
    private const string AutoloadName = "SomeAutoload";

    public override void _EnterTree()
    {
        // The autoload can be a scene or script file.
        AddAutoloadSingleton(AutoloadName, "res://addons/MyAddon/SomeAutoload.tscn");
    }

    public override void _ExitTree()
    {
        RemoveAutoloadSingleton(AutoloadName);
    }
}
#endif