Up to date
This page is up to date for Godot 4.2.
If you still find outdated information, please open an issue.
Creating the player scene
With the project settings in place, we can start working on the player-controlled character.
Pierwszą sceną, którą stworzymy, będzie Player. Jedną z zalet stworzenia oddzielnej sceny Player jest to, że możemy ją przetestować oddzielnie, nawet zanim utworzymy inne części gry.
Struktura węzłów
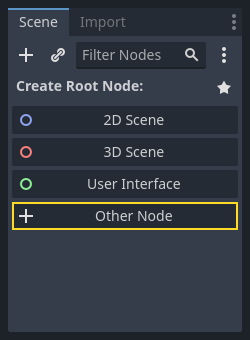
Na początek musimy wybrać węzeł główny obiektu gracza. Zazwyczaj węzeł główny sceny powinien odzwierciedlać pożądaną funkcjonalność obiektu - to, czym obiekt jest. Kliknij przycisk "Inny węzeł" i dodaj węzeł Area2D na scenę.
Godot wyświetli ikonę ostrzeżenia obok dodanego w drzewie sceny węzła. Zignorujmy to na tę chwilę. Zajmiemy się tym później.
Za pomocą Area2D możemy wykrywać obiekty, które zachodzą na siebie lub wpływają na gracza. Zmieńmy jego nazwę na Player klikając dwukrotnie na nazwę węzła. Jest to główny węzeł sceny i możemy dodać do niego dodatkowe węzły, aby zwiększyć jego funkcjonalność.
Before we add any children to the Player node, we want to make sure we don't
accidentally move or resize them by clicking on them. Select the node and click
the icon to the right of the lock. Its tooltip says "Make selected node's
children not selectable."

Zapisz scenę. Kliknij Scena -> Zapisz lub naciśnij Ctrl+S w Windowsie/Linuksie lub Command+S na systemie Mac.
Informacja
Dla tego projektu, będziemy korzystać z konwencji nazewnictwa typowych dla Godota.
GDScript: W klasach (węzłach) używać będziemy PascalCase, w zmiennych i funkcjach snake_case, a w stałych ALL_CAPS. Wszystkie nazwy zapisywane będą bez znaków diakrytycznych (Więcej o GDScript style guide).
C#: Classes, export variables and methods use PascalCase, private fields use _camelCase, local variables and parameters use camelCase (See Styl pisania kodu w C#). Be careful to type the method names precisely when connecting signals.
Animacja węzła Sprite
Click on the Player node and add (Ctrl + A on Windows/Linux or
Cmd + A on macOS) a child node AnimatedSprite2D. The AnimatedSprite2D will handle the
appearance and animations for our player. Notice that there is a warning symbol
next to the node. An AnimatedSprite2D requires a SpriteFrames resource, which is a list of the animations it can
display. To create one, find the Sprite Frames property under the Animation tab in the Inspector and click
"[empty]" -> "New SpriteFrames". Click again to open the "SpriteFrames" panel:
On the left is a list of animations. Click the "default" one and rename it to
"walk". Then click the "Add Animation" button to create a second animation named
"up". Find the player images in the "FileSystem" tab - they're in the art
folder you unzipped earlier. Drag the two images for each animation, named
playerGrey_up[1/2] and playerGrey_walk[1/2], into the "Animation Frames"
side of the panel for the corresponding animation:
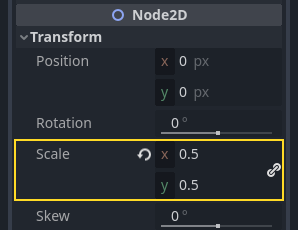
The player images are a bit too large for the game window, so we need to scale
them down. Click on the AnimatedSprite2D node and set the Scale property
to (0.5, 0.5). You can find it in the Inspector under the Node2D
heading.
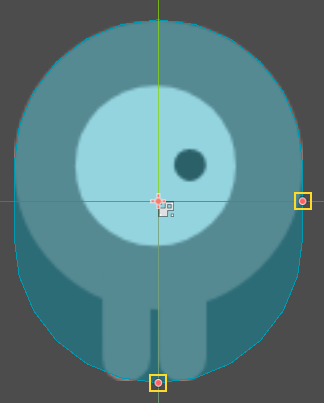
Finally, add a CollisionShape2D as a child of
Player. This will determine the player's "hitbox", or the bounds of its
collision area. For this character, a CapsuleShape2D node gives the best
fit, so next to "Shape" in the Inspector, click "[empty]" -> "New
CapsuleShape2D". Using the two size handles, resize the shape to cover the
sprite:
Po zakończeniu, scena Player powinna wyglądać w ten sposób:
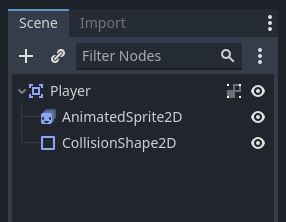
Pamiętaj o ponownym zapisaniu sceny po tych zmianach.
In the next part, we'll add a script to the player node to move and animate it. Then, we'll set up collision detection to know when the player got hit by something.