Up to date
This page is up to date for Godot 4.2.
If you still find outdated information, please open an issue.
Coding the player
In this lesson, we'll add player movement, animation, and set it up to detect collisions.
To do so, we need to add some functionality that we can't get from a built-in
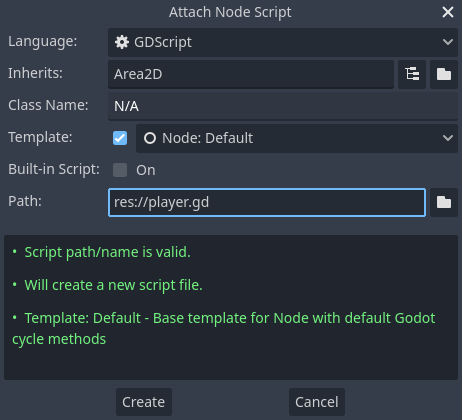
node, so we'll add a script. Click the Player node and click the "Attach
Script" button:

Nella finestra di impostazioni dello script, puoi lasciare le impostazioni di default. Clicca "Crea":
Nota
Se stai creando uno script C# o in altri linguaggi, scegli il linguaggio dal menu a tendina linguaggio prima di cliccare crea.
Nota
If this is your first time encountering GDScript, please read Linguaggi di scripting before continuing.
Inizia dichiarando le variabili membro che questo oggetto avrà bisogno:
extends Area2D

@export var speed = 400 # How fast the player will move (pixels/sec).
var screen_size # Size of the game window.
using Godot;

public partial class Player : Area2D
{
    [Export]
    public int Speed { get; set; } = 400; // How fast the player will move (pixels/sec).

    public Vector2 ScreenSize; // Size of the game window.
}
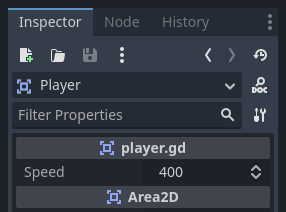
Usando la parola chiave export sulla prima variabile speed ci permette di impostare il suo valore dall'Ispettore. Questo può essere utile per valori che vorresti poter modificare come le proprietà dei nodi. Clicca sul nodo Player e vedrai che la proprietà è ora apparsa nella sezione "Variabili di Script" dell'ispettore. Ricorda, se cambi il valore qui, si sovrascriverà al valore scritto nello script.
Avvertimento
If you're using C#, you need to (re)build the project assemblies whenever you want to see new export variables or signals. This build can be manually triggered by clicking the Build button at the top right of the editor.

Your player.gd script should already contain
a _ready() and a _process() function.
If you didn't select the default template shown above,
create these functions while following the lesson.
La funzione _ready() viene chiamata quando un nodo entra nello scene tree, è un momento ideale per andare a ricavare le dimensioni della finestra di gioco:
func _ready():
    screen_size = get_viewport_rect().size
public override void _Ready()
{
    ScreenSize = GetViewportRect().Size;
}
Ora possiamo usare la funzione _process() per definire cosa farà il player. La funzione _process() viene chiamata ad ogni frame, quindi la useremo per aggiornare gli elementi del nostro gioco che ci aspettiamo che cambino spesso. Per il player dobbiamo fare il seguente:
Controlla per input.
Muoversi nella direzione data.
Esegui l'animazione appropriata.
First, we need to check for input - is the player pressing a key? For this game, we have 4 direction inputs to check. Input actions are defined in the Project Settings under "Input Map". Here, you can define custom events and assign different keys, mouse events, or other inputs to them. For this game, we will map the arrow keys to the four directions.
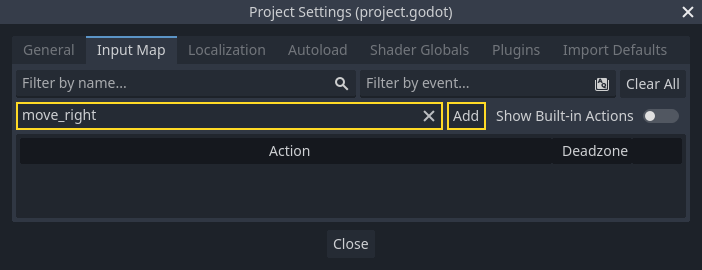
Click on Project -> Project Settings to open the project settings window and
click on the Input Map tab at the top. Type "move_right" in the top bar and
click the "Add" button to add the move_right action.
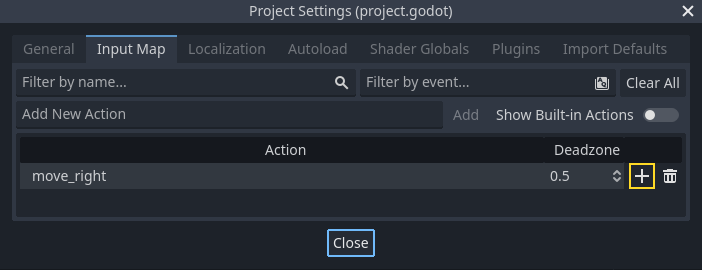
We need to assign a key to this action. Click the "+" icon on the right, to open the event manager window.
The "Listening for Input..." field should automatically be selected. Press the "right" key on your keyboard, and the menu should look like this now.
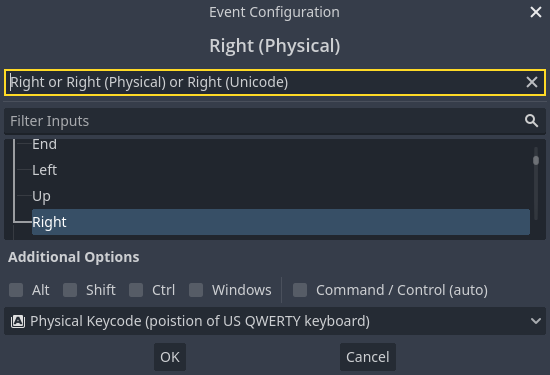
Select the "ok" button. The "right" key is now associated with the move_right action.
Repeat these steps to add three more mappings:
move_leftmapped to the left arrow key.move_upmapped to the up arrow key.And
move_downmapped to the down arrow key.
Your input map tab should look like this:
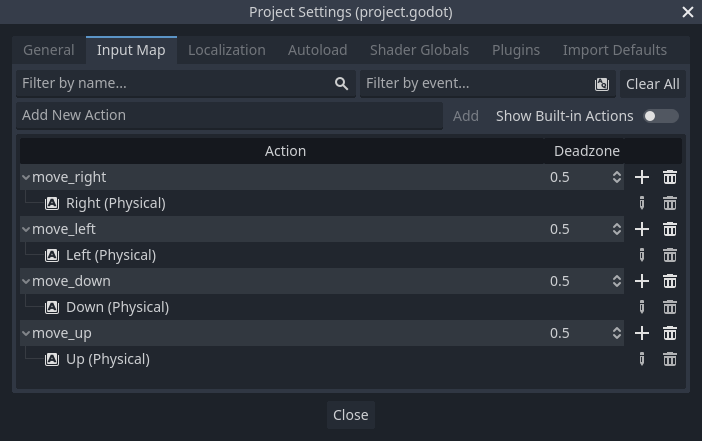
Click the "Close" button to close the project settings.
Nota
We only mapped one key to each input action, but you can map multiple keys, joystick buttons, or mouse buttons to the same input action.
Puoi rilevare quando un pulsante è premuto usando Input.is_action_pressed(), che ritorna true se è premuto o false se non lo è.
func _process(delta):
    var velocity = Vector2.ZERO # The player's movement vector.
    if Input.is_action_pressed("move_right"):
        velocity.x += 1
    if Input.is_action_pressed("move_left"):
        velocity.x -= 1
    if Input.is_action_pressed("move_down"):
        velocity.y += 1
    if Input.is_action_pressed("move_up"):
        velocity.y -= 1

    if velocity.length() > 0:
        velocity = velocity.normalized() * speed
        $AnimatedSprite2D.play()
    else:
        $AnimatedSprite2D.stop()
public override void _Process(double delta)
{
    var velocity = Vector2.Zero; // The player's movement vector.

    if (Input.IsActionPressed("move_right"))
    {
        velocity.X += 1;
    }

    if (Input.IsActionPressed("move_left"))
    {
        velocity.X -= 1;
    }

    if (Input.IsActionPressed("move_down"))
    {
        velocity.Y += 1;
    }

    if (Input.IsActionPressed("move_up"))
    {
        velocity.Y -= 1;
    }

    var animatedSprite2D = GetNode<AnimatedSprite2D>("AnimatedSprite2D");

    if (velocity.Length() > 0)
    {
        velocity = velocity.Normalized() * Speed;
        animatedSprite2D.Play();
    }
    else
    {
        animatedSprite2D.Stop();
    }
}
Iniziamo impostando la velocity a (0, 0) - di default il giocatore non dovrebbe muoversi. Poi controlliamo ogni input e aggiungiamo/sottraiamo da velocity per ottenere una direzione globale. Per esempio, se tieni premuto destra e giù allo stesso tempo, il vettore velocity che otterremo sarà (1, 1). In questo caso, dato che stiamo sommando un movimento orizzontale e uno verticale, il giocatore si muoverà più velocemente in diagonale rispetto al solo movimento orizzontale.
Possiamo prevenire ciò normalizzando la velocità, che significa impostare la sua lunghezza a 1, dopodiché possiamo moltiplicare il vettore per la velocità desiderata. In questo modo possiamo evitare i movimenti diagonali a velocità maggiore.
Suggerimento
Se non hai mai usato la matematica vettoriale prima d'ora, oppure hai bisogno di una rinfrescata, puoi vedere una spiegazione sull'uso dei vettori in Godot a v:ref:doc_vector_math. È buona cosa da sapere, ma non sarà necessario per il resto di questo tutorial.
We also check whether the player is moving so we can call play() or
stop() on the AnimatedSprite2D.
Suggerimento
$ is shorthand for get_node(). So in the code above,
$AnimatedSprite2D.play() is the same as
get_node("AnimatedSprite2D").play().
In GDScript, $ returns the node at the relative path from the
current node, or returns null if the node is not found. Since
AnimatedSprite2D is a child of the current node, we can use
$AnimatedSprite2D.
Ora che abbiamo una direzione di movimento, possiamo aggiornare la posizione del player. Possiamo inoltre usare clamp() per prevenire che il player esca dallo schermo. Fare il clamping di un valore significa restringerlo ad un certo intervallo. Aggiungi il seguente codice sul fondo della funzione _process() (assicurati che non sia indentato sotto else):
position += velocity * delta
position = position.clamp(Vector2.ZERO, screen_size)
Position += velocity * (float)delta;
Position = new Vector2(
    x: Mathf.Clamp(Position.X, 0, ScreenSize.X),
    y: Mathf.Clamp(Position.Y, 0, ScreenSize.Y)
);
Suggerimento
Il parametro delta della funzione _process() si riferisce alla lunghezza del frame - il tempo di esecuzione del frame precedente. Usare questo valore garantisce che il movimento sia proporzionale al frame precedente, in caso di variazione del frame rate.
Click "Play Scene" (F6, Cmd + R on macOS) and confirm you can move the player around the screen in all directions.
Avvertimento
Se ottieni un errore nel pannello "Debugger" che dice
Tentativo di chiamare la funzione 'play' nella base 'istanza nulla' su un'istanza nulla
this likely means you spelled the name of the AnimatedSprite2D node
wrong. Node names are case-sensitive and $NodeName must match
the name you see in the scene tree.
Scegliere le animazioni
Now that the player can move, we need to change which animation the
AnimatedSprite2D is playing based on its direction. We have the "walk" animation,
which shows the player walking to the right. This animation should be flipped
horizontally using the flip_h property for left movement. We also have the
"up" animation, which should be flipped vertically with flip_v for downward
movement. Let's place this code at the end of the _process() function:
if velocity.x != 0:
    $AnimatedSprite2D.animation = "walk"
    $AnimatedSprite2D.flip_v = false
    # See the note below about boolean assignment.
    $AnimatedSprite2D.flip_h = velocity.x < 0
elif velocity.y != 0:
    $AnimatedSprite2D.animation = "up"
    $AnimatedSprite2D.flip_v = velocity.y > 0
if (velocity.X != 0)
{
    animatedSprite2D.Animation = "walk";
    animatedSprite2D.FlipV = false;
    // See the note below about boolean assignment.
    animatedSprite2D.FlipH = velocity.X < 0;
}
else if (velocity.Y != 0)
{
    animatedSprite2D.Animation = "up";
    animatedSprite2D.FlipV = velocity.Y > 0;
}
Nota
Le assegnazioni booleane nel codice qui sopra sono comuni abbreviazioni per i programmatori. Siccome stiamo facendo una comparazione (booleano) a anche assegnando un valore booleano, possiamo fare entrambi allo stesso momento. Considera questo codice contro l'assegnamento booleano in un'unica riga mostrato sopra:
if velocity.x < 0:
    $AnimatedSprite2D.flip_h = true
else:
    $AnimatedSprite2D.flip_h = false
if (velocity.X < 0)
{
    animatedSprite2D.FlipH = true;
}
else
{
    animatedSprite2D.FlipH = false;
}
Riproduci la scena e verifica che le animazioni siano corrette in ciascuna delle direzioni.
Suggerimento
A common mistake here is to type the names of the animations wrong. The
animation names in the SpriteFrames panel must match what you type in
the code. If you named the animation "Walk", you must also use a
capital "W" in the code.
Quando sei sicuro che il movimento stia funzionando correttamente, aggiungi questa linea a _ready(), così che il player sarà nascosto quando il gioco ha inizio:
hide()
Hide();
Preparare per le collisioni
Vogliamo che il Player rilevi quando viene colpito da un nemico, ma non abbiamo ancora creato nemici! Non c'è problema, perché useremo la funzionalità segnali di Godot per fare in modo che funzioni.
Add the following at the top of the script. If you're using GDScript, add it after
extends Area2D. If you're using C#, add it after public partial class Player : Area2D:
signal hit
// Don't forget to rebuild the project so the editor knows about the new signal.

[Signal]
public delegate void HitEventHandler();
Questo definisce un segnale personalizzato chiamato "hit" che il giocatore emetterà quando entra a contatto con un nemico. Useremo il nodo Area2D``per rilevare la collisione. Seleziona il nodo ``Player e fai click sull'etichetta "Node", vicino a "Inspector", per vedere la lista di segnali che il giocatore può emettere:
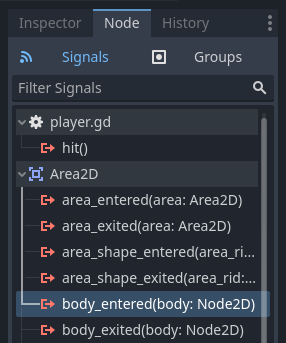
Notice our custom "hit" signal is there as well! Since our enemies are going to
be RigidBody2D nodes, we want the body_entered(body: Node2D) signal. This
signal will be emitted when a body contacts the player. Click "Connect.." and
the "Connect a Signal" window appears.
Godot will create a function with that exact name directly in script for you. You don't need to change the default settings right now.
Avvertimento
If you're using an external text editor (for example, Visual Studio Code), a bug currently prevents Godot from doing so. You'll be sent to your external editor, but the new function won't be there.
In this case, you'll need to write the function yourself into the Player's script file.

Note the green icon indicating that a signal is connected to this function; this does not mean the function exists, only that the signal will attempt to connect to a function with that name, so double-check that the spelling of the function matches exactly!
Next, add this code to the function:
func _on_body_entered(body):
    hide() # Player disappears after being hit.
    hit.emit()
    # Must be deferred as we can't change physics properties on a physics callback.
    $CollisionShape2D.set_deferred("disabled", true)
private void OnBodyEntered(Node2D body)
{
    Hide(); // Player disappears after being hit.
    EmitSignal(SignalName.Hit);
    // Must be deferred as we can't change physics properties on a physics callback.
    GetNode<CollisionShape2D>("CollisionShape2D").SetDeferred(CollisionShape2D.PropertyName.Disabled, true);
}
Ogni volta che un nemico colpirà il giocatore, il segnale verrà emesso. Bisogna disabilitare la collisione del giocatore per non innescare il segnale hit più di una volta.
Nota
Disabling the area's collision shape can cause an error if it happens
in the middle of the engine's collision processing. Using
set_deferred() tells Godot to wait to disable the shape until it's
safe to do so.
L'ultimo pezzo è aggiungere una funzione che chiamiamo per resettare il player quando inizia una nuova partita.
func start(pos):
    position = pos
    show()
    $CollisionShape2D.disabled = false
public void Start(Vector2 position)
{
    Position = position;
    Show();
    GetNode<CollisionShape2D>("CollisionShape2D").Disabled = false;
}
With the player working, we'll work on the enemy in the next lesson.