Up to date
This page is up to date for Godot 4.2.
If you still find outdated information, please open an issue.
Creating the enemy
Ora è il momento di creare i nemici che il nostro giocatore dovrà schivare. Il loro comportamento non sarà molto complesso: i mob saranno generati in modo casuale ai bordi dello schermo, sceglieranno una direzione casuale e si muoveranno in linea retta.
Creeremo una scena Mob, che possiamo poi istanziare per creare un qualsiasi numero di mob indipendenti nel gioco.
Impostazione dei nodi
Click Scene -> New Scene from the top menu and add the following nodes:
RigidBody2D (chiamato
Mob)
Non dimenticare di impostare i nodi figli in modo che non possano essere selezionati, come hai fatto con la scena del Giocatore.
Select the Mob node and set it's Gravity Scale
property in the RigidBody2D
section of the inspector to 0.
This will prevent the mob from falling downwards.
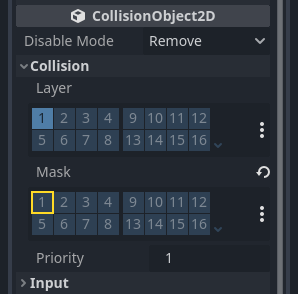
In addition, under the CollisionObject2D
section just beneath the RigidBody2D section,
expand the Collision group and
uncheck the 1 inside the Mask property.
This will ensure the mobs do not collide with each other.
Set up the AnimatedSprite2D like you did for the
player. This time, we have 3 animations: fly, swim, and walk. There
are two images for each animation in the art folder.
The Animation Speed property has to be set for each individual animation. Adjust it to 3 for all 3 animations.
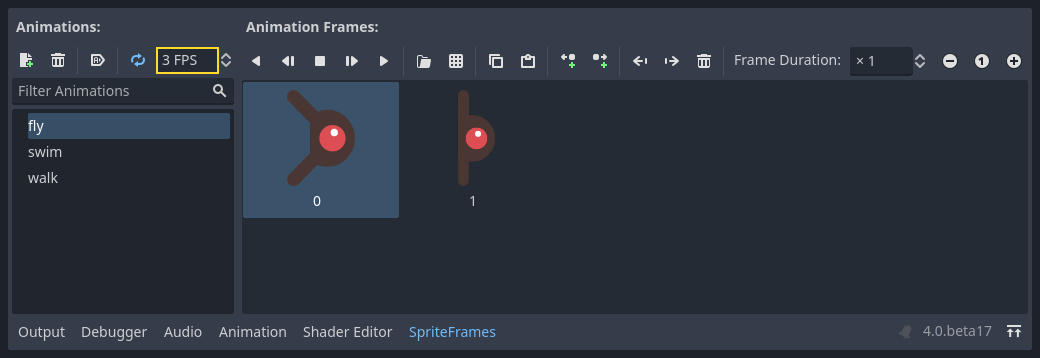
You can use the "Play Animation" buttons on the right of the Animation Speed input field to preview your animations.
Selezioneremo una di queste animazioni casualmente in modo che i nemici abbiano una certa varietà.
Like the player images, these mob images need to be scaled down. Set the
AnimatedSprite2D's Scale property to (0.75, 0.75).
As in the Player scene, add a CapsuleShape2D for the collision. To align
the shape with the image, you'll need to set the Rotation property
to 90 (under "Transform" in the Inspector).
Salva la scena.
Script del nemico
Add a script to the Mob like this:
extends RigidBody2D
using Godot;

public partial class Mob : RigidBody2D
{
    // Don't forget to rebuild the project.
}
Now let's look at the rest of the script. In _ready() we play the animation
and randomly choose one of the three animation types:
func _ready():
    var mob_types = $AnimatedSprite2D.sprite_frames.get_animation_names()
    $AnimatedSprite2D.play(mob_types[randi() % mob_types.size()])
public override void _Ready()
{
    var animatedSprite2D = GetNode<AnimatedSprite2D>("AnimatedSprite2D");
    string[] mobTypes = animatedSprite2D.SpriteFrames.GetAnimationNames();
    animatedSprite2D.Play(mobTypes[GD.Randi() % mobTypes.Length]);
}
First, we get the list of animation names from the AnimatedSprite2D's sprite_frames
property. This returns an Array containing all three animation names: ["walk",
"swim", "fly"].
Dobbiamo quindi scegliere un numero casuale tra 0 e 2 per selezionare uno di questi nomi dalla lista (gli indici degli array iniziano con 0). randi() % n seleziona un numero intero casuale tra 0 e n-1.
The last piece is to make the mobs delete themselves when they leave the screen.
Connect the screen_exited() signal of the VisibleOnScreenNotifier2D node
to the Mob and add this code:
func _on_visible_on_screen_notifier_2d_screen_exited():
    queue_free()
private void OnVisibleOnScreenNotifier2DScreenExited()
{
    QueueFree();
}
Questo completa la scena Mob.
With the player and enemies ready, in the next part, we'll bring them together in a new scene. We'll make enemies spawn randomly around the game board and move forward, turning our project into a playable game.