GridMapの使用
はじめに
Gridmaps は、3Dゲームレベルを作成するためのツールで、TileMap が2Dで行う動作と似ています。 3Dメッシュの事前定義されたコレクション(MeshLibrary)から開始します。これは、無制限の量のLegoブロックでレベルを構築しているかのように、グリッドに配置できます。
タイルマップのタイルで行うのと同じように、コリジョンとナビゲーションをメッシュに追加できます。
サンプル・プロジェクト
GridMaps の仕組みをくわしく知るには、サンプル プロジェクト gridmap_starter.zip をダウンロードしてください。
Unzip this project and add it to the Project Manager using the "Import" button. You may get a popup saying that it needs to be converted to a newer Godot version, click Convert project.godot.
MeshLibraryの作成
まず初めに、MeshLibrary が必要になります。これはグリッドマップで使用するメッシュを集めたものです。『mesh_library_source.tscn』シーンを開いて、MeshLibraryのセットアップ方法を見てみましょう。
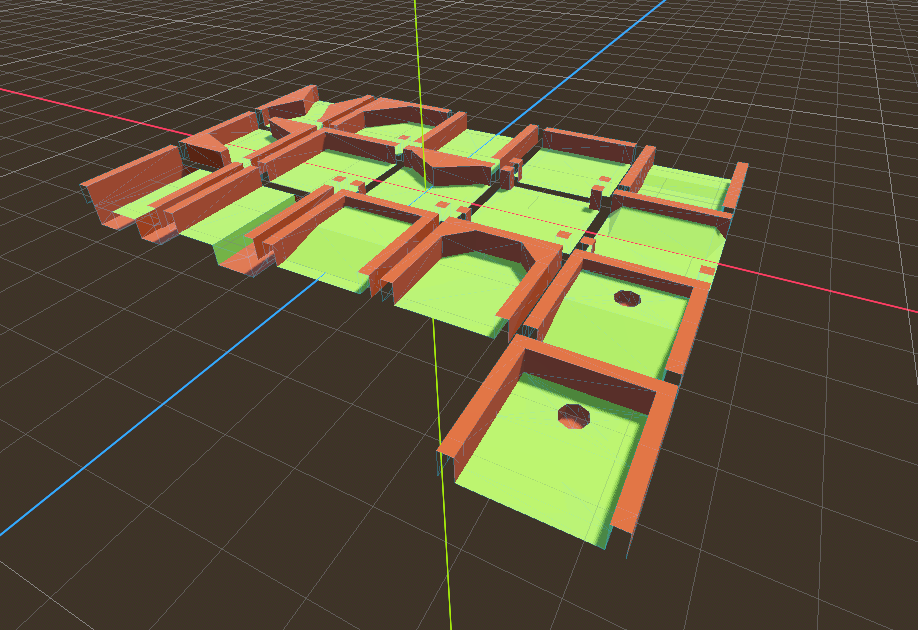
ご覧のとおり、このシーンのルートにはNode3Dノードがあり、そしていくつかのMeshInstance3Dノードが子になっています。
もし、あなたのシーンに物理演算が不要であれば、これで完了です。しかし、ほとんどの場合はメッシュにコリジョンを追加したくなるでしょう。
コリジョン
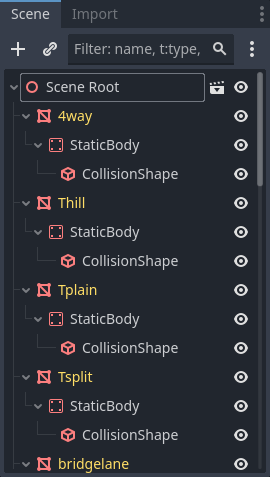
それぞれのメッシュに手動でStaticBody3D とCollisionShape3D を追加するという方法もありますが、『メッシュ』メニューを選択すれば、メッシュデータからコリジョンを自動生成することもできます。
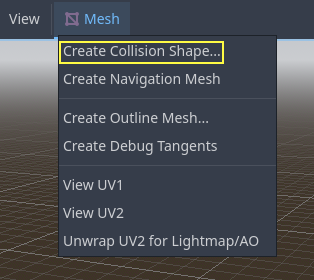
シンプルなメッシュには『凸状』コリジョン ボディのほうが合うでしょう。より複雑な形なら『静的三角形メッシュの作成』を選択します。それぞれのメッシュに物理ボディとコリジョン シェイプが割り当てられたら、メッシュ ライブラリは使えるようになります。
マテリアル
メッシュライブラリの生成時には、メッシュ内にあるマテリアルのみが使用され、ノードに設定したマテリアルは無視されます。
ナビゲーションメッシュ
全てのメッシュインスタンスと同じく、MeshLibrary にも NavigationMesh リソースを割り当てられます。これは手動で作るか、以下の方法で焼きこみます。
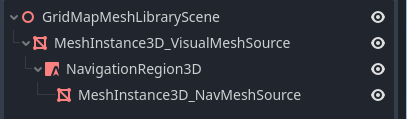
MeshLibraryシーンのエクスポートからナビゲーションメッシュを作るには、GridMap アイテムのメイン MeshInstance3D の下に子ノード NavigationRegion3D を設置します。有効な NavigationMesh リソースを NavigationRegion3D に追加し、その下にいくつかのソースジオメトリノードを追加して NavigationMesh を焼きこみ(ベイクし)ます。
注釈
グリッドセルが小さい場合、NavigationMeshのプロパティの内、エージェント半径とリージョン最小サイズを小さくする必要があることが多いです。
NavigationRegion3D 以下のノードはMeshLibraryシーンエクスポートでは無視されるため、ナビメッシュをベイクするためだけにソースジオメトリとしてノードを追加することがあります。
警告
グリッドセルが異なるナビゲーションメッシュを適切にマージするには、NavigationMeshのベイクされたセルサイズがNavigationServerのマップセルサイズと一致している必要があります。
Lightmaps
It is possible to bake lightmaps onto a GridMap. Lightmap UV2 data will be reused from meshes if already present. If UV2 data is not present, then it will be automatically generated on bake with a lightmap texel size of 0.1 units. To generate UV2 data with a different lightmap texel size, you can set the global illumination mode in the Import dock to Static Lightmaps and specify the texel size there. This option must be changed before the scene is converted to a MeshLibrary, as changing it later on will not affect the existing MeshLibrary data.
Aside from this peculiarity, the lightmap baking process is the same as for any other 3D scene. See Using Lightmap global illumination for more information about lightmap baking.
MeshLibrary format
To summarize the specific constraints of the MeshLibrary format, a MeshLibrary scene has a Node3D as the root node, and several child nodes which will become MeshLibrary items. Each child of the root node should:
Be a MeshInstance3D, which will become the MeshLibrary item. Only this visual mesh will be exported.
Have a material, in the mesh's material slot, not the MeshInstance3D's material slots.
Have up to one StaticBody3D child, for collision. The StaticBody3D should have one or more CollisionShape3D children.
Have up to one NavigationRegion3D child, for navigation. The NavigationRegion3D can have one or more additional MeshInstance3D children, which can be baked for navigation, but won't be exported as a visual mesh.
Only this specific format is recognized. Other node types placed as children will not be recognized and exported. GridMap is not a general-purpose system for placing nodes on a grid, but rather a specific, optimized system, designed to place meshes with collisions and navigation.
MeshLibraryのエクスポート
ライブラリをエクスポートするには、 シーン → エクスポート... → メッシュライブラリ... をクリックして、リソースとして保存します。
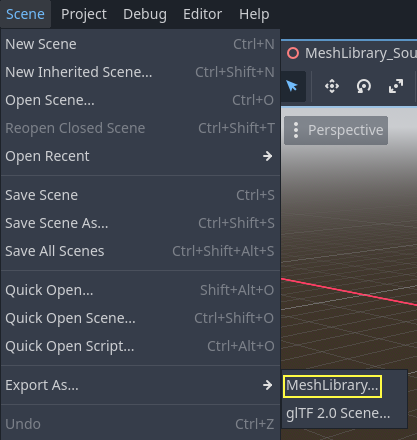
You can find an already exported MeshLibrary in the project named MeshLibrary.tres.
GridMap(グリッドマップ)の使用
Create a new scene and add a GridMap node. Add the mesh library by dragging the resource file from the FileSystem dock and dropping it in the Mesh Library property in the Inspector.
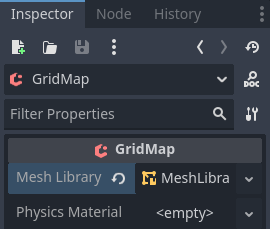
Inspector properties
The Physics Material setting allows you to override the physics material for every mesh in the NavigationMesh.
Under Cells, the Size property should be set to the size of your meshes. You can leave it at the default value for the demo. Uncheck the Center Y property.
The Collision options allow you to set the collision layer, collision mask, and priority for the entire grid. For more information on how those work see the 物理 section.
Under Navigation is the "Bake Navigation" option. If enabled it creates a navigation region for each cell that uses a mesh library item with a navigation mesh.
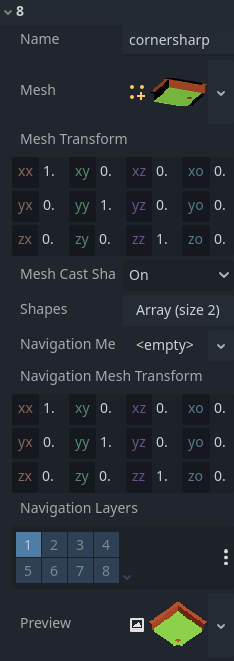
If you click on the MeshLibrary itself in the inspector you can adjust settings for individual meshes, such as their navigation mesh, navigation layers, or if the mesh casts shadows.
GridMap panel
At the bottom of the editor is the GridMap panel, which should have opened automatically when you added the GridMap node.

ツールバーの左から右へ:
Transform: Adds a gizmo to the scene that allows you to change the relative position and rotation of the gridmap in the scene.
Selection: While active you can select an area in the viewport, click and drag to select more than one space on the grid.
Erase: While active, click in the viewport and delete meshes.
Paint: While active, click in the viewport and add whatever mesh is currently selected in the GridMap panel to the scene.
Pick: While active, clicking on a gridmap mesh in the viewport will cause it to be selected in the GridMap panel.
Fill: Fill the area that has been selected in the viewport with whatever mesh is selected in the GridMap bottom panel.
Move: Move whatever mesh or meshes are currently selected in the viewport.
Duplicate: Create a copy of whatever the selected mesh or meshes in the GridMap are.
Delete: Similar to erase, but for the entire selected area.
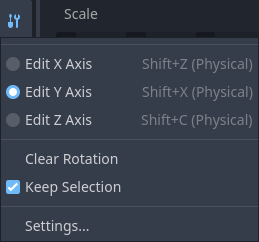
Cursor Rotate X: While the paint tool is selected, this will rotate the mesh that will be painted on the X-axis. This will also rotate selected areas if they are being moved.
Cursor Rotate Y: While the paint tool is selected, this will rotate the mesh that will be painted on the Y-axis. This will also rotate selected areas if they are being moved.
Cursor Rotate Z: While the paint tool is selected, this will rotate the mesh that will be painted on the Z-axis. This will also rotate selected areas if they are being moved.
Change Grid Floor: Adjusts what floor is currently being worked on, can be changed with the arrows or typing
Filter Meshes: Used to search for a specific mesh in the bottom panel.
Zoom: Controls the zoom level on meshes in the bottom panel.
Layout toggles: These two buttons toggle between different layouts for meshes in the bottom panel.
Tools dropdown: This button opens a dropdown menu with a few more options.
Clicking on Settings in that dropdown brings up a window that allows you to change the Pick Distance, which is the maximum distance at which tiles can be placed on a GridMap, relative to the camera position (in meters).
コードでのGridMapの使用
ノードのメソッドとメンバー変数の詳細については、GridMap を参照してください。