Android用にエクスポート
参考
This page describes how to export a Godot project to Android. If you're looking to compile export template binaries from source instead, read Android用のコンパイル.
Android用のエクスポートは、GodotをAndroid用にコンパイルするよりも必要な条件が少なくなります。Android SDKとエンジンの設定方法を、以下のステップで詳しく説明します。
注意
Projects written in C# can be exported to Android as of Godot 4.2, but support is experimental and some limitations apply.
Install OpenJDK 17
Download and install OpenJDK 17.
注釈
Higher versions of the JDK are also supported, but we recommend using JDK 17 for optimal compatibility and stability.
Android SDKをダウンロード
AndroidSDKをダウンロードしてインストールします。
You can install the Android SDK using Android Studio Iguana (version 2023.2.1) or later.
この方法 でツールの更新を行います。
Ensure that the required packages are installed as well.
Android SDK Platform-Tools version 35.0.0 or later
Android SDK Build-Tools version 35.0.0
Android SDK Platform 35
Android SDK Command-line Tools (最新版)
Ensure that the NDK and CMake are installed and configured.
CMake バージョン 3.10.2.4988404
NDK version r28b (28.1.13356709)
Alternatively, you can install the Android SDK with the sdkmanager command line tool.
Install the command line tools package using these instructions.
Once the command line tools are installed, run the following sdkmanager command to complete the setup process:
sdkmanager --sdk_root=<android_sdk_path> "platform-tools" "build-tools;35.0.0" "platforms;android-35" "cmdline-tools;latest" "cmake;3.10.2.4988404" "ndk;28.1.13356709"
注釈
Linux環境では、ディストリビューションのAndroid SDKは古いことが多いので、使用しないでください。
Godotで設定する
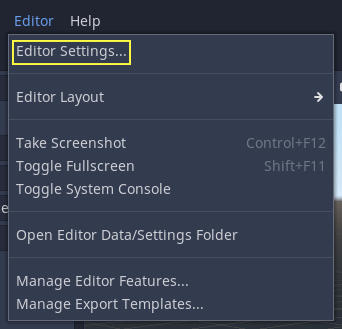
Enter the Editor Settings screen (under the Godot tab for macOS, or the Editor tab for other platforms). This screen contains the editor settings for the user account in the computer (it's independent of the project).
Androidの設定が配置されているセクションまで下にスクロールします:
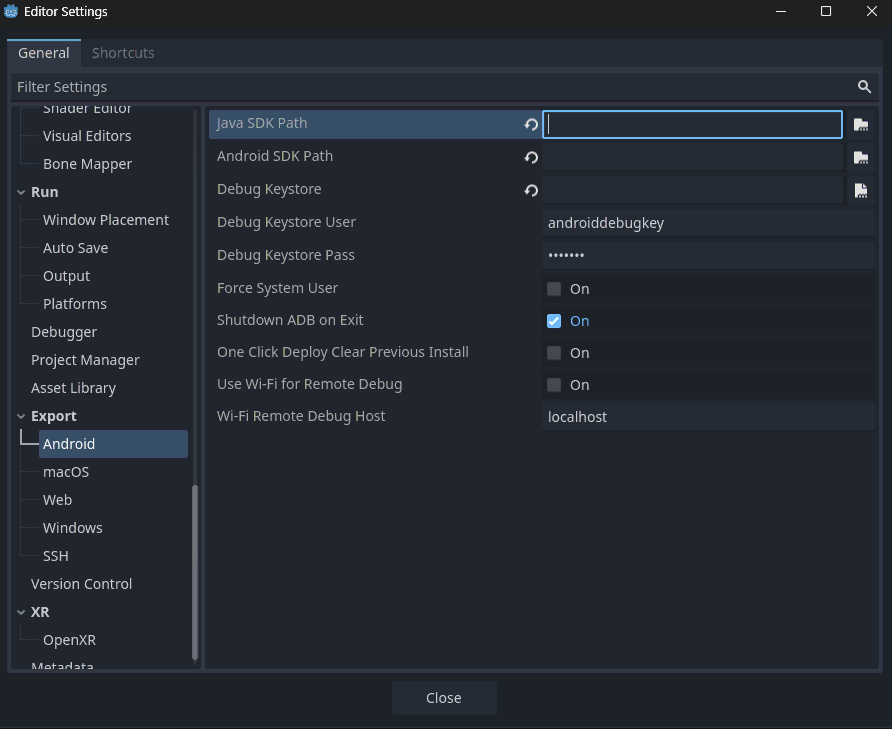
この画面で、2つのファイルパスを設定する必要があります:
Java SDK Pathshould be the location where OpenJDK 17 was installed.Android Sdk Pathshould be the location where the Android SDK was installed. - For example%LOCALAPPDATA%\Android\Sdk\on Windows or/Users/$USER/Library/Android/sdk/on macOS.
設定が完了すれば、Androidにエクスポートできるようになります!
注釈
If you get an error saying "Could not install to device.", make sure you do not have an application with the same Android package name already installed on the device (but signed with a different key).
If you have an application with the same Android package name but a different signing key already installed on the device, you must remove the application in question from the Android device before exporting to Android again.
ランチャーアイコンの提供
ランチャーアイコンは、Androidランチャーアプリでユーザーにアプリケーションを表すために使用されます。 Godotは高解像度アイコン(xxxhdpi 密度画面用)のみを必要とし、低解像度のバリアントを自動的に生成します。
There are three types of icons:
Main Icon: The "classic" icon. This will be used on all Android versions up to Android 8 (Oreo), exclusive. Must be at least 192×192 px.
Adaptive Icons: Android 8 からは、アダプティブ アイコンが導入されています。ネイティブの見た目にするには、アプリケーションはアイコンを前面と背景に分けて含める必要があります。アイコンのアニメーションとマスキングは、ランチャーによってコントロールされます。最低でも 432x432 ピクセルが必要。
Themed Icons (optional): Starting from Android 13 (inclusive), Themed Icons were introduced. Applications will need to include a monochrome icon to enable this feature. The user's launcher application will control the icon's theme. Must be at least 432×432 px.
参考
アダプティブ アイコンをデザインする際は、いくつかのルールに従うことが重要です。Google Designが、それらのルールとアダプティブ アイコンの機能について解説するすばらしい記事を公開 (英語)しています。
注意
The most important adaptive icon design rule is to have your icon critical elements inside the safe zone: a centered circle with a diameter of 66dp (264 pixels on xxxhdpi) to avoid being clipped by the launcher.
If you don't provide the requested icons (except for Monochrome), Godot will replace them using a fallback chain, trying the next in line when the current one fails:
Main Icon: 指定されたメイン アイコン -> プロジェクト アイコン -> デフォルトのGodotメインアイコン。
Adaptive Icon Foreground: 指定された前面アイコン -> 指定されたメイン アイコン -> プロジェクト アイコン -> デフォルトのGodot前面アイコン。
Adaptive Icon Background: 指定された背景アイコン -> デフォルトのGodot背景アイコン。
It's highly recommended to provide all the requested icons with their specified resolutions. This way, your application will look great on all Android devices and versions.
Google Playストア用にエクスポート
All new apps uploaded to Google Play after August 2021 must be an AAB (Android App Bundle) file.
Uploading an AAB or APK to Google's Play Store requires you to sign using a non-debug keystore file; such a file can be generated like this:
keytool -v -genkey -keystore mygame.keystore -alias mygame -keyalg RSA -validity 10000
This keystore and key are used to verify your developer identity, remember the password and keep it in a safe place! It is suggested to use only upper and lowercase letters and numbers. Special characters may cause errors. Use Google's Android Developer guides to learn more about app signing.
次に、Android エクスポートプリセットで次のフォームに入力します:
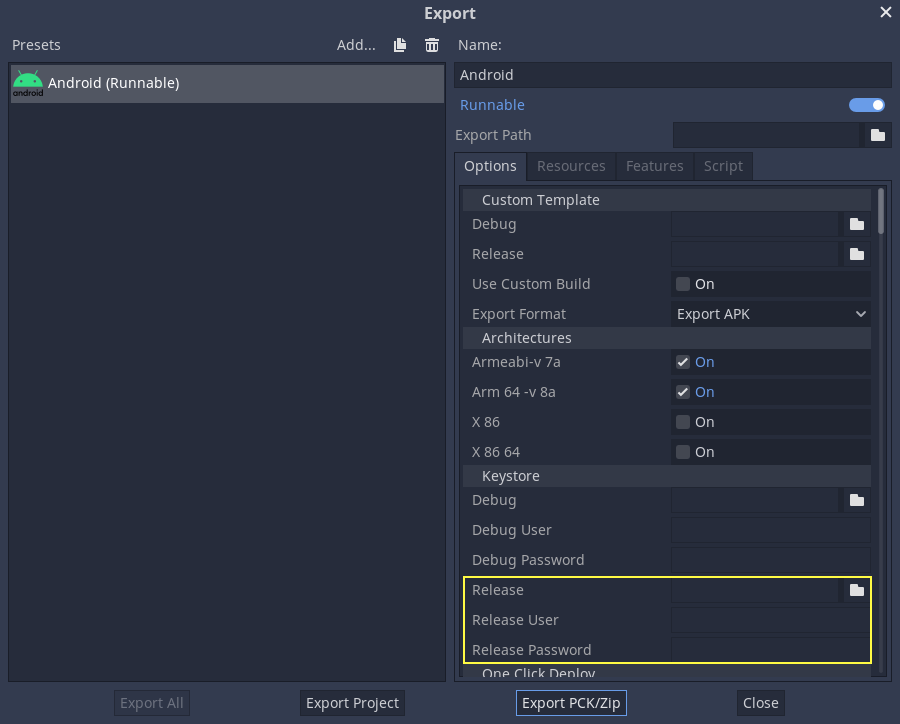
Release: 生成したばかりのキーストアファイルへのパスを入力します。
Release User: キーエイリアスで置き換えます。
Release Password: キーパスワード。現在、キーストアのパスワードとキーのパスワードは同じでなければならないことに注意してください。
APKの名前を選択する際は、[** Export with Debug**]チェックボックスをオフにすることを忘れないでください。

Optimizing the file size
If you're working with APKs and not AABs, by default, the APK will contain native libraries for both ARMv7 and ARMv8 architectures. This increases its size significantly. To create a smaller file, uncheck either Armeabi-v 7a or Arm 64 -v 8a in your project's Android export preset. This will create an APK that only contains a library for a single architecture. Note that applications targeting ARMv7 can also run on ARMv8 devices, but the opposite is not true. The reason you don't do this to save space with AABs is that Google automatically splits up the AAB on their backend, so the user only downloads what they need.
必要な機能のみを使用してAndroidエクスポートテンプレートをコンパイルすることにより、サイズをさらに最適化できます。詳細については、ビルドのサイズを最適化する を参照してください。
環境変数
You can use the following environment variables to set export options outside of the editor. During the export process, these override the values that you set in the export menu.
Export option |
Environment variable |
|---|---|
Encryption / Encryption Key |
|
Options / Keystore / Debug |
|
Options / Keystore / Debug User |
|
Options / Keystore / Debug Password |
|
Options / Keystore / Release |
|
Options / Keystore / Release User |
|
Options / Keystore / Release Password |
|
エクスポートオプション
You can find a full list of export options available in the EditorExportPlatformAndroid class reference.