Up to date
This page is up to date for Godot 4.2.
If you still find outdated information, please open an issue.
3D 导航概述
Godot 提供了多种对象、类和服务器,可帮助 2D 和 3D 游戏实现基于栅格(Grid)或网格(Mesh)的导航和寻路。下文将对 Godot 中与 3D 场景导航相关的对象及其主要用途进行概述。
Godot 为 3D 导航提供了如下对象和类:
- Astar3D
Astar3D对象能够在由具有权重的点构成的图中查找最短路径。The AStar3D class is best suited for cell-based 3D gameplay that does not require actors to reach any possible position within an area but only predefined, distinct positions.
- NavigationServer3D
NavigationServer3Dprovides a powerful server API to find the shortest path between two positions on an area defined by a navigation mesh.The NavigationServer is best suited for 3D realtime gameplay that does require actors to reach any possible position within a navigation mesh defined area. Mesh-based navigation scales well with large game worlds as a large area can often be defined with a single polygon when it would require many, many grid cells.
The NavigationServer holds different navigation maps that each consist of regions that hold navigation mesh data. Agents can be placed on a map for avoidance calculation. RIDs are used to reference internal maps, regions, and agents when communicating with the server.
- NavigationServer 中可用的 RID 类型如下。
- 导航地图 RID
Reference to a specific navigation map that holds regions and agents. The map will attempt to join the navigation meshes of the regions by proximity. The map will synchronize regions and agents each physics frame.
- 导航区块 RID
Reference to a specific navigation region that can hold navigation mesh data. The region can be enabled / disabled or the use restricted with a navigation layer bitmask.
- 导航链接 RID
引用指定的导航链接,能够将两个导航网格上的位置进行连接,无视距离。
- 导航代理 RID
Reference to a specific avoidance agent. The avoidance is defined by a radius value.
- 导航障碍物 RID
Reference to a specific avoidance obstacle used to affect and constrain the avoidance velocity of agents.
The following scene tree nodes are available as helpers to work with the NavigationServer3D API.
- NavigationRegion3D 节点
存放 Navigation Mesh 资源的节点,该资源定义的是 NavigationServer3D 中的导航网格。
区块可以启用/禁用。
通过
navigation_layers掩码,可以对其在寻路中的使用做进一步的限制。The NavigationServer3D will join the navigation meshes of regions by proximity for a combined navigation mesh.
- NavigationLink3D 节点
A Node that connects two positions on navigation meshes over arbitrary distances for pathfinding.
链接可以启用/禁用。
链接可以设为单向或双向。
通过
navigation_layers掩码,可以对其在寻路中的使用做进一步的限制。
链接会告诉寻路存在这样的连接、相关的消耗如何。实际的代理处理以及移动需要在自定义脚本中实现。
- NavigationAgent3D 节点
A helper Node used to facilitate common NavigationServer3D API calls for pathfinding and avoidance. Use this Node with a Node3D inheriting parent Node.
- NavigationObstacle3D 节点
A Node that can be used to affect and constrain the avoidance velocity of avoidance enabled agents. This Node does NOT affect the pathfinding of agents. You need to change the navigation meshes for that instead.
3D 导航网格由以下资源定义:
- NavigationMesh 资源
A resource that holds 3D navigation mesh data. It provides 3D geometry baking options to define navigation areas inside the Editor as well as at runtime.
NavigationRegion3D 节点使用该资源定义其导航区域。
NavigationServer3D 使用该资源更新各个区块的导航网格。
The GridMap Editor uses this resource when specific navigation meshes are defined for each grid cell.
参见
可以使用 3D 导航演示项目了解 3D 导航如何运作。
3D 场景的设置
The following steps show a basic setup for minimal viable navigation in 3D. It uses the NavigationServer3D and a NavigationAgent3D for path movement.
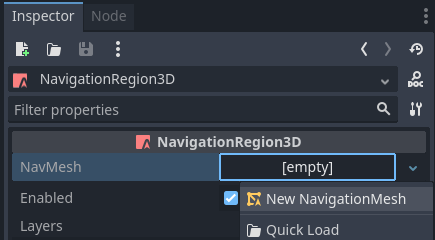
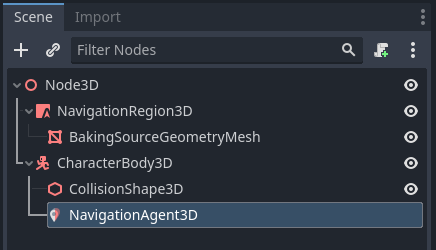
在场景中添加一个 NavigationRegion3D 节点。
单击该区块节点,向该节点添加一个新的 NavigationMesh 资源。
将一个新的 MeshInstance3D 节点添加为该区块节点的子节点。
选中该 MeshInstance3D 节点,添加一个新的 PlaneMesh 并将其 XY 大小设为 10。
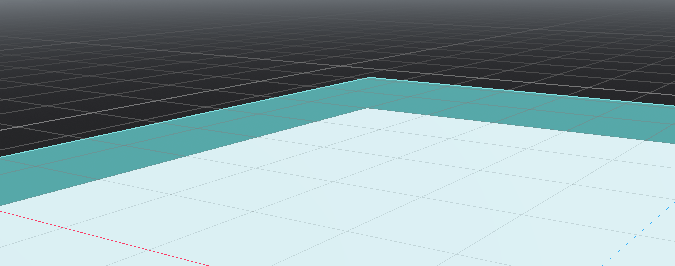
再次选中该区块节点,点击顶栏中的“烘焙导航网格”按钮。

Now a transparent navigation mesh appears that hovers some distance on top of the PlaneMesh.
在场景中添加一个 CharacterBody3D 节点,设置基础的碰撞形状,添加一些网格方便观察。
在该角色节点下添加一个 NavigationAgent3D 节点。
为 CharacterBody3D 节点添加一个脚本,内容如下。场景完全加载后,我们确保设置移动目标,NavigationServer 有时间进行同步。另外,添加一个 Camera3D、一些灯光以及环境,这样才能够看到东西。
extends CharacterBody3D

var movement_speed: float = 2.0
var movement_target_position: Vector3 = Vector3(-3.0,0.0,2.0)

@onready var navigation_agent: NavigationAgent3D = $NavigationAgent3D

func _ready():
    # These values need to be adjusted for the actor's speed
    # and the navigation layout.
    navigation_agent.path_desired_distance = 0.5
    navigation_agent.target_desired_distance = 0.5

    # Make sure to not await during _ready.
    call_deferred("actor_setup")

func actor_setup():
    # Wait for the first physics frame so the NavigationServer can sync.
    await get_tree().physics_frame

    # Now that the navigation map is no longer empty, set the movement target.
    set_movement_target(movement_target_position)

func set_movement_target(movement_target: Vector3):
    navigation_agent.set_target_position(movement_target)

func _physics_process(delta):
    if navigation_agent.is_navigation_finished():
        return

    var current_agent_position: Vector3 = global_position
    var next_path_position: Vector3 = navigation_agent.get_next_path_position()

    velocity = current_agent_position.direction_to(next_path_position) * movement_speed
    move_and_slide()
using Godot;

public partial class MyCharacterBody3D : CharacterBody3D
{
    private NavigationAgent3D _navigationAgent;

    private float _movementSpeed = 2.0f;
    private Vector3 _movementTargetPosition = new Vector3(-3.0f, 0.0f, 2.0f);

    public Vector3 MovementTarget
    {
        get { return _navigationAgent.TargetPosition; }
        set { _navigationAgent.TargetPosition = value; }
    }

    public override void _Ready()
    {
        base._Ready();

        _navigationAgent = GetNode<NavigationAgent3D>("NavigationAgent3D");

        // These values need to be adjusted for the actor's speed
        // and the navigation layout.
        _navigationAgent.PathDesiredDistance = 0.5f;
        _navigationAgent.TargetDesiredDistance = 0.5f;

        // Make sure to not await during _Ready.
        Callable.From(ActorSetup).CallDeferred();
    }

    public override void _PhysicsProcess(double delta)
    {
        base._PhysicsProcess(delta);

        if (_navigationAgent.IsNavigationFinished())
        {
            return;
        }

        Vector3 currentAgentPosition = GlobalTransform.Origin;
        Vector3 nextPathPosition = _navigationAgent.GetNextPathPosition();

        Velocity = currentAgentPosition.DirectionTo(nextPathPosition) * _movementSpeed;
        MoveAndSlide();
    }

    private async void ActorSetup()
    {
        // Wait for the first physics frame so the NavigationServer can sync.
        await ToSignal(GetTree(), SceneTree.SignalName.PhysicsFrame);

        // Now that the navigation map is no longer empty, set the movement target.
        MovementTarget = _movementTargetPosition;
    }
}
备注
On the first frame the NavigationServer map has not synchronized region data and any path query will return empty. Wait for the NavigationServer synchronization by awaiting one frame in the script.