Up to date
This page is up to date for Godot 4.2.
If you still find outdated information, please open an issue.
Limitations du rendu 3D
Introduction
En raison de l'importance qu'ils accordent aux performances, les moteurs de rendu en temps réel présentent de nombreuses limites. Le moteur de rendu de Godot ne fait pas exception à la règle. Pour fonctionner efficacement avec ces limitations, vous devez les comprendre.
Limites de taille des textures
Sur les ordinateurs de bureau et les ordinateurs portables, les textures supérieures à 8192×8192 peuvent ne pas être prises en charge sur les anciens appareils. Vous pouvez vérifier les limitations de votre GPU cible sur GPUinfo.org.
Les GPU mobiles sont généralement limités à des textures 4096 × 4096. De plus, certains GPU mobiles ne prennent pas en charge la répétition de textures de taille différente de la puissance de deux. Par conséquent, si vous souhaitez que votre texture s'affiche correctement sur toutes les plates-formes, vous devez éviter d'utiliser des textures supérieures à 4096 × 4096 et utiliser une puissance de deux de tailles si la texture doit se répéter.
To limit the size of a specific texture that may be too large to render, you can
set the Process > Size Limit import option to a value greater than 0.
This will reduce the texture's dimensions on import (preserving aspect ratio)
without affecting the source file.
Bandes de couleur
When using the Forward+ or Forward Mobile rendering methods, Godot's 3D engine renders internally in HDR. However, the rendering output will be tonemapped to a low dynamic range so it can be displayed on the screen. This can result in visible banding, especially when using untextured materials. For performance reasons, color precision is also lower when using the Forward Mobile rendering method compared to Forward+.
When using the Compatibility rendering method, HDR is not used and the color precision is the lowest of all rendering methods. This also applies to 2D rendering, where banding may be visible when using smooth gradient textures.
Il y a deux façons principales de réduire l'effet de postérisation HDR :
If using the Forward+ or Forward Mobile rendering methods, enable Use Debanding in the advanced Project Settings. This applies a fullscreen debanding shader as a post-processing effect and is very cheap.
Alternatively, bake some noise into your textures. This is mainly effective in 2D, e.g. for vignetting effects. In 3D, you can also use a custom debanding shader to be applied on your materials. This technique works even if your project is rendered with low color precision, which means it will work when using the Mobile and Compatibility rendering methods.
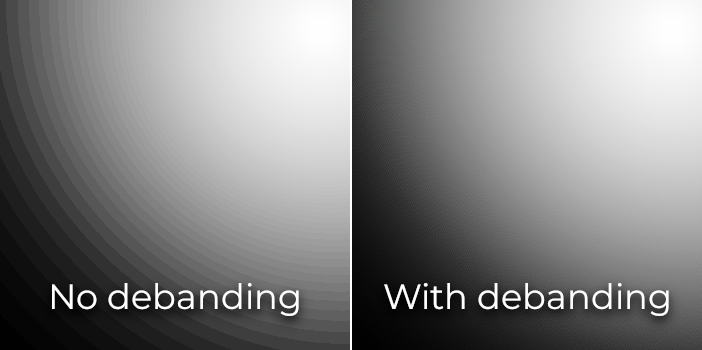
Color banding comparison (contrast increased for more visibility)
Voir aussi
See Banding in Games: A Noisy Rant (PDF) for more details about banding and ways to combat it.
Précision du tampon de profondeur
Pour trier les objets dans l'espace 3D, les moteurs de rendu s'appuient sur un tampon de profondeur (aussi appelé Z-tampon). Ce tampon a une précision finie : 24 bits sur les plateformes de bureau, parfois 16 bits sur les plateformes mobiles (pour des raisons de performances). Si deux objets différents se retrouvent sur la même valeur de tampon, il y a alors combat en Z. Cela se matérialisera sous la forme de textures vacillant d'avant en arrière lorsque la caméra se déplace ou tourne.
Pour rendre le tampon de profondeur plus précis sur la zone rendue, vous devez augmenter la propriété Near du nœud Camera. Attention toutefois : si vous la réglez trop haut, les joueurs pourront voir à travers la géométrie proche. Vous devez également réduire la propriété Far du nœud Camera à la valeur la plus basse autorisée pour votre cas d'utilisation, mais gardez à l'esprit qu'elle n'aura pas un impact aussi important sur la précision que la propriété Near.
Si vous n'avez besoin d'une grande précision que lorsque le joueur peut voir au loin, vous pouvez la modifier dynamiquement en fonction des conditions de jeu. Par exemple, si le joueur entre dans un avion, la propriété Near peut être temporairement augmentée pour éviter les combats en Z au loin. Elle peut ensuite être diminuée une fois que le joueur a quitté l'avion.
Selon la scène et les conditions de visualisation, vous pouvez également déplacer les objets combattant en Z plus loin sans que la différence soit visible pour le joueur.
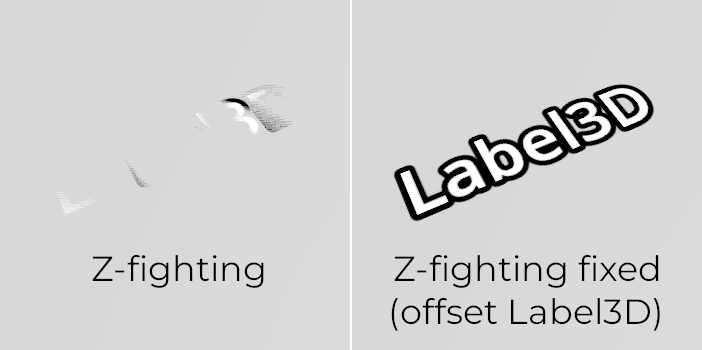
Z-fighting comparison (before and after tweaking the scene by offsetting the Label3D away from the floor)
Tri par transparence
In Godot, transparent materials are drawn after opaque materials. Transparent objects are sorted back to front before being drawn based on the Node3D's position, not the vertex position in world space. Due to this, overlapping objects may often be sorted out of order. To fix improperly sorted objects, tweak the material's Render Priority property or the node's Sorting Offset. Render Priority will force specific materials to appear in front of or behind other transparent materials, while Sorting Offset will move the object forward or backward for the purpose of sorting. Even then, these may not always be sufficient.
Certains moteurs de rendu proposent des techniques de transparence indépendantes de l'ordre pour pallier ce problème, mais cela est coûteux pour le GPU. Godot ne fournit pas cette fonctionnalité actuellement. Il y a encore plusieurs façons d'éviter ce problème :
Only make materials transparent if you actually need it. If a material only has a small transparent part, consider splitting it into a separate material. This will allow the opaque part to cast shadows and will also improve performance.
If your texture mostly has fully opaque and fully transparent areas, you can use alpha testing instead of alpha blending. This transparency mode is faster to render and doesn't suffer from transparency issues. Enable Transparency > Transparency to Alpha Scissor in StandardMaterial3D, and adjust Transparency > Alpha Scissor Threshold accordingly if needed. Note that MSAA will not antialias the texture's edges unless alpha antialiasing is enabled in the material's properties. However, FXAA, TAA and supersampling will be able to antialias the texture's edges regardless of whether alpha antialiasing is enabled on the material.
If you need to render semi-transparent areas of the texture, alpha scissor isn't suitable. Instead, setting the StandardMaterial3D's Transparency > Transparency property to Depth Pre-Pass can sometimes work (at a performance cost). You can also try the Alpha Hash mode.
If you want a material to fade with distance, use the StandardMaterial3D distance fade mode Pixel Dither or Object Dither instead of Pixel Alpha. This will make the material opaque, which also speeds up rendering.
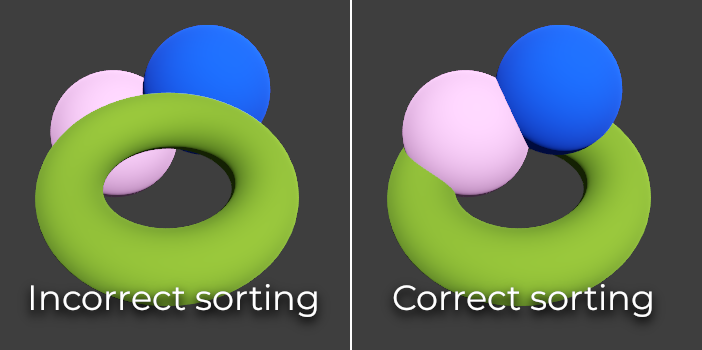
Transparency sorting comparison (alpha-blended materials on the left, alpha scissor materials on the right)
Anticrénelage multi-échantillons
Voir aussi
Antialiasing is explained in detail on the 3D antialiasing page.
L'anticrénelage multi-échantillons (MSAA) permet de prélever plusieurs échantillons de couverture sur les bords des polygones lors du rendu des objets. Il n'augmente pas le nombre d'échantillons de couleur utilisés pour rendre une scène. Voici ce que cela signifie en pratique :
Les bords des maillage seront bien lissés (tout comme avec le suréchantillonnage(supersampling)).
Les matériaux transparents qui utilisent l'alpha testing (transparence de 1 bit) ne seront pas lissés.
le specular aliasing ("scintillements" qui apparaissent sur les surfaces réfléchissantes) ne sera pas réduit.
Il existe plusieurs façons de contourner cette limitation, en fonction de votre budget de performance :
To make specular aliasing less noticeable, open the Project Settings and enable Rendering > Quality > Screen Space Filters > Screen Space Roughness Limiter. This filter has a moderate cost on performance, so it should only be enabled if you actually need it.
Enable fast approximate antialiasing (FXAA) in addition to (or instead of) MSAA. Since FXAA is a screen-space antialiasing method, it will smooth out anything. As a downside, FXAA also makes the scene appear blurrier, especially at resolutions below 1440p. FXAA also lacks temporal information, which means its impact on specular aliasing is limited.
Enable temporal antialiasing (TAA) in addition to (or instead of) MSAA. Since TAA is a screen-space antialiasing method, it will smooth out anything. As a downside, TAA also makes the scene appear blurrier, especially at resolutions below 1440p. TAA provides superior quality compared to FXAA and can effectively combat specular aliasing. However, TAA has a greater performance cost compared to FXAA, and TAA can introduce ghosting artifacts with fast movement.
Render the scene at a higher resolution by increasing the Scaling 3D > Scale project setting above
1.0. This technique is called supersample antialiasing (SSAA) and is very slow. Its use is generally only recommended for offline rendering.