Work in progress
The content of this page was not yet updated for Godot
4.2
and may be outdated. If you know how to improve this page or you can confirm
that it's up to date, feel free to open a pull request.
WebRTC
HTML5, WebSocket, WebRTC
L'une des grandes caractéristiques de Godot est sa capacité d'exportation vers la plateforme HTML5/WebAssembly, permettant à votre jeu de s'exécuter directement dans le navigateur lorsqu'un utilisateur visite votre page web.
Il s'agit d'une excellente opportunité pour les démos et les jeux complets, mais elle était auparavant assortie de certaines limitations. Dans le domaine de la mise en réseau, les navigateurs ne prenaient en charge que les requêtes HTTPR jusqu'à récemment, lorsque WebSocket puis WebRTC ont été proposés comme normes.
WebSocket
When the WebSocket protocol was standardized in December 2011, it allowed browsers to create stable and bidirectional connections to a WebSocket server. The protocol is a very powerful tool to send push notifications to browsers, and has been used to implement chats, turn-based games, etc.
Les WebSockets, cependant, utilisent toujours une connexion TCP, ce qui est bon pour la fiabilité mais pas pour la latence, donc pas bon pour les applications en temps réel comme la VoIP et les jeux rapides.
WebRTC
C'est pourquoi, depuis 2010, Google a commencé à travailler sur une nouvelle technologie appelée WebRTC, qui plus tard, en 2017, est devenue une recommandation candidate du W3C. Le WebRTC est un ensemble de spécifications beaucoup plus complexe, et s'appuie sur de nombreuses autres technologies en coulisse (ICE, DTLS, SDP) pour assurer une communication rapide, en temps réel et sécurisée entre deux pairs.
L'idée est de trouver le chemin le plus rapide entre les deux pairs et d'établir, dans la mesure du possible, une communication directe (c'est-à-dire essayer d'éviter un serveur relais).
Cependant, cela a un prix, c'est-à-dire que certaines informations sur les médias doivent être échangées entre les deux pairs avant que la communication puisse commencer (sous la forme du Session Description Protocol - SDP chaînes). Cela prend généralement la forme d'un Signaling Server WebRTC.
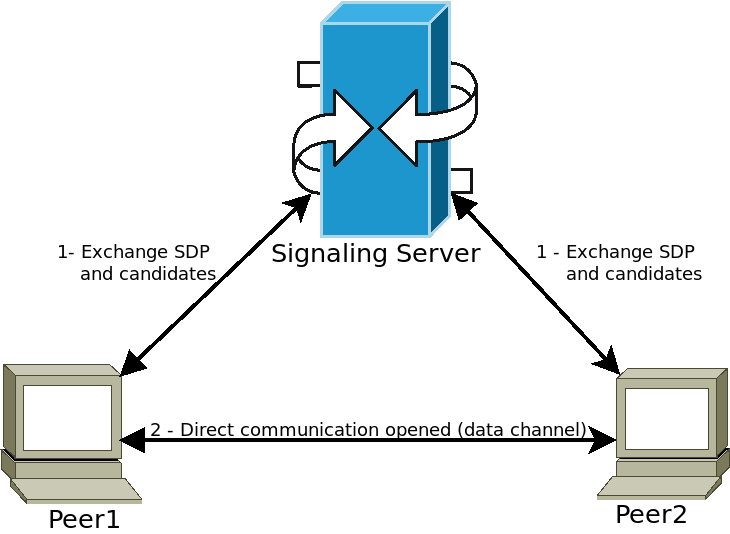
Les pairs se connectent à un serveur de signalisation (par exemple un serveur WebSocket) et envoient leurs informations média. Le serveur relaie ensuite ces informations à d'autres pairs, leur permettant d'établir la communication directe souhaitée. Une fois cette étape franchie, les pairs peuvent se déconnecter du serveur de signalisation et garder la connexion directe de poste à poste (P2P) ouverte.
Utilisation de WebRTC dans Godot
WebRTC is implemented in Godot via two main classes WebRTCPeerConnection and WebRTCDataChannel, plus the multiplayer API implementation WebRTCMultiplayerPeer. See section on high-level multiplayer for more details.
Note
These classes are available automatically in HTML5, but require an external GDExtension plugin on native (non-HTML5) platforms. Check out the webrtc-native plugin repository for instructions and to get the latest release.
Avertissement
Lors de l'exportation vers Android, assurez-vous d'activer la permission INTERNET dans le préréglage d'exportation Android avant d'exporter le projet ou d'utiliser le déploiement en un clic. Sinon, toute communication réseau sera bloquée par Android.
Exemple minimal de connexion
Cet exemple vous montrera comment créer une connexion WebRTC entre deux pairs dans la même application. Ce n'est pas très utile dans la vie réelle, mais cela vous donnera un bon aperçu de la manière dont une connexion WebRTC est établie.
extends Node

# Create the two peers
var p1 = WebRTCPeerConnection.new()
var p2 = WebRTCPeerConnection.new()
# And a negotiated channel for each each peer
var ch1 = p1.create_data_channel("chat", {"id": 1, "negotiated": true})
var ch2 = p2.create_data_channel("chat", {"id": 1, "negotiated": true})

func _ready():
    # Connect P1 session created to itself to set local description.
    p1.session_description_created.connect(p1.set_local_description)
    # Connect P1 session and ICE created to p2 set remote description and candidates.
    p1.session_description_created.connect(p2.set_remote_description)
    p1.ice_candidate_created.connect(p2.add_ice_candidate)

    # Same for P2
    p2.session_description_created.connect(p2.set_local_description)
    p2.session_description_created.connect(p1.set_remote_description)
    p2.ice_candidate_created.connect(p1.add_ice_candidate)

    # Let P1 create the offer
    p1.create_offer()

    # Wait a second and send message from P1.
    await get_tree().create_timer(1).timeout
    ch1.put_packet("Hi from P1".to_utf8_buffer())

    # Wait a second and send message from P2.
    await get_tree().create_timer(1).timeout
    ch2.put_packet("Hi from P2".to_utf8_buffer())

func _process(_delta):
    # Poll connections
    p1.poll()
    p2.poll()

    # Check for messages
    if ch1.get_ready_state() == ch1.STATE_OPEN and ch1.get_available_packet_count() > 0:
        print("P1 received: ", ch1.get_packet().get_string_from_utf8())
    if ch2.get_ready_state() == ch2.STATE_OPEN and ch2.get_available_packet_count() > 0:
        print("P2 received: ", ch2.get_packet().get_string_from_utf8())
Ceci s'affichera :
P1 received: Hi from P1
P2 received: Hi from P2
Exemple de signalisation locale
Cet exemple développe le précédent, en séparant les pairs dans deux scènes différentes, et en utilisant un singleton comme serveur de signalisation.
extends Node
# An example p2p chat client.

var peer = WebRTCPeerConnection.new()

# Create negotiated data channel.
var channel = peer.create_data_channel("chat", {"negotiated": true, "id": 1})

func _ready():
    # Connect all functions.
    peer.ice_candidate_created.connect(self._on_ice_candidate)
    peer.session_description_created.connect(self._on_session)

    # Register to the local signaling server (see below for the implementation).
    Signaling.register(String(get_path()))


func _on_ice_candidate(mid, index, sdp):
    # Send the ICE candidate to the other peer via signaling server.
    Signaling.send_candidate(String(get_path()), mid, index, sdp)


func _on_session(type, sdp):
    # Send the session to other peer via signaling server.
    Signaling.send_session(String(get_path()), type, sdp)
    # Set generated description as local.
    peer.set_local_description(type, sdp)


func _process(delta):
    # Always poll the connection frequently.
    peer.poll()
    if channel.get_ready_state() == WebRTCDataChannel.STATE_OPEN:
        while channel.get_available_packet_count() > 0:
            print(String(get_path()), " received: ", channel.get_packet().get_string_from_utf8())


func send_message(message):
    channel.put_packet(message.to_utf8_buffer())
Et maintenant, le serveur de signalisation local :
Note
Ce serveur de signalisation local est censé être utilisé comme un singleton pour connecter deux pairs dans la même scène.
# A local signaling server. Add this to autoloads with name "Signaling" (/root/Signaling)
extends Node

# We will store the two peers here
var peers = []

func register(path):
    assert(peers.size() < 2)
    peers.append(path)
    if peers.size() == 2:
        get_node(peers[0]).peer.create_offer()


func _find_other(path):
    # Find the other registered peer.
    for p in peers:
        if p != path:
            return p
    return ""


func send_session(path, type, sdp):
    var other = _find_other(path)
    assert(other != "")
    get_node(other).peer.set_remote_description(type, sdp)


func send_candidate(path, mid, index, sdp):
    var other = _find_other(path)
    assert(other != "")
    get_node(other).peer.add_ice_candidate(mid, index, sdp)
Alors vous pouvez l'utiliser comme ça :
# Main scene (main.gd)
extends Node

const Chat = preload("res://chat.gd")

func _ready():
    var p1 = Chat.new()
    var p2 = Chat.new()
    add_child(p1)
    add_child(p2)

    # Wait a second and send message from P1
    await get_tree().create_timer(1).timeout
    p1.send_message("Hi from %s" % String(p1.get_path()))

    # Wait a second and send message from P2
    await get_tree().create_timer(1).timeout
    p2.send_message("Hi from %s" % String(p2.get_path()))
Cela va imprimer quelque chose de similaire à ceci :
/root/main/@@3 received: Hi from /root/main/@@2
/root/main/@@2 received: Hi from /root/main/@@3
Signalisation à distance avec WebSocket
A more advanced demo using WebSocket for signaling peers and WebRTCMultiplayerPeer is available in the godot demo projects under networking/webrtc_signaling.