Attention: Here be dragons
This is the latest
(unstable) version of this documentation, which may document features
not available in or compatible with released stable versions of Godot.
Checking the stable version of the documentation...
Heads up display
The final piece our game needs is a User Interface (UI) to display things like score, a "game over" message, and a restart button.
Create a new scene, click the "Other Node" button and add a CanvasLayer node named
HUD. "HUD" stands for "heads-up display", an informational display that
appears as an overlay on top of the game view.
Węzeł CanvasLayer pozwala nam narysować nasze elementy interfejsu użytkownika na warstwie będącą przed resztą gry, tak aby wyświetlane przez niego informacje nie były zakryte żadnymi elementami gry, takimi jak gracz lub przeciwnik.
HUD powinien wyświetlić następujące informacje:
Wynik, zmieniany przez
ScoreTimer.Wiadomości takie jak "Koniec Gry" lub "Przygotuj Się!"
Przycisk "Start" rozpoczyna grę.
The basic node for UI elements is Control. To create our UI, we'll use two types of Control nodes: Label and Button.
Utwórz je jako dzieci węzła HUD:
Label nazwany
ScoreLabel.Label nazwany
Message.Przycisk Button o nazwie
StartButton.Timer o nazwie
MessageTimer.
Domyślna czcionka dla węzłów Control jest mała i nie skaluje się dobrze. W zasobach gry znajduje się plik czcionki o nazwie "Xolonium-Regular.ttf". Aby użyć tej czcionki, wykonaj następujące czynności dla każdego z trzech węzłów Control:
Under "Theme Overrides > Fonts", choose "Load" and select the "Xolonium-Regular.ttf" file.

The font size is still too small, increase it to 64 under "Theme Overrides > Font Sizes".
Once you've done this with the ScoreLabel, repeat the changes for the Message and StartButton nodes.

Informacja
Anchors: Control nodes have a position and size,
but they also have anchors. Anchors define the origin -
the reference point for the edges of the node.
Rozmieść węzły, jak pokazano poniżej. Możesz przeciągać węzły, aby rozmieścić je ręcznie, lub użyć opcji „Anchor Presets”, aby uzyskać bardziej precyzyjne rozmieszczenie.

ScoreLabel
Dodaj tekst
0.Set the "Horizontal Alignment" and "Vertical Alignment" to
Center.Choose the "Anchor Preset"
Center Top.
Wiadomość
Dodaj tekst :
Dodge the Creeps!.Set the "Horizontal Alignment" and "Vertical Alignment" to
Center.Set the "Autowrap Mode" to
Word, otherwise the label will stay on one line.Under "Control - Layout/Transform" set "Size X" to
480to use the entire width of the screen.Choose the "Anchor Preset"
Center.
Podłączenie HUD do Main
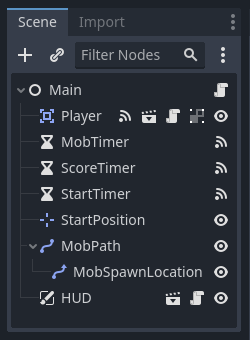
Teraz, kiedy już stworzyłeś scenę HUD, zapisz ją i wróć do Main`. Stwórz instancję HUD w Main tak, jak zrobiłeś to Player scenę i umieść ją na dole drzewa. Pełne drzewo powinno wyglądać tak, więc upewnij się, że niczego nie przegapiłeś:
Teraz musimy podłączyć funkcję HUD do naszego skryptu Main. Wymaga to paru poprawek do sceny Main:
In the Signals tab, connect the HUD's start_game signal to the new_game()
function of the Main node by clicking the "Pick" button in the "Connect a Signal"
window and selecting the new_game() method or type "new_game" below "Receiver Method"
in the window. Verify that the green connection icon now appears next to
func new_game() in the script.
W new_game(), zaktualizuj wyświetlany wynik i pokaż komunikat "Przygotuj się":
$HUD.update_score(score)
$HUD.show_message("Get Ready")
var hud = GetNode<HUD>("HUD");
hud.UpdateScore(_score);
hud.ShowMessage("Get Ready!");
W game_over() musimy wywołać odpowiednią funkcję w HUD:
$HUD.show_game_over()
GetNode<HUD>("HUD").ShowGameOver();
Finally, add this to _on_score_timer_timeout() to keep the display in sync
with the changing score:
$HUD.update_score(score)
GetNode<HUD>("HUD").UpdateScore(_score);
Ostrzeżenie
Remember to remove the call to new_game() from
_ready() if you haven't already, otherwise
your game will start automatically.
Now you're ready to play! Click the "Play the Project" button.
Removing old creeps
If you play until "Game Over" and then start a new game right away, the creeps from the previous game may still be on the screen. It would be better if they all disappeared at the start of a new game. We just need a way to tell all the mobs to remove themselves. We can do this with the "group" feature.
In the Mob scene, select the root node and click the Groups tab next to the
Signals tab and the "+" button to open the "Create New Group" dialog.
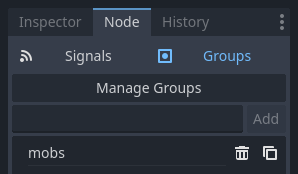
Name the group mobs and click "ok" to add a new scene group.

Now all mobs will be in the "mobs" group.

We can then add the following line to the new_game() function in Main:
get_tree().call_group("mobs", "queue_free")
// Note that for calling Godot-provided methods with strings,
// we have to use the original Godot snake_case name.
GetTree().CallGroup("mobs", Node.MethodName.QueueFree);
The call_group() function calls the named function on every node in a
group - in this case we are telling every mob to delete itself.
The game's mostly done at this point. In the next and last part, we'll polish it a bit by adding a background, looping music, and some keyboard shortcuts.