Attention: Here be dragons
This is the latest
(unstable) version of this documentation, which may document features
not available in or compatible with released stable versions of Godot.
Checking the stable version of the documentation...
Scena gracza i akcje wejścia
W ciągu następnych dwóch lekcji zaprojektujemy scenę gracza, zarejestrujemy swoje własne akcje wejściowe i zakodujemy poruszanie się gracza. Na koniec będziesz mieć postać, którą można grać i porusza się w ośmiu kierunkach.
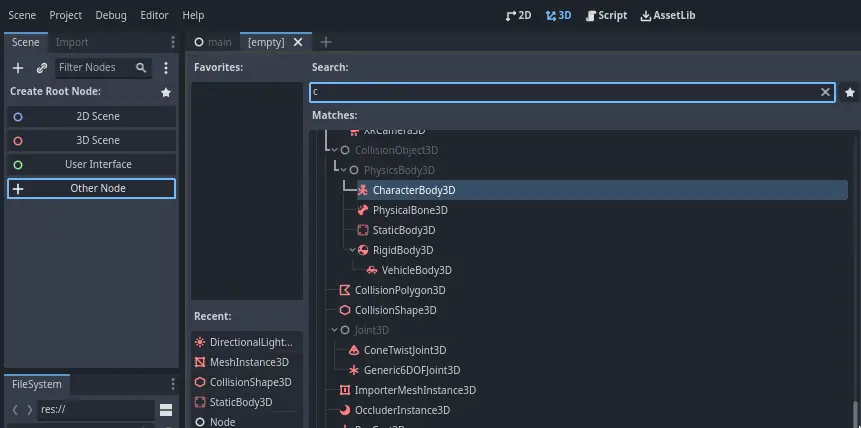
Create a new scene by going to the Scene menu in the top-left and clicking New Scene.

Click the Other Node button and select the CharacterBody3D node type
to create a CharacterBody3D as the root node.
Rename the CharacterBody3D to Player.
Character bodies are complementary to the area and rigid bodies used in the 2D
game tutorial. Like rigid bodies, they can move and collide with the
environment, but instead of being controlled by the physics engine, you dictate
their movement. You will see how we use the node's unique features when we code
the jump and squash mechanics.
Zobacz także
Aby dowiedzieć się więcej o różnych typach węzłów z fizyką, zobacz Przedstawienie podstaw fizyki.
Na razie stworzymy podstawowy zestaw dla naszej postaci 3D. Umożliwi nam to późniejsze obrócenie modelu za pomocą kodu podczas odtwarzania animacji.
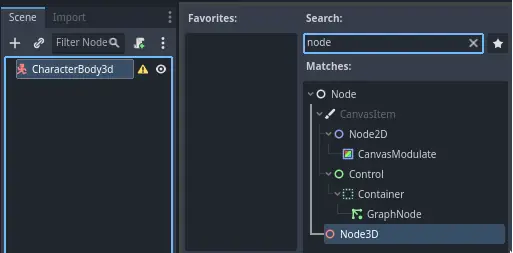
Add a Node3D node as a child of Player.
Select the Player node in the Scene tree and click the "+" button to add a child node.
Rename it to Pivot.
Następnie w doku FileSystem rozwiń folder art/, klikając go dwukrotnie, a następnie przeciągnij i upuść player.glb na Pivot.

To powinno utworzyć instancję modelu będącego dzieckiem Pivot. Możesz zmienić jego nazwę na Character.

Informacja
The .glb files contain 3D scene data based on the open source glTF 2.0
specification. They're a modern and powerful alternative to a proprietary format
like FBX, which Godot also supports. To produce these files, we designed the
model in Blender 3D and exported it to glTF.
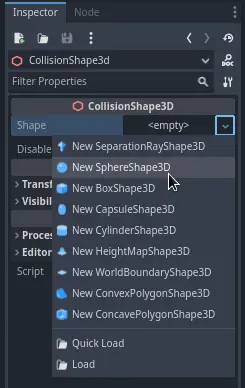
As with all kinds of physics nodes, we need a collision shape for our character
to collide with the environment. Select the Player node again and add a child node
CollisionShape3D. In the Inspector, on the Shape property,
add a new SphereShape3D.
Siatka sfery pojawia się pod postacią.

It will be the shape the physics engine uses to collide with the environment, so
we want it to better fit the 3D model. Make it a bit larger by dragging the orange
dot in the viewport. My sphere has a radius of about 0.8 meters.
Then, move the collision shape up so its bottom roughly aligns with the grid's plane.

To make moving the shape easier, you can toggle the model's visibility by clicking
the eye icon next to the Character or the Pivot nodes.

Save the scene as player.tscn.
Mając gotowe węzły, możemy już prawie rozpocząć kodowanie. Ale najpierw musimy zdefiniować kilka akcji wejściowych.
Tworzenie akcji wejściowych
Aby poruszać postacią, będziemy sprawdzać dane wejściowe, takie jak naciskanie klawiszy strzałek. W Godocie moglibyśmy napisać wszystkie powiązania klawiszy w kodzie, ale istnieje potężny system, który pozwala przypisać etykietę do zestawu klawiszy i przycisków. Upraszcza to nasze skrypty i czyni je bardziej czytelnymi.
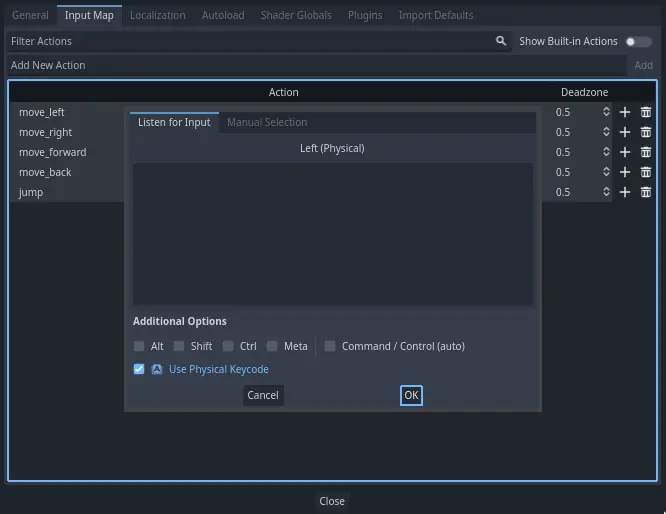
This system is the Input Map. To access its editor, head to the Project menu and select Project Settings....

At the top, there are multiple tabs. Click on Input Map. This window allows you to add new actions at the top; they are your labels. In the bottom part, you can bind keys to these actions.

Godot projects come with some predefined actions designed for user interface design (see above screenshot). These will become visible if you enable the Show Built-in Actions toggle. We could use these here, but instead we're defining our own to support gamepads. Leave Show Built-in Actions disabled.
Nazwiemy nasze akcje move_left, move_right, move_forward, move_back i jump.
To add an action, write its name in the bar at the top and press Enter or click the Add button.

Utwórz pięć następujących akcji:

To bind a key or button to an action, click the "+" button to its right. Do this
for move_left. Press the left arrow key and click OK.
Powiąż również klawisz A z akcją move_left.

Let's now add support for a gamepad's left joystick. Click the "+" button again but this time, select the input within the input tree yourself. Select the negative X axis of the left joystick under Joypad Axes.
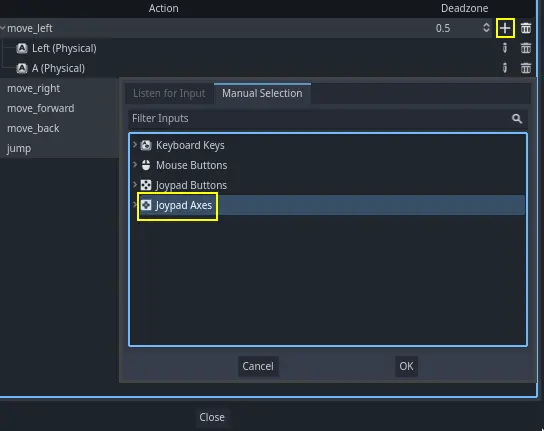
Leave the other values as default and press OK.
Informacja
Jeśli chcesz, aby kontrolery miały różne akcje wejściowe, powinieneś użyć opcji Urządzenia w Opcjach Dodatkowych. Urządzenie 0 odpowiada pierwszemu podłączonemu gamepadowi, urządzenie 1 odpowiada drugiemu podłączonemu gamepadowi itd.
Zrób to samo dla innych akcji wejściowych. Na przykład, przypisz strzałkę w prawo, D i dodatnią oś lewego joysticka do move_right. Po przypisaniu wszystkich klawiszy interfejs powinien wyglądać następująco.

The final action to set up is the jump action. Bind the Space key and the gamepad's
A button located under Joypad Buttons.

Sterowanie dla akcji skoku powinno wyglądać następująco.

To wszystkie akcje, których potrzebujemy w tej grze. Możesz użyć tego menu do oznaczenia dowolnych grup klawiszy i przycisków w swoich projektach.
W następnej części zakodujemy i przetestujemy ruchy gracza.