Langue de shading
Introduction
Godot utilise un langage de shading semblable à celui de GLSL ES 3.0. La plupart des types de données et des fonctions sont pris en charge, et les quelques autres seront probablement ajoutés au fil du temps.
Si vous êtes déjà familier avec le GLSL, le guide de migration de shader Godot est une ressource qui vous aidera à faire la transition entre le GLSL normal et le langage de shading de Godot.
types
La plupart des types de GLSL ES 3.0 sont supportés :
Type |
Description |
|---|---|
void |
Type void, seulement utile pour les fonctions ne retournant rien. |
bool |
Type de données booléen, ne peut contenir que |
bvec2 |
vecteur à deux composants de booléens. |
bvec3 |
Vecteur de booléens à trois composants. |
bvec4 |
Vecteur de booléens à quatre composants. |
int |
32 bit signed scalar integer. |
ivec2 |
Vecteur d'entier signé (int) à deux composants. |
ivec3 |
Vecteur d'entier signé (int) à trois composants. |
ivec4 |
Vecteur d'entier signé (int) à quatre composants. |
uint |
Entier scalaire non-signé ; ne peut contenir de nombre négatif. |
uvec2 |
Vecteur d'entier non-signé (unsigned int) à deux composants. |
uvec3 |
Vecteur d'entier non-signé (unsigned int) à trois composants. |
uvec4 |
Vecteur d'entier non-signé (unsigned int) à quatre composants. |
float |
32 bit floating-point scalar. |
vec2 |
Vecteur à deux composantes de valeurs à virgule flottante. |
vec3 |
Vecteur à trois composantes de valeurs à virgule flottante. |
vec4 |
Vecteur à quatre composantes de valeurs à virgule flottante. |
mat2 |
Matrice 2x2, dans l'ordre principal des colonnes. |
mat3 |
Matrice 3x3, dans l'ordre principal des colonnes. |
mat4 |
Matrice 4x4, dans l'ordre principal des colonnes. |
sampler2D |
Type d'échantillonneur pour lier des textures 2D, qui sont lues comme des flottants. |
isampler2D |
Type d'échantillonneur pour lier des textures 2D, qui sont lues comme des entiers signés. |
usampler2D |
Type d'échantillonneur pour lier des textures 2D, qui sont lues comme des entiers non signés. |
Sampler2DArray |
Type d'échantillonneur pour lier des tableaux de textures 2D, qui sont lues comme des flottants. |
isampler2DArray |
Type d'échantillonneur pour lier des tableaux de textures 2D, qui sont lues comme des entiers signés. |
usampler2DArray |
Type d'échantillonneur pour lier des tableaux de textures 2D, qui sont lues comme des entiers non signés. |
sampler3D |
Type d'échantillonneur pour lier des textures 3D, qui sont lues comme des flottants. |
isampler3D |
Type d'échantillonneur pour lier des textures 3D, qui sont lues comme des entiers signés. |
usampler3D |
Type d'échantillonneur pour lier des textures 3D, qui sont lues comme des entiers non signés. |
samplerCube |
Type d'échantillonneur pour lier des Cubemaps, qui sont lus comme des flottants. |
samplerCubeArray |
Sampler type for binding Cubemap arrays, which are read as float. Only supported in Forward+ and Mobile, not Compatibility. |
samplerExternalOES |
External sampler type. Only supported in Compatibility/Android platform. |
Avertissement
Local variables are not initialized to a default value such as 0.0. If
you use a variable without assigning it first, it will contain whatever
value was already present at that memory location, and unpredictable visual
glitches will appear. However, uniforms and varyings are initialized to a
default value.
Conversion de type
Comme dans GLSL ES 3.0, les conversions (casts) implicites entre sclaires et vecteurs de la même taille mais de type différent sont interdites. La conversion de type de différentes tailles est aussi interdite. Les conversions doivent être faites explicitement via les constructeurs.
Exemple :
float a = 2; // invalid
float a = 2.0; // valid
float a = float(2); // valid
Les entiers de base sont signés, ce qui oblige l'utilisation des casts pour convertir en non-signé :
int a = 2; // valid
uint a = 2; // invalid
uint a = uint(2); // valid
Membres
Les membre scalaires des types vecteurs sont accessible par les membres "x", "y", "z" et "w". Cependant, utiliser "r", "g", "b" et "a" fonctionne aussi et est équivalent. Utilisez ce qui correspond le mieux à vos besoins.
For matrices, use the m[column][row] indexing syntax to access each scalar,
or m[column] to access a vector by column index. For example, for accessing the
y-component of the translation from a mat4 transform matrix (4th column, 2nd line) you use m[3][1] or m[3].y.
Construction
La construction de vecteurs doit toujours passer :
// The required amount of scalars
vec4 a = vec4(0.0, 1.0, 2.0, 3.0);
// Complementary vectors and/or scalars
vec4 a = vec4(vec2(0.0, 1.0), vec2(2.0, 3.0));
vec4 a = vec4(vec3(0.0, 1.0, 2.0), 3.0);
// A single scalar for the whole vector
vec4 a = vec4(0.0);
Construction of matrix types requires vectors of the same dimension as the
matrix, interpreted as columns. You can also build a diagonal matrix using matx(float) syntax.
Accordingly, mat4(1.0) is an identity matrix.
mat2 m2 = mat2(vec2(1.0, 0.0), vec2(0.0, 1.0));
mat3 m3 = mat3(vec3(1.0, 0.0, 0.0), vec3(0.0, 1.0, 0.0), vec3(0.0, 0.0, 1.0));
mat4 identity = mat4(1.0);
Les matrices peuvent aussi être construites depuis une matrice d'une autre dimension. Il y a deux règles :
1. If a larger matrix is constructed from a smaller matrix, the additional rows and columns are set to the values they would have in an identity matrix. 2. If a smaller matrix is constructed from a larger matrix, the top, left submatrix of the larger matrix is used.
mat3 basis = mat3(MODEL_MATRIX);
mat4 m4 = mat4(basis);
mat2 m2 = mat2(m4);
Mélange
Il est possible d'obtenir n'importe quelle combinaison de composants dans n'importe quel ordre, tant que le résultat est un autre type vecteur (ou scalaire). C'est plus facile à montrer qu'à expliquer :
vec4 a = vec4(0.0, 1.0, 2.0, 3.0);
vec3 b = a.rgb; // Creates a vec3 with vec4 components.
vec3 b = a.ggg; // Also valid; creates a vec3 and fills it with a single vec4 component.
vec3 b = a.bgr; // "b" will be vec3(2.0, 1.0, 0.0).
vec3 b = a.xyz; // Also rgba, xyzw are equivalent.
vec3 b = a.stp; // And stpq (for texture coordinates).
float c = b.w; // Invalid, because "w" is not present in vec3 b.
vec3 c = b.xrt; // Invalid, mixing different styles is forbidden.
b.rrr = a.rgb; // Invalid, assignment with duplication.
b.bgr = a.rgb; // Valid assignment. "b"'s "blue" component will be "a"'s "red" and vice versa.
Précision
Il est possible d'ajouter des modificateurs de précision aux types de données. Utilisez-les pour les uniformes, les variables, les arguments et les varyings :
lowp vec4 a = vec4(0.0, 1.0, 2.0, 3.0); // low precision, usually 8 bits per component mapped to 0-1
mediump vec4 a = vec4(0.0, 1.0, 2.0, 3.0); // medium precision, usually 16 bits or half float
highp vec4 a = vec4(0.0, 1.0, 2.0, 3.0); // high precision, uses full float or integer range (32 bit default)
L'utilisation d'une précision inférieure pour certaines opérations peut accélérer les calculs (au prix d'une moindre précision). Ceci est rarement nécessaire dans la fonction de processeur de vertex (où la précision maximum est nécessaire la plupart du temps), mais c'est souvent utile dans le processeur de fragment.
Certaines architectures (principalement mobiles) peuvent en bénéficier de manière significative, mais il y a des inconvénients tels que le surcoût de la conversion entre les précisions. Pour plus d'informations, veuillez vous reporter à la documentation de l'architecture cible. Dans de nombreux cas, les pilotes mobiles provoquent un comportement incohérent ou inattendu et il est préférable d'éviter de spécifier la précision, sauf si cela s'avère nécessaire.
Les tableaux
Les tableaux sont des conteneurs pour plusieurs variables d'un type similaire.
Tableaux locaux
Les tableaux locaux sont déclarés dans les fonctions. Ils peuvent utiliser tous les types de données autorisés, sauf les samplers. La déclaration du tableau suit une syntaxe de type C : [const] + [precision] + typename + identifier + [array size].
void fragment() {
    float arr[3];
}
Ils peuvent être initialisés au début comme cela :
float float_arr[3] = float[3] (1.0, 0.5, 0.0); // first constructor

int int_arr[3] = int[] (2, 1, 0); // second constructor

vec2 vec2_arr[3] = { vec2(1.0, 1.0), vec2(0.5, 0.5), vec2(0.0, 0.0) }; // third constructor

bool bool_arr[] = { true, true, false }; // fourth constructor - size is defined automatically from the element count
Vous pouvez déclarer plusieurs tableaux (même avec des tailles différentes) dans une expression :
float a[3] = float[3] (1.0, 0.5, 0.0),
b[2] = { 1.0, 0.5 },
c[] = { 0.7 },
d = 0.0,
e[5];
Pour accéder à un élément de tableau, utilisez la syntaxe d'indexation :
float arr[3];

arr[0] = 1.0; // setter

COLOR.r = arr[0]; // getter
Les tableaux ont aussi une fonction intégrée .length() (à ne pas confondre avec la fonction intégrée length()). Il n'accepte aucun paramètre et retourne la taille du tableau.
float arr[] = { 0.0, 1.0, 0.5, -1.0 };
for (int i = 0; i < arr.length(); i++) {
    // ...
}
Note
Si vous utilisez un indice inférieur à 0 ou supérieur à la taille du tableau - le shader va planter et casser le rendu. Pour éviter cela, utilisez les fonctions length(), if, ou clamp() pour vous assurer que l'index est compris entre 0 et la longueur du tableau. Testez et vérifiez toujours soigneusement votre code. Si vous passez une expression constante ou un simple nombre, l'éditeur vérifiera ses limites pour éviter ce plantage.
Tableaux globaux
You can declare arrays in global space as either const or uniform:
shader_type spatial;

const lowp vec3 v[1] = lowp vec3[1] ( vec3(0, 0, 1) );
uniform lowp vec3 w[1];

void fragment() {
  ALBEDO = v[0] + w[0];
}
Note
Global arrays use the same syntax as local arrays, except with a const
or uniform added to their declaration. Note that uniform arrays can't
have a default value.
Constantes
Utilisez le mot-clé const avant la déclaration de la variable pour rendre cette variable immuable, ce qui signifie qu'elle ne peut pas être modifiée. Tous les types de base, sauf les samplers, peuvent être déclarés comme des constantes. L'accès et l'utilisation d'une valeur constante est légèrement plus rapide que l'utilisation d'un uniforme. Les constantes doivent être initialisées lors de leur déclaration.
const vec2 a = vec2(0.0, 1.0);
vec2 b;

a = b; // invalid
b = a; // valid
Les constantes ne peuvent pas être modifiées et ne peuvent pas non plus avoir d'indices, mais plusieurs d'entre elles (si elles ont le même type) peuvent être déclarées dans une seule expression, par exemple
const vec2 V1 = vec2(1, 1), V2 = vec2(2, 2);
Comme les variables, les tableaux peuvent aussi être déclarés avec const.
const float arr[] = { 1.0, 0.5, 0.0 };

arr[0] = 1.0; // invalid

COLOR.r = arr[0]; // valid
Les constantes peuvent être déclarées à la fois globalement (en dehors de toute fonction) ou localement (à l'intérieur d'une fonction). Les constantes globales sont utiles lorsque vous voulez avoir accès à une valeur dans tout votre shader qui n'a pas besoin d'être modifiée. Comme les uniformes, les constantes globales sont partagées entre tous les étages de shaders, mais elles ne sont pas accessibles en dehors du shader.
shader_type spatial;

const float GOLDEN_RATIO = 1.618033988749894;
Les constantes du type float doivent être initialisées en utilisant la notation . après la partie décimale ou en utilisant la notation scientifique. Le post-suffix f optionnel est également supporté.
float a = 1.0;
float b = 1.0f; // same, using suffix for clarity
float c = 1e-1; // gives 0.1 by using the scientific notation
Les constantes du type uint (entier non signé) doivent avoir un suffixe u pour les différencier des entiers signés. Sinon, cela peut être fait en utilisant la fonction de conversion intégrée uint(x).
uint a = 1u;
uint b = uint(1);
Structs
Les structures sont des types composés qui peuvent être utilisés pour une meilleure abstraction du code du shader. Vous pouvez les déclarer à la portée globale comme ceci :
struct PointLight {
    vec3 position;
    vec3 color;
    float intensity;
};
Après la déclaration, vous pouvez les instancier et les initialiser comme ceci :
void fragment()
{
    PointLight light;
    light.position = vec3(0.0);
    light.color = vec3(1.0, 0.0, 0.0);
    light.intensity = 0.5;
}
Ou utiliser le constructeur de struct à la même fin :
PointLight light = PointLight(vec3(0.0), vec3(1.0, 0.0, 0.0), 0.5);
Les structures peuvent contenir d'autres structures ou tableaux, vous pouvez également les considérer comme une constante globale :
shader_type spatial;

...

struct Scene {
    PointLight lights[2];
};

const Scene scene = Scene(PointLight[2](PointLight(vec3(0.0, 0.0, 0.0), vec3(1.0, 0.0, 0.0), 1.0), PointLight(vec3(0.0, 0.0, 0.0), vec3(1.0, 0.0, 0.0), 1.0)));

void fragment()
{
    ALBEDO = scene.lights[0].color;
}
Vous pouvez aussi les passer à des fonctions :
shader_type canvas_item;

...

Scene construct_scene(PointLight light1, PointLight light2) {
    return Scene({light1, light2});
}

void fragment()
{
    COLOR.rgb = construct_scene(PointLight(vec3(0.0, 0.0, 0.0), vec3(1.0, 0.0, 0.0), 1.0), PointLight(vec3(0.0, 0.0, 0.0), vec3(1.0, 0.0, 1.0), 1.0)).lights[0].color;
}
Opérateurs
Le langage de shading de Godot prend en charge le même ensemble d'opérateurs que GLSL ES 3.0. Vous trouverez ci-dessous la liste de ces derniers par ordre de priorité :
Priorité |
Classe |
Opérateur |
1 (le plus élevé) |
groupement entre parenthèses |
() |
2 |
unaire |
+, -, !, ~ |
3 |
multiplicatif |
/, *, % |
4 |
additif |
+, - |
5 |
décalage par bits |
<<, >> |
6 |
relationnel |
<, >, <=, >= |
7 |
égalité |
==, != |
8 |
bit-wise ET |
& |
9 |
bit-wise OU exclusif |
^ |
10 |
bit-wise OU inclusif |
| |
11 |
ET logique |
&& |
12 (le plus bas) |
OU inclusif logique |
|| |
Note
Most operators that accept vectors or matrices (multiplication, division, etc) operate component-wise, meaning the function is applied to the first value of each vector and then on the second value of each vector, etc. Some examples:
Opération |
Opération scalaire équivalente |
|---|---|
|
|
|
|
|
|
The GLSL Language Specification says under section 5.10 Vector and Matrix Operations:
With a few exceptions, operations are component-wise. Usually, when an operator operates on a vector or matrix, it is operating independently on each component of the vector or matrix, in a component-wise fashion. [...] The exceptions are matrix multiplied by vector, vector multiplied by matrix, and matrix multiplied by matrix. These do not operate component-wise, but rather perform the correct linear algebraic multiply.
Contrôle de flux
Le langage de Shading de Godot prend en charge les types de contrôle de flux les plus courants :
// `if`, `else if` and `else`.
if (cond) {

} else if (other_cond) {

} else {

}

// Ternary operator.
// This is an expression that behaves like `if`/`else` and returns the value.
// If `cond` evaluates to `true`, `result` will be `9`.
// Otherwise, `result` will be `5`.
int result = cond ? 9 : 5;

// `switch`.
switch (i) { // `i` should be a signed integer expression.
    case -1:
        break;
    case 0:
        return; // `break` or `return` to avoid running the next `case`.
    case 1: // Fallthrough (no `break` or `return`): will run the next `case`.
    case 2:
        break;
    //...
    default: // Only run if no `case` above matches. Optional.
        break;
}

// `for` loop. Best used when the number of elements to iterate on
// is known in advance.
for (int i = 0; i < 10; i++) {

}

// `while` loop. Best used when the number of elements to iterate on
// is not known in advance.
while (cond) {

}

// `do while`. Like `while`, but always runs at least once even if `cond`
// never evaluates to `true`.
do {

} while (cond);
Gardez à l'esprit que, dans les GPU modernes, une boucle infinie peut exister et peut geler votre application (y compris l'éditeur). Godot ne peut pas vous protéger de ça, alors faites attention à ne pas faire cette erreur !
De plus, en comparant les valeurs flottantes par rapport à un nombre, assurez-vous de les comparer à une plage au lieu d'un nombre exact.
Une comparaison comme if (valeur == 0,3) peut ne pas être évaluée à true. Les mathématiques des flottants sont souvent approximatifs et peuvent défier les attentes. Ils peuvent également se comporter différemment selon le matériel.
Ne faites pas ceci.
float value = 0.1 + 0.2;

// May not evaluate to `true`!
if (value == 0.3) {
    // ...
}
Au lieu de cela, effectuez toujours une comparaison de plage avec une valeur epsilon. Plus large est le nombre à virgule flottante (et moins précis est le nombre à virgule flottante), plus la valeur d’epsilon devrait être grande.
const float EPSILON = 0.0001;
if (value >= 0.3 - EPSILON && value <= 0.3 + EPSILON) {
    // ...
}
Voir floating-point-gui.de pour plus d'information.
Jeter
Fragment, light, and custom functions (called from fragment or light) can use the
discard keyword. If used, the fragment is discarded and nothing is written.
Beware that discard has a performance cost when used, as it will prevent the
depth prepass from being effective on any surfaces using the shader. Also, a
discarded pixel still needs to be rendered in the vertex shader, which means a
shader that uses discard on all of its pixels is still more expensive to
render compared to not rendering any object in the first place.
Fonctions
Il est possible de définir des fonctions dans un shader Godot. Elles utilisent la syntaxe suivante :
ret_type func_name(args) {
    return ret_type; // if returning a value
}

// a more specific example:

int sum2(int a, int b) {
    return a + b;
}
You can only use functions that have been defined above (higher in the editor) the function from which you are calling them. Redefining a function that has already been defined above (or is a built-in function name) will cause an error.
Les arguments de fonction peuvent avoir des qualificateurs spéciaux :
in : Signifie que l'argument est seulement en lecture seule (par défaut).
out : Cela signifie que l'argument est en écriture seule.
inout : Signifie que l'argument est entièrement passé par la référence.
const: Means the argument is a constant and cannot be changed, may be combined with in qualifier.
Exemple ci-dessous :
void sum2(int a, int b, inout int result) {
    result = a + b;
}
Function overloading is supported. You can define multiple functions with the same
name, but different arguments. Note that implicit casting in overloaded
function calls is not allowed, such as from int to float (1 to 1.0).
vec3 get_color(int t) {
    return vec3(1, 0, 0); // Red color.
}
vec3 get_color(float t) {
    return vec3(0, 1, 0); // Green color.
}
void fragment() {
    vec3 red = get_color(1);
    vec3 green = get_color(1.0);
}
Varyings
Pour envoyer des données de la fonction de traitement de sommets à la fonction de traitement de fragments, des varyings sont utilisées. Ils sont définis pour chaque sommet primitif dans le traitement de sommets, et la valeur est interpolée pour chaque pixel dans le traitement de fragments.
shader_type spatial;

varying vec3 some_color;

void vertex() {
    some_color = NORMAL; // Make the normal the color.
}

void fragment() {
    ALBEDO = some_color;
}

void light() {
    DIFFUSE_LIGHT = some_color * 100; // optionally
}
Il est possible d'utiliser un tableau comme Varying :
shader_type spatial;

varying float var_arr[3];

void vertex() {
    var_arr[0] = 1.0;
    var_arr[1] = 0.0;
}

void fragment() {
    ALBEDO = vec3(var_arr[0], var_arr[1], var_arr[2]); // red color
}
Il est également possible d'envoyer des données depuis fragment vers les processeurs light en utilisant le mot clé varying. Pour ce faire, vous pouvez l'affecter dans fragment et l'utiliser plus tard dans la fonction light.
shader_type spatial;

varying vec3 some_light;

void fragment() {
    some_light = ALBEDO * 100.0; // Make a shining light.
}

void light() {
    DIFFUSE_LIGHT = some_light;
}
Notez qu'un varying ne peut pas être attribué dans les fonctions personnalisées ou dans un processeur de lumière comme :
shader_type spatial;

varying float test;

void foo() {
    test = 0.0; // Error.
}

void vertex() {
    test = 0.0;
}

void light() {
    test = 0.0; // Error too.
}
Cette limite a été introduite pour empêcher un usage incorrect avec l'initialisation.
Qualificateurs d'interpolation
Certaines valeurs sont interpolées pendant le pipeline de shading. Vous pouvez modifier la façon dont ces interpolations sont effectuées en utilisant les qualificateurs d'interpolation.
shader_type spatial;

varying flat vec3 our_color;

void vertex() {
    our_color = COLOR.rgb;
}

void fragment() {
    ALBEDO = our_color;
}
Il y a deux qualificateur d'interpolation possibles :
Qualificateur |
Description |
|---|---|
flat |
La valeur n'est pas interpolée. |
smooth |
La valeur est interpolée de façon à corriger la perspective. C'est la valeur par défaut. |
Uniforms
Passing values to shaders is possible with uniforms, which are defined in the
global scope of the shader, outside of functions. When a shader is later
assigned to a material, the uniforms will appear as editable parameters in the
material's inspector. Uniforms can't be written from within the shader. Any
data type except for void can be a uniform.
shader_type spatial;

uniform float some_value;

uniform vec3 colors[3];
Vous pouvez mettre des uniforms dans l'éditeur dans l'inspecteur du matériau. Sinon, vous pouvez les définir depuis le code.
Uniform hints
Godot provides optional uniform hints to make the compiler understand what the uniform is used for, and how the editor should allow users to modify it.
shader_type spatial;

uniform vec4 color : source_color;
uniform float amount : hint_range(0, 1);
uniform vec4 other_color : source_color = vec4(1.0); // Default values go after the hint.
uniform sampler2D image : source_color;
Des valeurs par défaut peuvent également être attribuées aux uniforms :
shader_type spatial;

uniform vec4 some_vector = vec4(0.0);
uniform vec4 some_color : source_color = vec4(1.0);
Note that when adding a default value and a hint, the default value goes after the hint.
Full list of uniform hints below:
Type |
Suggestion |
Description |
|---|---|---|
vec3, vec4 |
source_color |
Utilisé comme couleur. |
int |
hint_enum("Chaîne1", "Chaîne2") |
Displays int input as a dropdown widget in the editor. |
int, float |
hint_range(min, max[, step]) |
Limité aux valeurs d'un intervalle (avec min/max/étape). |
sampler2D |
source_color |
Used as albedo color. |
sampler2D |
hint_normal |
Utilisé comme une NormalMap. |
sampler2D |
hint_default_white |
As value or albedo color, default to opaque white. |
sampler2D |
hint_default_black |
As value or albedo color, default to opaque black. |
sampler2D |
hint_default_transparent |
As value or albedo color, default to transparent black. |
sampler2D |
hint_anisotropy |
Comme flowmap, par défaut à droite. |
sampler2D |
hint_roughness[_r, _g, _b, _a, _normal, _gray] |
Used for roughness limiter on import (attempts reducing specular aliasing).
|
sampler2D |
filter[_nearest, _linear][_mipmap][_anisotropic] |
Enabled specified texture filtering. |
sampler2D |
repeat[_enable, _disable] |
Répétition de texture activée. |
sampler2D |
hint_screen_texture |
La texture est la texture de l'écran. |
sampler2D |
hint_depth_texture |
La texture est la texture de profondeur. |
sampler2D |
hint_normal_roughness_texture |
Texture is the normal roughness texture (only supported in Forward+). |
Utiliser hint_enum
You can access int values as a readable dropdown widget using the hint_enum uniform:
uniform int noise_type : hint_enum("OpenSimplex2", "Cellular", "Perlin", "Value") = 0;
You can assign explicit values to the hint_enum uniform using colon syntax similar to GDScript:
uniform int character_speed: hint_enum("Slow:30", "Average:60", "Very Fast:200") = 60;
The value will be stored as an integer, corresponding to the index of the selected
option (i.e. 0, 1, or 2) or the value assigned by colon syntax
(i.e. 30, 60, or 200). When setting the value with
set_shader_parameter(), you must use the integer value, not the String
name.
Utiliser source_color
Any texture which contains sRGB color data requires a source_color hint
in order to be correctly sampled. This is because Godot renders in linear
color space, but some textures contain sRGB color data. If this hint is not
used, the texture will appear washed out.
Albedo and color textures should typically have a source_color hint. Normal,
roughness, metallic, and height textures typically do not need a source_color
hint.
Using source_color hint is required in the Forward+ and Mobile renderers,
and in canvas_item shaders when HDR 2D
is enabled. The source_color hint is optional for the Compatibility renderer,
and for canvas_item shaders if HDR 2D is disabled. However, it is
recommended to always use the source_color hint, because it works even
if you change renderers or disable HDR 2D.
Uniform groups
To group multiple uniforms in a section in the inspector, you can use a
group_uniform keyword like this:
group_uniforms MyGroup;
uniform sampler2D test;
You can close the group by using:
group_uniforms;
The syntax also supports subgroups (it's not mandatory to declare the base group before this):
group_uniforms MyGroup.MySubgroup;
Global uniforms
Sometimes, you want to modify a parameter in many different shaders at once.
With a regular uniform, this takes a lot of work as all these shaders need to be
tracked and the uniform needs to be set for each of them. Global uniforms allow
you to create and update uniforms that will be available in all shaders, in
every shader type (canvas_item, spatial, particles, sky and
fog).
Global uniforms are especially useful for environmental effects that affect many objects in a scene, like having foliage bend when the player is nearby, or having objects move with the wind.
Note
Global uniforms are not the same as global scope for an individual shader. While regular uniforms are defined outside of shader functions and are therefore the global scope of the shader, global uniforms are global to all shaders in the entire project (but within each shader, are also in the global scope).
To create a global uniform, open the Project Settings then go to the Shader Globals tab. Specify a name for the uniform (case-sensitive) and a type, then click Add in the top-right corner of the dialog. You can then edit the value assigned to the uniform by clicking the value in the list of uniforms:

Adding a global uniform in the Shader Globals tab of the Project Settings
After creating a global uniform, you can use it in a shader as follows:
shader_type canvas_item;

global uniform vec4 my_color;

void fragment() {
    COLOR = my_color.rgb;
}
Note that the global uniform must exist in the Project Settings at the time
the shader is saved, or compilation will fail. While you can assign a default
value using global uniform vec4 my_color = ... in the shader code, it will
be ignored as the global uniform must always be defined in the Project Settings
anyway.
To change the value of a global uniform at runtime, use the RenderingServer.global_shader_parameter_set method in a script:
RenderingServer.global_shader_parameter_set("my_color", Color(0.3, 0.6, 1.0))
Assigning global uniform values can be done as many times as desired without impacting performance, as setting data doesn't require synchronization between the CPU and GPU.
You can also add or remove global uniforms at runtime:
RenderingServer.global_shader_parameter_add("my_color", RenderingServer.GLOBAL_VAR_TYPE_COLOR, Color(0.3, 0.6, 1.0))
RenderingServer.global_shader_parameter_remove("my_color")
Adding or removing global uniforms at runtime has a performance cost, although it's not as pronounced compared to getting global uniform values from a script (see the warning below).
Avertissement
While you can query the value of a global uniform at runtime in a script
using RenderingServer.global_shader_parameter_get("uniform_name"), this
has a large performance penalty as the rendering thread needs to synchronize
with the calling thread.
Therefore, it's not recommended to read global shader uniform values continuously in a script. If you need to read values in a script after setting them, consider creating an autoload where you store the values you need to query at the same time you're setting them as global uniforms.
Uniforms par instance
Note
Per-instance uniforms are available in both canvas_item (2D) and spatial (3D) shaders.
Sometimes, you want to modify a parameter on each node using the material. As an example, in a forest full of trees, when you want each tree to have a slightly different color that is editable by hand. Without per-instance uniforms, this requires creating a unique material for each tree (each with a slightly different hue). This makes material management more complex, and also has a performance overhead due to the scene requiring more unique material instances. Vertex colors could also be used here, but they'd require creating unique copies of the mesh for each different color, which also has a performance overhead.
Per-instance uniforms are set on each GeometryInstance3D, rather than on each Material instance. Take this into account when working with meshes that have multiple materials assigned to them, or MultiMesh setups.
shader_type spatial;

// Provide a hint to edit as a color. Optionally, a default value can be provided.
// If no default value is provided, the type's default is used (e.g. opaque black for colors).
instance uniform vec4 my_color : source_color = vec4(1.0, 0.5, 0.0, 1.0);

void fragment() {
    ALBEDO = my_color.rgb;
}
After saving the shader, you can change the per-instance uniform's value using the inspector:
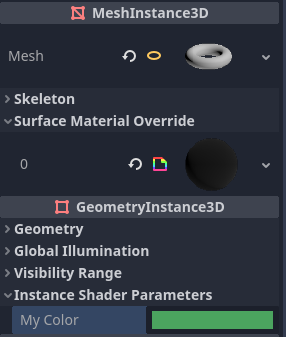
Setting a per-instance uniform's value in the GeometryInstance3D section of the inspector
Per-instance uniform values can also be set at runtime using set_instance_shader_parameter method on a node that inherits from GeometryInstance3D:
$MeshInstance3D.set_instance_shader_parameter("my_color", Color(0.3, 0.6, 1.0))
When using per-instance uniforms, there are some restrictions you should be aware of:
Per-instance uniforms do not support textures, only regular scalar and vector types. As a workaround, you can pass a texture array as a regular uniform, then pass the index of the texture to be drawn using a per-instance uniform.
There is a practical maximum limit of 16 instance uniforms per shader.
If your mesh uses multiple materials, the parameters for the first mesh material found will "win" over the subsequent ones, unless they have the same name, index and type. In this case, all parameters are affected correctly.
If you run into the above situation, you can avoid clashes by manually specifying the index (0-15) of the instance uniform by using the
instance_indexhint:
instance uniform vec4 my_color : source_color, instance_index(5);
Setting uniforms from code
You can set uniforms from GDScript using the set_shader_parameter() method:
material.set_shader_parameter("some_value", some_value)

material.set_shader_parameter("colors", [Vector3(1, 0, 0), Vector3(0, 1, 0), Vector3(0, 0, 1)])
Note
The first argument to set_shader_parameter() is the name of the uniform
in the shader. It must match exactly to the name of the uniform in
the shader or else it will not be recognized.
GDScript utilise des types de variables différents de ceux de GLSL, donc lors du passage des variables de GDScript aux shaders, Godot convertit le type automatiquement. Vous trouverez ci-dessous un tableau des types correspondants :
type GLSL |
Type GDScript |
Notes |
|---|---|---|
bool |
bool |
|
bvec2 |
int |
Bitwise packed int where bit 0 (LSB) corresponds to x. For example, a bvec2 of (bx, by) could be created in the following way: bvec2_input: int = (int(bx)) | (int(by) << 1)
|
bvec3 |
int |
Bitwise packed int where bit 0 (LSB) corresponds to x. |
bvec4 |
int |
Bitwise packed int where bit 0 (LSB) corresponds to x. |
int |
int |
|
ivec2 |
Vector2i |
|
ivec3 |
Vector3i |
|
ivec4 |
Vector4i |
|
uint |
int |
|
uvec2 |
Vector2i |
|
uvec3 |
Vector3i |
|
uvec4 |
Vector4i |
|
float |
float |
|
vec2 |
Vector2 |
|
vec3 |
Vector3, Color |
When Color is used, it will be interpreted as (r, g, b). |
vec4 |
Vector4, Color, Rect2, Plane, Quaternion |
When Color is used, it will be interpreted as (r, g, b, a). When Rect2 is used, it will be interpreted as (position.x, position.y, size.x, size.y). When Plane is used it will be interpreted as (normal.x, normal.y, normal.z, d). |
mat2 |
Transform2D |
|
mat3 |
Basis |
|
mat4 |
Projection, Transform3D |
When a Transform3D is used, the w Vector is set to the identity. |
sampler2D |
Texture2D |
|
isampler2D |
Texture2D |
|
usampler2D |
Texture2D |
|
Sampler2DArray |
Texture2DArray |
|
isampler2DArray |
Texture2DArray |
|
usampler2DArray |
Texture2DArray |
|
sampler3D |
Texture3D |
|
isampler3D |
Texture3D |
|
usampler3D |
Texture3D |
|
samplerCube |
Cubemap |
See Changing import type for instructions on importing cubemaps for use in Godot. |
samplerCubeArray |
CubemapArray |
Only supported in Forward+ and Mobile, not Compatibility. |
samplerExternalOES |
ExternalTexture |
Only supported in Compatibility/Android platform. |
Note
Be careful when setting shader uniforms from GDScript, since no error will be thrown if the type does not match. Your shader will just exhibit undefined behavior. Specifically, this includes setting a GDScript int/float (64 bit) into a Godot shader language int/float (32 bit). This may lead to unintended consequences in cases where high precision is required.
Uniform limits
There is a limit to the total size of shader uniforms that you can use
in a single shader. On most desktop platforms, this limit is 65536
bytes, or 4096 vec4 uniforms. On mobile platforms, the limit is
typically 16384 bytes, or 1024 vec4 uniforms. Vector uniforms
smaller than a vec4, such as vec2 or vec3, are padded to
the size of a vec4. Scalar uniforms such as int or float
are not padded, and bool is padded to the size of an int.
Arrays count as the total size of their contents. If you need a uniform array that is larger than this limit, consider packing the data into a texture instead, since the contents of a texture do not count towards this limit, only the size of the sampler uniform.
Variables intégrées
A large number of built-in variables are available, like UV, COLOR and
VERTEX. What variables are available depends on the type of shader
(spatial, canvas_item, particle, etc) and the
function used (vertex, fragment, light, start, process,
``sky, or fog). For a list of the built-in variables that are available,
please see the corresponding pages:
Fonctions intégrées
Un grand nombre de fonctions intégrées sont prises en charge, conformément à GLSL ES 3.0. Voir la page Fonctions intégrées pour plus de détails.
Commentaires
The shading language supports the same comment syntax as used in C# and C++, using
//for single-line comments and/* */for multi-line comments:Additionally, you can use documentation comments that are displayed in the inspector when hovering a shader parameter. Documentation comments are currently only supported when placed immediately above a
uniformdeclaration. These documentation comments only support the multiline comment syntax and must use two leading asterisks (/**) instead of just one (/*):The asterisks on the follow-up lines are not required, but are recommended as per the Guide de style des shaders. These asterisks are automatically stripped by the inspector, so they won't appear in the tooltip.