Up to date
This page is up to date for Godot 4.2.
If you still find outdated information, please open an issue.
ヘッドアップディスプレイ
このゲームに必要な最後の要素は、スコアや"ゲームオーバー"のメッセージ、リスタートボタンなどを表示するユーザーインターフェイス(UI)です。
Create a new scene, click the "Other Node" button and add a CanvasLayer node named
HUD. "HUD" stands for "heads-up display", an informational display that
appears as an overlay on top of the game view.
CanvasLayerノードを使用すると、ゲームの他の部分よりも上のレイヤにUI要素を描画することができるため、表示される情報がプレイヤーやモブなどのゲーム要素によって隠されることがなくなります。
HUDには、次の情報を表示する必要があります:
ScoreTimerによって変更されるスコア。「Game Over」や「Get Ready! (よーい!)」 などのメッセージ
ゲームを開始する「スタート」ボタン。
UI要素の基本ノードはコントロールです。UIを作成するには、ラベルとボタンの2種類のコントロールノードを使用します。
HUD ノードの子として次を作成します:
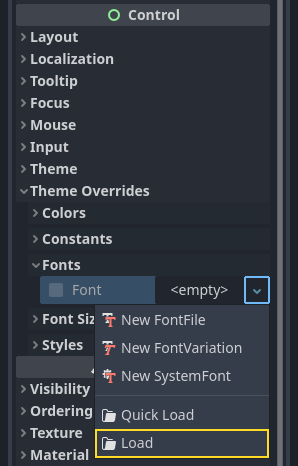
ScoreLabel をクリックし、インスペクタのTextフィールドに数字を入力します。 Control ノードのデフォルトのフォントは小さく、うまくスケールしません。そこで、ゲームアセットに含まれる 「Xolonium-Regular.ttf」というフォントファイルがあります。 このフォントを使用するには、次のようにしてください:
"Theme Overrides > Fonts" で 「読み込み」を選択して "Xolonium-Regular.ttf" を選択して下さい。
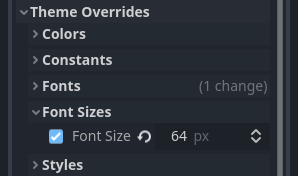
フォントサイズがまだ小さいので、"Theme Overrides > Font Sizes" で 64 に増やしてください。 Message と StartButton ノードも同じように変更します。
注釈
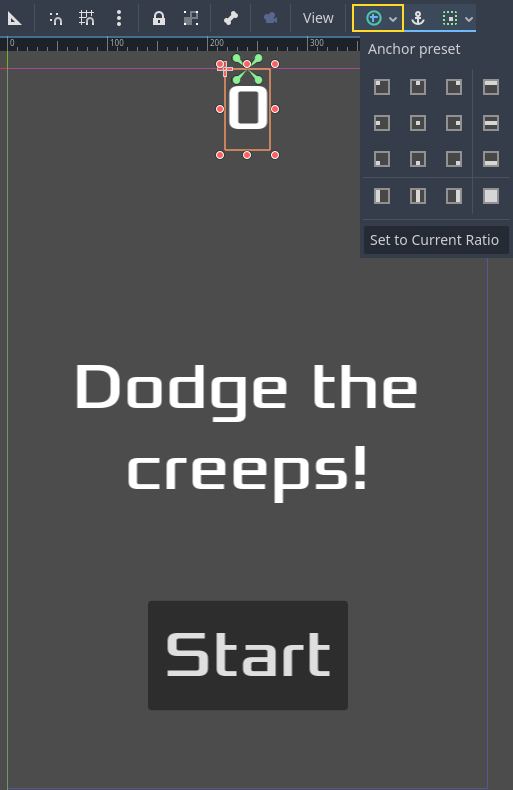
アンカー : Control ノードには位置とサイズがありますが、アンカーもあります。アンカーは原点 (ノードの端の基準点) を定義します。
以下のようにノードを配置します。ノードをドラッグして手動で配置することもできますが、より正確な配置を行うには "アンカーのプリセット" を使用します。
ScoreLabel
0というテキストを追加します。"Horizontal Alignment" と "Vertical Alignment" を
Centerに設定します。"アンカーのプリセット" で
中央上を選択します。
Message
Add the text
Dodge the Creeps!."Horizontal Alignment" と "Vertical Alignment" を
Centerに設定します。"Autowrap Mode" を
Wordに設定します。そうしないとラベルは1行のままになります。"Control - Layout/Transform" で "Size X" を
480に設定して、画面の幅全体を使うようにします。"アンカーのプリセット" で
中央を選択します。
HUDをメインに接続する
HUD シーンの作成が完了したら、 Main に戻ります。 Player のシーンと同じように HUD シーンを Main にインスタンス化し、ツリーの一番下に配置します。ツリー全体は次のようになるはずです。何も見落としていないか確認してください:

次に、 HUD 機能を Main のスクリプトに接続します。これには、 Main シーンにいくつかの追加が必要です:
ノードタブで、「メソッドにシグナルを接続」ウィンドウの「Pick」ボタンをクリックして new_game() メソッドを選択するか、 「受信側メソッド」に "new_game" と入力して、HUDの start_game のシグナルをメインノードの new_game() 関数に接続します。スクリプトの func new_game() の横に緑色の接続アイコンが表示されていることを確認してください。
new_game() で、スコア表示を更新し、「Get Ready」メッセージを表示します:
$HUD.update_score(score)
$HUD.show_message("Get Ready")
var hud = GetNode<HUD>("HUD");
hud.UpdateScore(_score);
hud.ShowMessage("Get Ready!");
game_over() では、対応する HUD 関数を呼び出す必要があります:
$HUD.show_game_over()
GetNode<HUD>("HUD").ShowGameOver();
最後に、これを _on_score_timer_timeout() に追加して、変更されたスコアと同期して表示を維持します:
$HUD.update_score(score)
GetNode<HUD>("HUD").UpdateScore(_score);
警告
Remember to remove the call to new_game() from
_ready() if you haven't already, otherwise
your game will start automatically.
これでプレイの準備が整いました! [プロジェクトを実行] ボタンをクリックします。メインシーンの選択を求められるので、 main.tscn を選択します。
古い「クリープ」を削除する
「ゲームオーバー」までプレイしてから新しいゲームを開始すると、前のゲームの「クリープ」が画面に表示されたままになっています。 それらすべて、新しいゲームの開始時には消したほうがいいでしょう。それには、すべてのモブたちに自身の削除を指示する方法が必要です。これは「グループ」機能を使えば可能です。
Mob シーンでルートノードを選択し、インスペクタの隣にある「ノード」タブをクリックしてください (ノードのシグナルを見つけるのと同じ場所です)。「シグナル」の横にある「グループ」をクリックして、新しいグループ名を入力して「追加」をクリックします。

これですべてのモブが 「mobs」グループに入るようになります。あとは、 Main内の game_over()関数に次の行を追加します。
get_tree().call_group("mobs", "queue_free")
// Note that for calling Godot-provided methods with strings,
// we have to use the original Godot snake_case name.
GetTree().CallGroup("mobs", Node.MethodName.QueueFree);
call_group() 関数はグループ内の全てのノードに対して名前付きの関数を呼び出します - この場合は全てのモブに自分自身を削除するように指示しています。
この時点で、ゲームはほぼ完成しています。次と最後のパートでは、背景、ループする音楽、キーボードショートカットを追加して、もう少し磨きをかけます。