Up to date
This page is up to date for Godot 4.2.
If you still find outdated information, please open an issue.
行列と変換
はじめに
このチュートリアルを読むには、まずベクトルの知識が必要なので、ベクトル演算 チュートリアルをよく読んで理解することをお勧めします。
このチュートリアルでは、*変換*と、行列を使用してGodotでそれらを表現する方法について説明します。行列の詳細なガイドではありません。変換はほとんどの場合、平行移動、回転、スケールとして適用されるため、これらを行列で表現する方法に焦点を当てます。
このガイドのほとんどは、Transform2D と Vector2 を使用して2Dに焦点を当てていますが、3Dでの動作は非常に似ています。
注釈
前のチュートリアルで述べたように、Godotでは、Y軸が2Dで 下 を指していることに注意することが重要です。これは、ほとんどの学校が線形代数を教える方法の反対で、学校の授業ではY軸は上向きです。
注釈
慣例では、X軸は赤、Y軸は緑、Z軸は青です。このチュートリアルは、これらの規則に合わせて色分けされていますが、原点ベクトルも青色で表します。
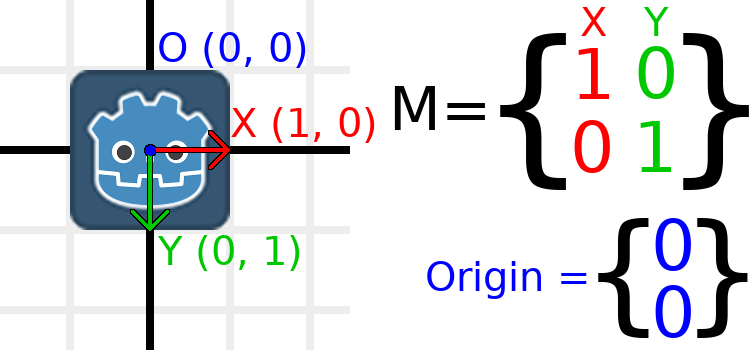
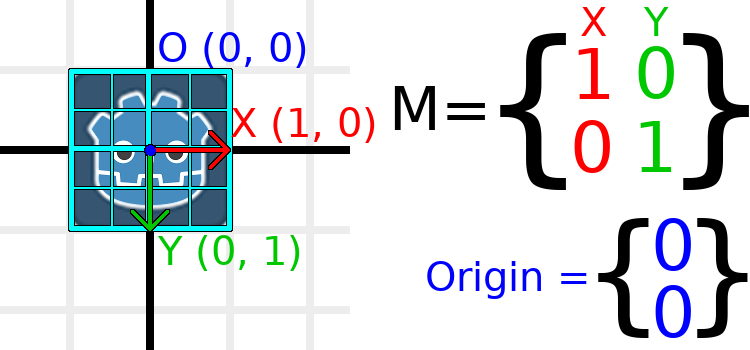
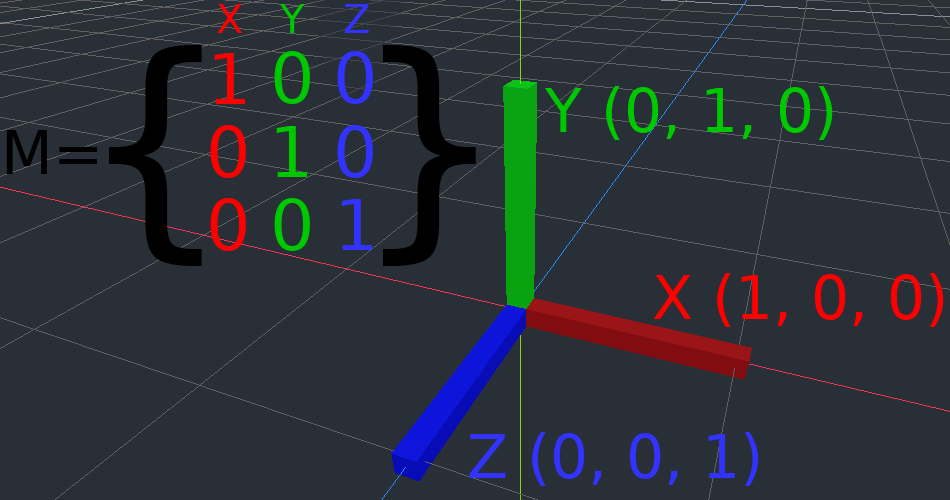
行列成分と単位行列
単位行列は、平行移動、回転、スケールのないtransformを表します。単位行列と、その成分が視覚的にどのように表示されるかを確認することから始めましょう。
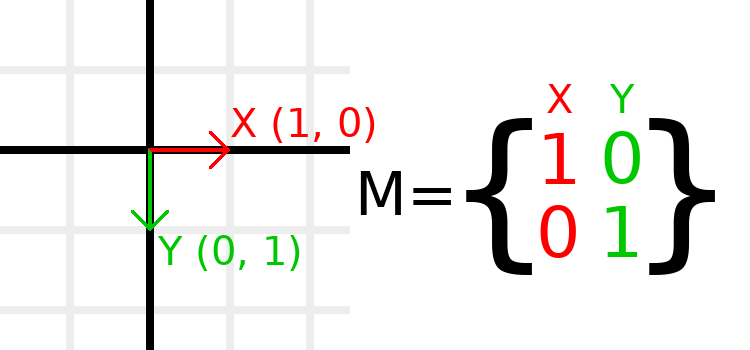
行列には行と列があり、変換行列にはそれぞれの動作に関する特定の規則があります。
上の画像では、赤のXベクトルは行列の最初の列で表され、緑のYベクトルは同様に2番目の列で表されています。列を変更すると、これらのベクトルが変更されます。次のいくつかの例で、それらの操作方法を説明します。
通常は列を操作するため、行を直接操作することを心配する必要はありません。ただし、マトリックスの行は、特定の方向への移動に寄与するベクトルを示すものと考えることができます。
When we refer to a value such as t.x.y, that's the Y component of
the X column vector. In other words, the bottom-left of the matrix.
Similarly, t.x.x is top-left, t.y.x is top-right, and t.y.y
is bottom-right, where t is the Transform2D.
変換行列のスケーリング
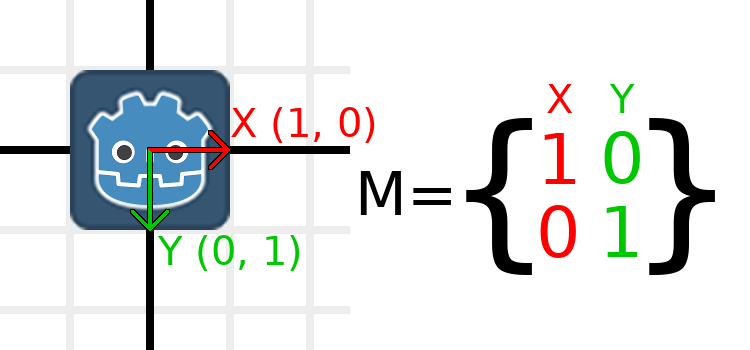
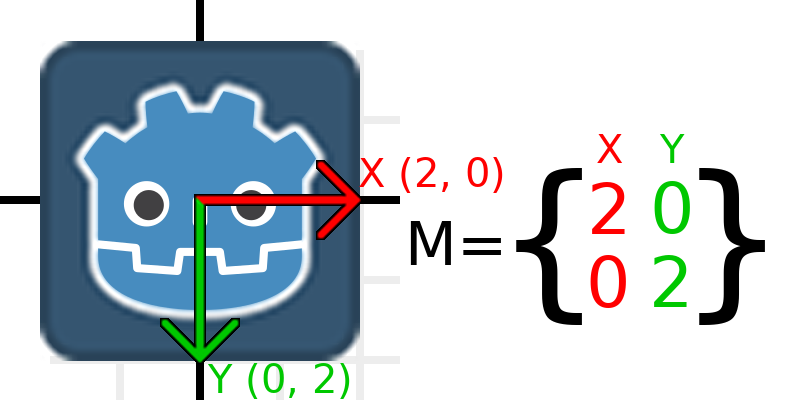
スケールの適用は、理解するのが最も簡単な操作の1つです。まず、ベクトルの下にGodotロゴを配置して、オブジェクトに対する効果を視覚的に確認できるようにします:
行列をスケーリングするために必要なことは、各成分に必要なスケールを乗算することだけです。 2倍に拡大しましょう。1 x 2が2になり、0 x 2が0になるため、次のようになります:
To do this in code, we multiply each of the vectors:
var t = Transform2D()
# Scale
t.x *= 2
t.y *= 2
transform = t # Change the node's transform to what we calculated.
Transform2D t = Transform2D.Identity;
// Scale
t.X *= 2;
t.Y *= 2;
Transform = t; // Change the node's transform to what we calculated.
元のスケールに戻したい場合は、各成分に0.5を掛けます。変換行列のスケーリングはこれでほぼすべてです。
To calculate the object's scale from an existing transformation
matrix, you can use length() on each of the column vectors.
注釈
In actual projects, you can use the scaled()
method to perform scaling.
変換行列の回転
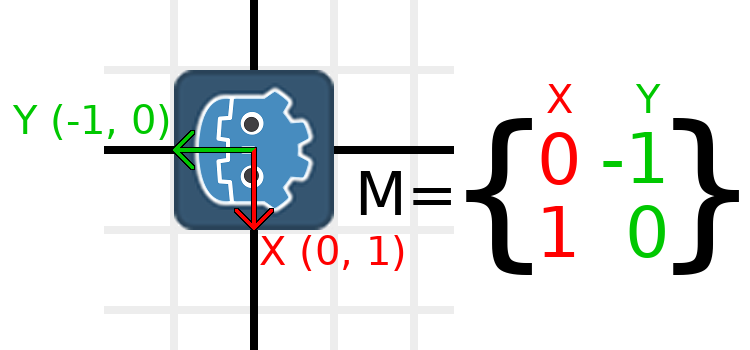
単位行列の下にGodotロゴを配置して、以前と同じ方法で開始します:
例として、Godotロゴを時計回りに90度回転させたいとしましょう。現在、X軸は右向き、Y軸は下向きです。これらを頭の中で回転させると、論理的には新しいX軸が下を向き、新しいY軸が左を指すはずです。
Godotのロゴとそのベクトルの両方をつかみ、それを中央で回転させると想像できます。回転を終了するたびに、ベクトルの向きによって行列が決まります。
We need to represent "down" and "left" in normal coordinates,
so means we'll set X to (0, 1) and Y to (-1, 0). These are
also the values of Vector2.DOWN and Vector2.LEFT.
When we do this, we get the desired result of rotating the object:
If you have trouble understanding the above, try this exercise: Cut a square of paper, draw X and Y vectors on top of it, place it on graph paper, then rotate it and note the endpoints.
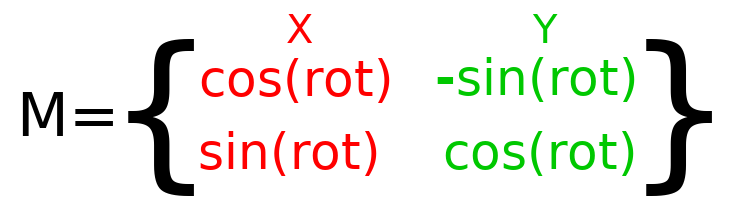
To perform rotation in code, we need to be able to calculate the values programmatically. This image shows the formulas needed to calculate the transformation matrix from a rotation angle. Don't worry if this part seems complicated, I promise it's the hardest thing you need to know.
注釈
Godotはすべての回転を度ではなくラジアンで表します。 1回転は TAU または PI*2 ラジアンで、90度の4分の1回転は TAU/4 または PI/2 ラジアンです。TAU を使用すると、通常、コードが読みやすくなります。
注釈
おもしろい事実: GodotではYが 下 であることに加えて、回転は時計回りに表されます。これにより、これらの違いが「キャンセルされる」ため、すべての数学およびトリガ関数が"Y-is-up CCW"(Yが上で反時計回り)システムと同じように動作することを意味します。両方のシステムの回転は「XからY」であると考えることができます。
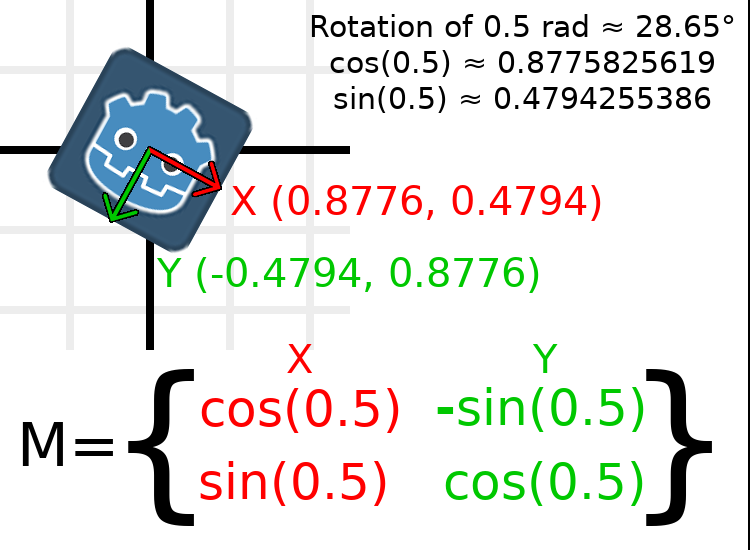
In order to perform a rotation of 0.5 radians (about 28.65 degrees), we plug in a value of 0.5 to the formula above and evaluate to find what the actual values should be:
コードでそれを行う方法を次に示します(スクリプトをNode2Dに配置します):
var rot = 0.5 # The rotation to apply.
var t = Transform2D()
t.x.x = cos(rot)
t.y.y = cos(rot)
t.x.y = sin(rot)
t.y.x = -sin(rot)
transform = t # Change the node's transform to what we calculated.
float rot = 0.5f; // The rotation to apply.
Transform2D t = Transform2D.Identity;
t.X.X = t.Y.Y = Mathf.Cos(rot);
t.X.Y = t.Y.X = Mathf.Sin(rot);
t.Y.X *= -1;
Transform = t; // Change the node's transform to what we calculated.
To calculate the object's rotation from an existing transformation
matrix, you can use atan2(t.x.y, t.x.x), where t is the Transform2D.
注釈
In actual projects, you can use the rotated()
method to perform rotations.
変換行列の基底
So far we have only been working with the x and y, vectors, which
are in charge of representing rotation, scale, and/or shearing
(advanced, covered at the end). The X and Y vectors are together
called the basis of the transformation matrix. The terms "basis"
and "basis vectors" are important to know.
You might have noticed that Transform2D actually
has three Vector2 values: x, y, and origin.
The origin value is not part of the basis, but it is part of the
transform, and we need it to represent position. From now on we'll
keep track of the origin vector in all examples. You can think of
origin as another column, but it's often better to think of it as
completely separate.
Note that in 3D, Godot has a separate Basis structure for holding the three Vector3 values of the basis, since the code can get complex and it makes sense to separate it from Transform3D (which is composed of one Basis and one extra Vector3 for the origin).
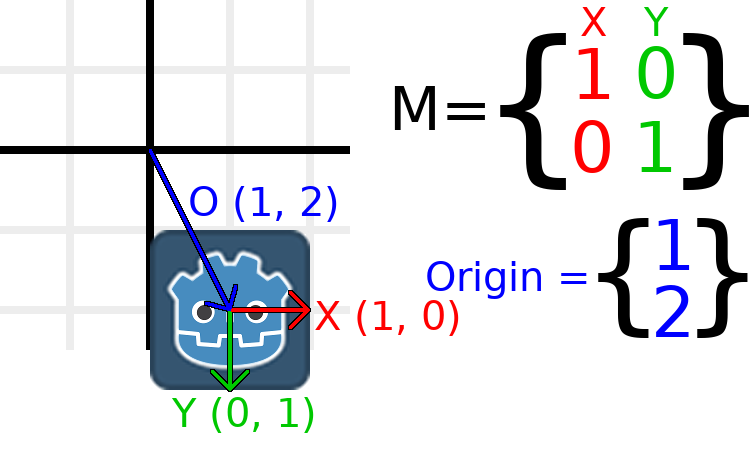
変換行列の平行移動
Changing the origin vector is called translating the transformation
matrix. Translating is basically a technical term for "moving" the
object, but it explicitly does not involve any rotation.
Let's work through an example to help understand this. We will start with the identity transform like last time, except we will keep track of the origin vector this time.
If we want to move the object to a position of (1, 2), we need
to set its origin vector to (1, 2):
There is also a translated() method, which performs a different
operation to adding or changing origin directly. The translated()
method will translate the object relative to its own rotation.
For example, an object rotated 90 degrees clockwise will move to
the right when translated() with Vector2.UP.
注釈
Godotの2Dはピクセルに基づく座標を使用するため、実際のプロジェクトでは数百という単位で並行移動を行う必要があります。
すべてをまとめる
We're going to apply everything we mentioned so far onto one transform. To follow along, create a project with a Sprite2D node and use the Godot logo for the texture resource.
平行移動を(350, 150)に設定し、-0.5 radで回転し、3でスケーリングしましょう。スクリーンショットと再現コードを投稿しましたが、コードを見ずにスクリーンショットを再現することをおすすめします!
var t = Transform2D()
# Translation
t.origin = Vector2(350, 150)
# Rotation
var rot = -0.5 # The rotation to apply.
t.x.x = cos(rot)
t.y.y = cos(rot)
t.x.y = sin(rot)
t.y.x = -sin(rot)
# Scale
t.x *= 3
t.y *= 3
transform = t # Change the node's transform to what we calculated.
Transform2D t = Transform2D.Identity;
// Translation
t.Origin = new Vector2(350, 150);
// Rotation
float rot = -0.5f; // The rotation to apply.
t.X.X = t.Y.Y = Mathf.Cos(rot);
t.X.Y = t.Y.X = Mathf.Sin(rot);
t.Y.X *= -1;
// Scale
t.X *= 3;
t.Y *= 3;
Transform = t; // Change the node's transform to what we calculated.
変換行列のせん断(高度な内容)
注釈
変換行列を 使用 する方法のみを探している場合は、チュートリアルのこのセクションをスキップしてください。このセクションでは、変換行列の理解を深める目的で、一般的に使用されない側面について説明します。
Node2D provides a shearing property out of the box.
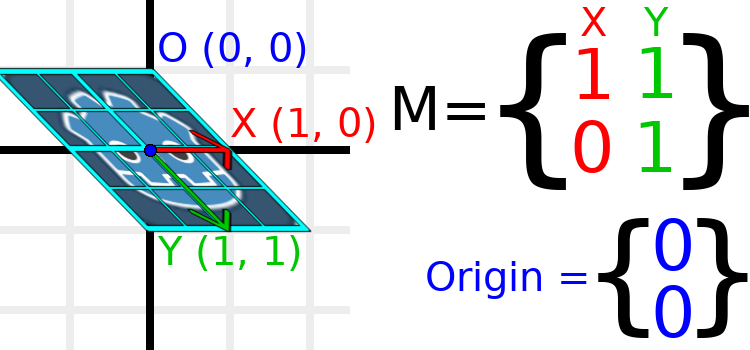
transformは、上記のアクションの組み合わせよりも自由度が高いことに気づいたかもしれません。 2D変換行列の基底には、2つの Vector2 値に合計4つの数値がありますが、回転値とスケールのVector2には3つの数値しかありません。欠落している自由度の高い概念は、せん断と呼ばれます。
Normally, you will always have the basis vectors perpendicular to each other. However, shearing can be useful in some situations, and understanding shearing helps you understand how transforms work.
視覚的にどのように見えるかを示すために、グリッドをGodotロゴにオーバーレイしましょう:
このグリッド上の各ポイントは、基底ベクトルを加算することにより取得されます。右下隅はX + Y、右上隅はX - Yです。基底ベクトルを変更すると、グリッドが基底ベクトルで構成されるため、グリッド全体が一緒に移動します。基底ベクトルにどのような変更を加えても、現在平行なグリッド上のすべての線は平行のままです。
例として、Yを(1, 1)に設定しましょう:
var t = Transform2D()
# Shear by setting Y to (1, 1)
t.y = Vector2.ONE
transform = t # Change the node's transform to what we calculated.
Transform2D t = Transform2D.Identity;
// Shear by setting Y to (1, 1)
t.Y = Vector2.One;
Transform = t; // Change the node's transform to what we calculated.
注釈
エディタでTransform2Dの生の値を設定することはできません。そのため、オブジェクトをせん断したい場合はコードを使用する 必要 があります。
ベクトルが垂直ではなくなったため、オブジェクトはせん断化されました。グリッドの下部中央は、本体に対して(0, 1)であり、それが(1, 1)のワールド位置に配置されています。
オブジェクト内の座標は、テクスチャではUV座標と呼ばれます。そのため、ここではその用語を借用しましょう。相対位置からワールド位置を見つける式はU * X + V * Yです。ここで、UとVは数値で、XとYは基底ベクトルです。
グリッドの右下隅は常に(1, 1)のUV位置にあり、(2, 1)のワールド位置にあります。これは、X*1 + Y*1すなわち (1, 0) + (1, 1)、 (1 + 1, 0 + 1)、または (2, 1)です。これは、画像の右下隅の位置に関する観察結果と一致します。
同様に、グリッドの右上隅は常に(1, -1)のUV位置にあり、X*1 + Y*-1すなわち(1, 0) - (1, 1)、(1 - 1, 0 - 1)、または(0, -1)から計算されるワールド位置(0, -1)にあります。これは、画像の右上隅の位置に関する観察結果と一致します。
変換行列がオブジェクトにどのように影響するか、基底ベクトル間の関係、およびオブジェクトの"UV"または「内部座標」のワールド位置がどのように変化するかを完全に理解できたと思います。
注釈
Godotでは、すべての変換計算は親ノードを基準にして行われます。 「ワールド位置」を参照する場合、ノードに親がある場合は、そのノードの親に対する相対的な位置になります。
追加の説明が必要な場合は、線形変換に関する3Blue1Brownの優れたビデオをご覧ください: https://www.youtube.com/watch?v=kYB8IZa5AuE
変換の実用的な応用
In actual projects, you will usually be working with transforms inside transforms by having multiple Node2D or Node3D nodes parented to each other.
However, it's useful to understand how to manually calculate the values we need. We will go over how you could use Transform2D or Transform3D to manually calculate transforms of nodes.
transform間の位置の変換
transformの内外で位置を変換したい場合が多くあります。たとえば、プレイヤーに対する相対的な位置があり、そのワールド(親相対)位置を検索する場合、またはワールド位置があり、そのプレイヤーとの相対的な位置を知りたい場合です。
We can find what a vector relative to the player would be defined in
world space as using the * operator:
# World space vector 100 units below the player.
print(transform * Vector2(0, 100))
// World space vector 100 units below the player.
GD.Print(Transform * new Vector2(0, 100));
And we can use the * operator in the opposite order to find a what world
space position would be if it was defined relative to the player:
# Where is (0, 100) relative to the player?
print(Vector2(0, 100) * transform)
// Where is (0, 100) relative to the player?
GD.Print(new Vector2(0, 100) * Transform);
注釈
transfomが(0, 0)に配置されていることが事前にわかっている場合は、代わりに"basis_xform"または"basis_xform_inv"メソッドを使用できます。これらのメソッドは、平行移動の処理をスキップします。
オブジェクトをそれ自身に対して相対的に移動する
特に3Dゲームでの一般的な操作は、オブジェクトをそれ自体に対して移動することです。たとえば、一人称シューティングゲームでは、W を押すと、キャラクターが前方(-Z軸)に移動します。
Since the basis vectors are the orientation relative to the parent, and the origin vector is the position relative to the parent, we can add multiples of the basis vectors to move an object relative to itself.
次のコードは、オブジェクトを 100単位右に移動します:
transform.origin += transform.x * 100
Transform2D t = Transform;
t.Origin += t.X * 100;
Transform = t;
3Dで移動する場合は、"x"を"basis.x"に置き換える必要があります。
注釈
In actual projects, you can use translate_object_local in 3D
or move_local_x and move_local_y in 2D to do this.
transformへの変換の適用
transformについて知っておくべき最も重要なことの1つは、transformのいくつかを一緒に使用する方法です。親ノードのtransformは、そのすべての子に影響します。例を見てみましょう。
この図では、子ノードは成分名の後に "2" があり、親ノードと区別しています。非常に多くの数字で少し圧倒されるように見えるかもしれませんが、各数字は2回(矢印の横とマトリックスにも)表示され、数字のほぼ半分がゼロであることに注意してください。
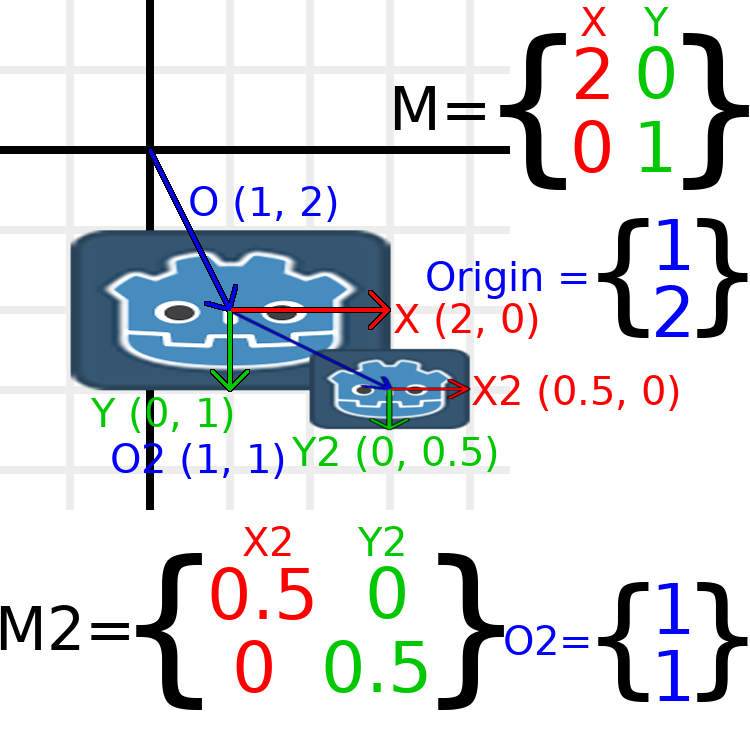
ここで行われている唯一の変換は、親ノードに(2, 1)のスケールが与えられ、子に(0.5, 0.5)のスケールが与えられ、両方のノードに位置が与えられていることです。
All child transformations are affected by the parent transformations.
The child has a scale of (0.5, 0.5), so you would expect it to be
a 1:1 ratio square, and it is, but only relative to the parent.
The child's X vector ends up being (1, 0) in world space, because
it is scaled by the parent's basis vectors.
Similarly, the child node's origin vector is set to (1, 1), but this
actually moves it (2, 1) in world space, due to the parent node's
basis vectors.
子transformからワールド空間transformへの手動計算には、次のコードを使用します:
# Set up transforms like in the image, except make positions be 100 times bigger.
var parent = Transform2D(Vector2(2, 0), Vector2(0, 1), Vector2(100, 200))
var child = Transform2D(Vector2(0.5, 0), Vector2(0, 0.5), Vector2(100, 100))

# Calculate the child's world space transform
# origin = (2, 0) * 100 + (0, 1) * 100 + (100, 200)
var origin = parent.x * child.origin.x + parent.y * child.origin.y + parent.origin
# basis_x = (2, 0) * 0.5 + (0, 1) * 0
var basis_x = parent.x * child.x.x + parent.y * child.x.y
# basis_y = (2, 0) * 0 + (0, 1) * 0.5
var basis_y = parent.x * child.y.x + parent.y * child.y.y

# Change the node's transform to what we calculated.
transform = Transform2D(basis_x, basis_y, origin)
// Set up transforms like in the image, except make positions be 100 times bigger.
Transform2D parent = new Transform2D(2, 0, 0, 1, 100, 200);
Transform2D child = new Transform2D(0.5f, 0, 0, 0.5f, 100, 100);

// Calculate the child's world space transform
// origin = (2, 0) * 100 + (0, 1) * 100 + (100, 200)
Vector2 origin = parent.X * child.Origin.X + parent.Y * child.Origin.Y + parent.Origin;
// basisX = (2, 0) * 0.5 + (0, 1) * 0 = (0.5, 0)
Vector2 basisX = parent.X * child.X.X + parent.Y * child.X.Y;
// basisY = (2, 0) * 0 + (0, 1) * 0.5 = (0.5, 0)
Vector2 basisY = parent.X * child.Y.X + parent.Y * child.Y.Y;

// Change the node's transform to what we calculated.
Transform = new Transform2D(basisX, basisY, origin);
In actual projects, we can find the world transform of the child by
applying one transform onto another using the * operator:
# Set up transforms like in the image, except make positions be 100 times bigger.
var parent = Transform2D(Vector2(2, 0), Vector2(0, 1), Vector2(100, 200))
var child = Transform2D(Vector2(0.5, 0), Vector2(0, 0.5), Vector2(100, 100))

# Change the node's transform to what would be the child's world transform.
transform = parent * child
// Set up transforms like in the image, except make positions be 100 times bigger.
Transform2D parent = new Transform2D(2, 0, 0, 1, 100, 200);
Transform2D child = new Transform2D(0.5f, 0, 0, 0.5f, 100, 100);

// Change the node's transform to what would be the child's world transform.
Transform = parent * child;
注釈
行列を乗算する場合、順序が重要です!それらを混同しないでください。
最後に、恒等変換の適用は常に何も行いません。
追加の説明が必要な場合は、行列の構成に関する3Blue1Brownの優れたビデオをご覧ください: https://www.youtube.com/watch?v=XkY2DOUCWMU
変換行列の反転
The "affine_inverse" function returns a transform that "undoes" the previous transform. This can be useful in some situations. Let's take a look at a few examples.
逆transformに通常のtransformを乗算すると、すべての変換が取り消されます:
var ti = transform.affine_inverse()
var t = ti * transform
# The transform is the identity transform.
Transform2D ti = Transform.AffineInverse();
Transform2D t = ti * Transform;
// The transform is the identity transform.
Transforming a position by a transform and its inverse results in the same position:
var ti = transform.affine_inverse()
position = transform * position
position = ti * position
# The position is the same as before.
Transform2D ti = Transform.AffineInverse();
Position = Transform * Position;
Position = ti * Position;
// The position is the same as before.
3Dではどのように機能しますか?
One of the great things about transformation matrices is that they work very similarly between 2D and 3D transformations. All the code and formulas used above for 2D work the same in 3D, with 3 exceptions: the addition of a third axis, that each axis is of type Vector3, and also that Godot stores the Basis separately from the Transform3D, since the math can get complex and it makes sense to separate it.
3Dでの平行移動、回転、拡大縮小、およびせん断の仕組みに関するすべての概念は、2Dと比較してすべて同じです。スケーリングするには、各成分を取得して乗算します。回転するには、各基底ベクトルが指す場所を変更します。並行移動するには、原点を操作します。そしてせん断するために、基底ベクトルを非直交に変更します。
必要に応じて、transformを操作して、それらがどのように機能するかを理解することをお勧めします。Godotを使用すると、インスペクタから直接3D変換行列を編集できます。Basis ベクトルと原点を2Dと3Dの両方で視覚化するのに役立つ色付きの線とキューブを含むこのプロジェクトをダウンロードできます: https://github.com/godotengine/godot-demo-projects/tree/master/misc/matrix_transform
注釈
You cannot edit Node2D's transform matrix directly in Godot 4.0's inspector. This may be changed in a future release of Godot.
追加の説明が必要な場合は、3Blue1Brownの3D線形変換に関する優れたビデオをご覧ください: https://www.youtube.com/watch?v=rHLEWRxRGiM
3Dでの回転の表現(高度な内容)
2Dと3D変換行列の最大の違いは、基底ベクトルなしで回転をそれ自体で表現する方法です。
With 2D, we have an easy way (atan2) to switch between a transformation matrix and an angle. In 3D, rotation is too complex to represent as one number. There is something called Euler angles, which can represent rotations as a set of 3 numbers, however, they are limited and not very useful, except for trivial cases.
In 3D we do not typically use angles, we either use a transformation basis (used pretty much everywhere in Godot), or we use quaternions. Godot can represent quaternions using the Quaternion struct. My suggestion to you is to completely ignore how they work under-the-hood, because they are very complicated and unintuitive.
ただし、実際にその仕組みを知っておく必要がある場合は、次の優れたリソースを参照してください:
https://www.youtube.com/watch?v=mvmuCPvRoWQ