Up to date
This page is up to date for Godot 4.2.
If you still find outdated information, please open an issue.
Creating the player scene
With the project settings in place, we can start working on the player-controlled character.
첫 번째 씬은 Player 오브젝트를 정의합니다. 별도의 플레이어 씬을 만드는 것의 장점 중 하나는 게임의 다른 부분을 만들기 전에도 별도로 테스트할 수 있다는 것입니다.
노드 구조
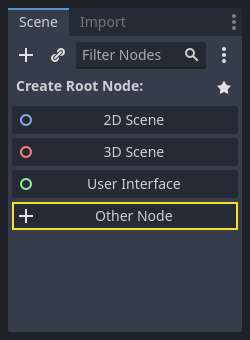
시작하려면 플레이어 오브젝트의 루트 노드를 선택해야 합니다. 일반적으로 씬의 루트 노드는 개체가 원하는 기능, 즉 개체가 *무엇*인지를 반영해야 합니다. "다른 노드(Other Node)" 버튼을 클릭하고 씬에 Area2D 노드를 추가하세요.
Godot는 씬 트리에서 노드 옆에 경고 아이콘을 보여줍니다. 지금은 무시해도 됩니다. 나중에 다룰 것입니다.
Area2D를 사용하면 플레이어와 겹치거나 충돌하는 물체를 감지할 수 있습니다. 노드를 두 번 클릭하여 노드 이름을 Player로 변경하세요. 이제 씬의 루트 노드를 설정했으므로 노드를 추가해 더 많은 기능을 줄 수 있습니다.
Before we add any children to the Player node, we want to make sure we don't
accidentally move or resize them by clicking on them. Select the node and click
the icon to the right of the lock. Its tooltip says "Make selected node's
children not selectable."

씬을 저장합니다. 씬(Scene) -> 씬 저장(Save Scene)을 클릭하거나 Windows/Linux에서는 Ctrl + S를, Mac에서는 Cmd + S를 누르세요.
참고
이 프로젝트에서, 우리는 Godot의 명명 규칙을 따를 것입니다.
GDScript: 클래스(노드)는 파스칼 표기법(PascalCase)을 사용하고, 변수와 함수는 스네이크_표기법(snake_case)을 사용하며, 상수는 전부 대문자(ALL_CAPS)를 사용합니다(GDScript 스타일 가이드 참조).
C#: Classes, export variables and methods use PascalCase, private fields use _camelCase, local variables and parameters use camelCase (See C# 스타일 가이드). Be careful to type the method names precisely when connecting signals.
스프라이트 애니메이션
Click on the Player node and add (Ctrl + A on Windows/Linux or
Cmd + A on macOS) a child node AnimatedSprite2D. The AnimatedSprite2D will handle the
appearance and animations for our player. Notice that there is a warning symbol
next to the node. An AnimatedSprite2D requires a SpriteFrames resource, which is a list of the animations it can
display. To create one, find the Sprite Frames property under the Animation tab in the Inspector and click
"[empty]" -> "New SpriteFrames". Click again to open the "SpriteFrames" panel:
On the left is a list of animations. Click the "default" one and rename it to
"walk". Then click the "Add Animation" button to create a second animation named
"up". Find the player images in the "FileSystem" tab - they're in the art
folder you unzipped earlier. Drag the two images for each animation, named
playerGrey_up[1/2] and playerGrey_walk[1/2], into the "Animation Frames"
side of the panel for the corresponding animation:
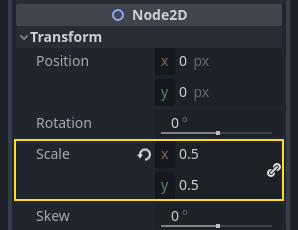
The player images are a bit too large for the game window, so we need to scale
them down. Click on the AnimatedSprite2D node and set the Scale property
to (0.5, 0.5). You can find it in the Inspector under the Node2D
heading.
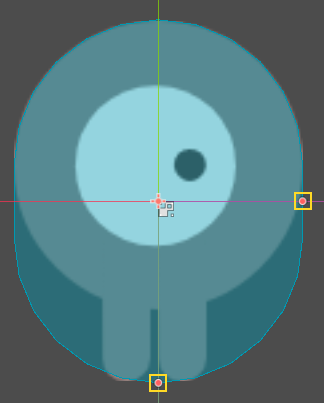
Finally, add a CollisionShape2D as a child of
Player. This will determine the player's "hitbox", or the bounds of its
collision area. For this character, a CapsuleShape2D node gives the best
fit, so next to "Shape" in the Inspector, click "[empty]" -> "New
CapsuleShape2D". Using the two size handles, resize the shape to cover the
sprite:
다 되셨다면, 당신의 Player 씬은 이렇게 되어야 합니다:

이러한 변경 후에 씬을 다시 저장하는 것을 잊지 마세요.
In the next part, we'll add a script to the player node to move and animate it. Then, we'll set up collision detection to know when the player got hit by something.