Up to date
This page is up to date for Godot 4.2.
If you still find outdated information, please open an issue.
베지어 곡선과 경로
베지어 곡선은 자연적인 기하학적 형상들의 수학적 근사입니다. 이들을 사용하면 가능한 한 적은 정보를 이용하여 최대한 높은 유연성으로 곡선을 나타낼 수 있습니다.
다른 추상적인 수학적 개념들과는 다르게, 베지어 곡선은 산업 디자인을 위해 만들어졌습니다. 이는 그래픽 소프트웨어 업계에서 매우 인기 있는 도구입니다.
이들은 우리가 이전 글에서 보았던 선형 보간법 에 의존하며, 여러 단계를 조합하여 부드러운 곡선을 만듭니다. 베지어 곡선이 어떻게 작동하는지 더 잘 이해할 수 있도록, 우선 가장 간단한 형태인 2차 베지어 곡선부터 살펴봅시다.
2차 베지어 (Quadratic Bezier)
2차 베지어 곡선을 만들기 위해, 최소한의 요구치인 점 3개를 잡아 봅시다:
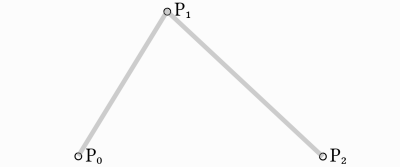
먼저 세 점을 통해서 만들어지는 두 개의 선분 각각이 가지는 두 꼭짓점을, 0과 1 사이의 t 값을 이용하여 서서히 보간합니다. 그러면 t 값을 0에서 1으로 바꿀 때 선분을 따라 이동하는 점 2개를 얻을 수 있습니다.
func _quadratic_bezier(p0: Vector2, p1: Vector2, p2: Vector2, t: float):
    var q0 = p0.lerp(p1, t)
    var q1 = p1.lerp(p2, t)
private Vector2 QuadraticBezier(Vector2 p0, Vector2 p1, Vector2 p2, float t)
{
    Vector2 q0 = p0.Lerp(p1, t);
    Vector2 q1 = p1.Lerp(p2, t);
}
얻은 두 점인 q0 과 q1 을 보간하면, 곡선을 그리며 이동하는 한 점 r 을 얻을 수 있습니다.
var r = q0.lerp(q1, t)
return r
Vector2 r = q0.Lerp(q1, t);
return r;
이와 같은 곡선을 2차 베지어 곡선 이라고 부릅니다.
(사진 출처: 위키백과)
3차 베지어 (Cubic Bezier)
바로 전 예제를 바탕으로, 세 점 대신 네 점을 사용하면 곡선을 더 잘 제어할 수 있습니다.
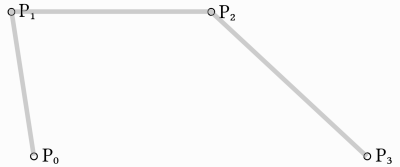
우선, p0, p1, p2, p3 이 4개의 점을 인자로 받는 함수를 정의합니다:
func _cubic_bezier(p0: Vector2, p1: Vector2, p2: Vector2, p3: Vector2, t: float):
public Vector2 CubicBezier(Vector2 p0, Vector2 p1, Vector2 p2, Vector2 p3, float t)
{

}
그 뒤 각각의 꼭짓점을 따라 선형 보간을 적용하여 점 3개를 얻습니다:
var q0 = p0.lerp(p1, t)
var q1 = p1.lerp(p2, t)
var q2 = p2.lerp(p3, t)
Vector2 q0 = p0.Lerp(p1, t);
Vector2 q1 = p1.Lerp(p2, t);
Vector2 q2 = p2.Lerp(p3, t);
같은 방법으로 점 3개를 이용해 2개의 점을 얻고:
var r0 = q0.lerp(q1, t)
var r1 = q1.lerp(q2, t)
Vector2 r0 = q0.Lerp(q1, t);
Vector2 r1 = q1.Lerp(q2, t);
마지막으로 하나의 점을 얻으면:
var s = r0.lerp(r1, t)
return s
Vector2 s = r0.Lerp(r1, t);
return s;
아래는 완성된 함수입니다:
func _cubic_bezier(p0: Vector2, p1: Vector2, p2: Vector2, p3: Vector2, t: float):
    var q0 = p0.lerp(p1, t)
    var q1 = p1.lerp(p2, t)
    var q2 = p2.lerp(p3, t)

    var r0 = q0.lerp(q1, t)
    var r1 = q1.lerp(q2, t)

    var s = r0.lerp(r1, t)
    return s
private Vector2 CubicBezier(Vector2 p0, Vector2 p1, Vector2 p2, Vector2 p3, float t)
{
    Vector2 q0 = p0.Lerp(p1, t);
    Vector2 q1 = p1.Lerp(p2, t);
    Vector2 q2 = p2.Lerp(p3, t);

    Vector2 r0 = q0.Lerp(q1, t);
    Vector2 r1 = q1.Lerp(q2, t);

    Vector2 s = r0.Lerp(r1, t);
    return s;
}
결과적으로 네 점을 따라서 보간되는 매끄러운 곡선이 그려지게 됩니다:
(사진 출처: 위키백과)
참고
3차 베지어 보간은 Vector2 를 Vector3 으로만 바꾸면 3D에서도 동일하게 작동합니다.
제어점 만들기
Building upon Cubic Bezier, we can change the way two of the points work to
control the shape of our curve freely. Instead of having p0, p1, p2
and p3, we will store them as:
point0 = p0: Is the first point, the sourcecontrol0 = p1 - p0: Is a vector relative to the first control pointcontrol1 = p3 - p2: Is a vector relative to the second control pointpoint1 = p3: Is the second point, the destination
This way, we have two points and two control points which are relative vectors to the respective points. If you've used graphics or animation software before, this might look familiar:
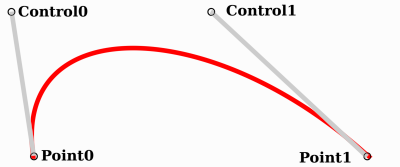
This is how graphics software presents Bezier curves to the users, and how they work and look in Godot.
Curve2D, Curve3D, Path and Path2D
There are two objects that contain curves: Curve3D and Curve2D (for 3D and 2D respectively).
They can contain several points, allowing for longer paths. It is also possible to set them to nodes: Path3D and Path2D (also for 3D and 2D respectively):
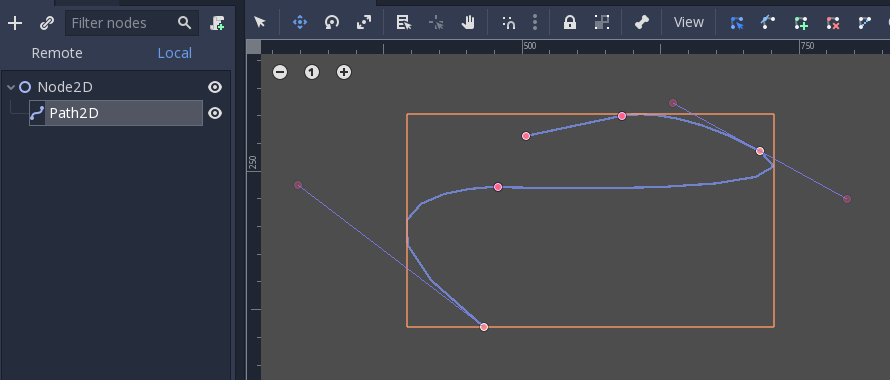
Using them, however, may not be completely obvious, so following is a description of the most common use cases for Bezier curves.
Evaluating
Only evaluating them may be an option, but in most cases it's not very useful. The big drawback with Bezier curves is that if you traverse them at constant speed, from t = 0 to t = 1, the actual interpolation will not move at constant speed. The speed is also an interpolation between the distances between points p0, p1, p2 and p3 and there is not a mathematically simple way to traverse the curve at constant speed.
Let's do an example with the following pseudocode:
var t = 0.0

func _process(delta):
    t += delta
    position = _cubic_bezier(p0, p1, p2, p3, t)
private float _t = 0.0f;

public override void _Process(double delta)
{
    _t += (float)delta;
    Position = CubicBezier(p0, p1, p2, p3, _t);
}
As you can see, the speed (in pixels per second) of the circle varies, even though t is increased at constant speed. This makes beziers difficult to use for anything practical out of the box.
그리기
Drawing beziers (or objects based on the curve) is a very common use case, but it's also not easy. For pretty much any case, Bezier curves need to be converted to some sort of segments. This is normally difficult, however, without creating a very high amount of them.
The reason is that some sections of a curve (specifically, corners) may require considerable amounts of points, while other sections may not:
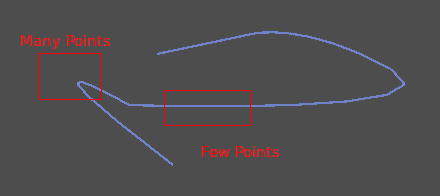
Additionally, if both control points were 0, 0 (remember they are relative vectors), the Bezier curve would just be a straight line (so drawing a high amount of points would be wasteful).
Before drawing Bezier curves, tessellation is required. This is often done with a recursive or divide and conquer function that splits the curve until the curvature amount becomes less than a certain threshold.
The Curve classes provide this via the
Curve2D.tessellate() function (which receives optional stages of recursion and angle tolerance arguments). This way, drawing something based on a curve is easier.
Traversal
The last common use case for the curves is to traverse them. Because of what was mentioned before regarding constant speed, this is also difficult.
To make this easier, the curves need to be baked into equidistant points. This way, they can be approximated with regular interpolation (which can be improved further with a cubic option). To do this, just use the Curve3D.sample_baked() method together with Curve2D.get_baked_length(). The first call to either of them will bake the curve internally.
Traversal at constant speed, then, can be done with the following pseudo-code:
var t = 0.0

func _process(delta):
    t += delta
    position = curve.sample_baked(t * curve.get_baked_length(), true)
private float _t = 0.0f;

public override void _Process(double delta)
{
    _t += (float)delta;
    Position = curve.SampleBaked(_t * curve.GetBakedLength(), true);
}
And the output will, then, move at constant speed:
