Up to date
This page is up to date for Godot 4.2.
If you still find outdated information, please open an issue.
Coding the player
In this lesson, we'll add player movement, animation, and set it up to detect collisions.
To do so, we need to add some functionality that we can't get from a built-in
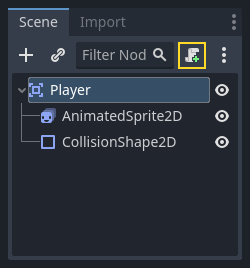
node, so we'll add a script. Click the Player node and click the "Attach
Script" button:
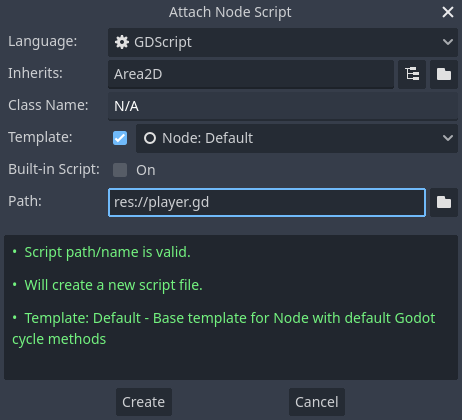
스크립트 설정 창은 기본 설정으로 냅두어도 됩니다. 그냥 "만들기(Create)"를 누르세요:
참고
C#이나 다른 언어로 스크립트를 만들려면 만들기를 누르기 전에 언어(language) 드롭 다운 메뉴에서 언어를 선택하세요.
참고
If this is your first time encountering GDScript, please read Scripting languages before continuing.
이 오브젝트가 필요로 하는 멤버 변수를 선언함으로써 시작합시다:
extends Area2D

@export var speed = 400 # How fast the player will move (pixels/sec).
var screen_size # Size of the game window.
using Godot;

public partial class Player : Area2D
{
    [Export]
    public int Speed { get; set; } = 400; // How fast the player will move (pixels/sec).

    public Vector2 ScreenSize; // Size of the game window.
}
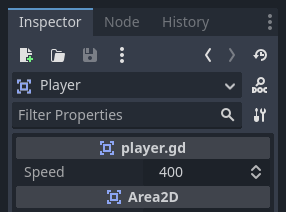
첫 번째 변수인 speed에 export 키워드를 사용하면 인스펙터(Inspector) 내에서 값을 설정할 수 있습니다. 인스펙터(Inspector)에서도 원하는 값으로 조정할 수 있어서 편리합니다. Player 노드를 선택하면 인스펙터(Inspector)의 "Script Variables" 섹션에 나타납니다. 여기서 값을 바꾸면 스크립트에 작성한 값을 오버라이드한다는 점을 기억하세요.
경고
If you're using C#, you need to (re)build the project assemblies whenever you want to see new export variables or signals. This build can be manually triggered by clicking the Build button at the top right of the editor.

Your player.gd script should already contain
a _ready() and a _process() function.
If you didn't select the default template shown above,
create these functions while following the lesson.
_ready() 함수는 노드가 씬 트리에 들어올 때 호출되는데, 이 때가 게임 창의 크기를 알아보기 좋은 순간입니다:
func _ready():
    screen_size = get_viewport_rect().size
public override void _Ready()
{
    ScreenSize = GetViewportRect().Size;
}
이제 _process() 함수를 사용해서 플레이어가 무엇을 할 지 정의할 수 있습니다. _process()는 매 프레임마다 호출되므로, 게임에서 자주 변하는 요소들을 업데이트하기 위해서 사용할 수 있습니다. 플레이어에게는, 다음과 같은 작업이 필요합니다:
입력을 확인.
주어진 방향으로 이동.
적절한 애니메이션을 재생.
First, we need to check for input - is the player pressing a key? For this game, we have 4 direction inputs to check. Input actions are defined in the Project Settings under "Input Map". Here, you can define custom events and assign different keys, mouse events, or other inputs to them. For this game, we will map the arrow keys to the four directions.
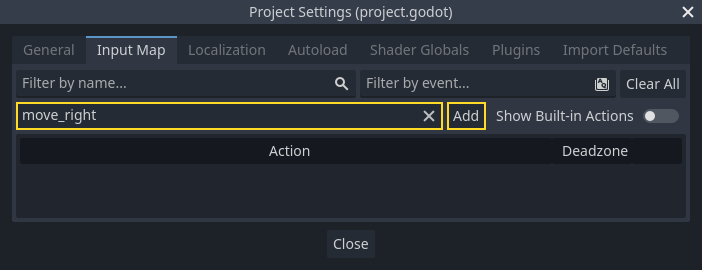
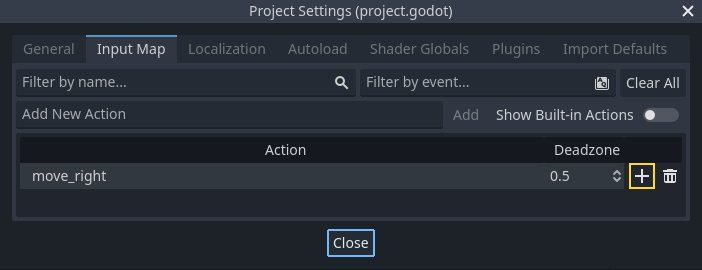
Click on Project -> Project Settings to open the project settings window and
click on the Input Map tab at the top. Type "move_right" in the top bar and
click the "Add" button to add the move_right action.
We need to assign a key to this action. Click the "+" icon on the right, to open the event manager window.
The "Listening for Input..." field should automatically be selected. Press the "right" key on your keyboard, and the menu should look like this now.
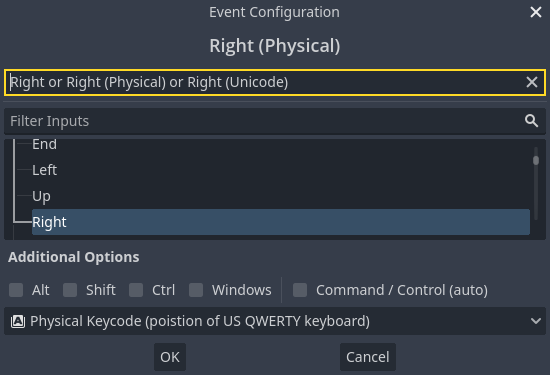
Select the "ok" button. The "right" key is now associated with the move_right action.
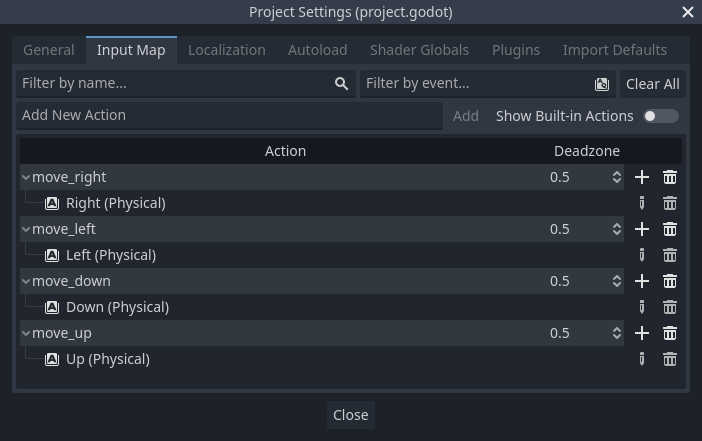
Repeat these steps to add three more mappings:
move_leftmapped to the left arrow key.move_upmapped to the up arrow key.And
move_downmapped to the down arrow key.
Your input map tab should look like this:
Click the "Close" button to close the project settings.
참고
We only mapped one key to each input action, but you can map multiple keys, joystick buttons, or mouse buttons to the same input action.
Input.is_action_pressed()를 사용해서 키가 눌러졌는지를 감지할 수 있는데, 눌러지면 true 값을 반환하고 그렇지 않으면 false 값을 반환합니다.
func _process(delta):
    var velocity = Vector2.ZERO # The player's movement vector.
    if Input.is_action_pressed("move_right"):
        velocity.x += 1
    if Input.is_action_pressed("move_left"):
        velocity.x -= 1
    if Input.is_action_pressed("move_down"):
        velocity.y += 1
    if Input.is_action_pressed("move_up"):
        velocity.y -= 1

    if velocity.length() > 0:
        velocity = velocity.normalized() * speed
        $AnimatedSprite2D.play()
    else:
        $AnimatedSprite2D.stop()
public override void _Process(double delta)
{
    var velocity = Vector2.Zero; // The player's movement vector.

    if (Input.IsActionPressed("move_right"))
    {
        velocity.X += 1;
    }

    if (Input.IsActionPressed("move_left"))
    {
        velocity.X -= 1;
    }

    if (Input.IsActionPressed("move_down"))
    {
        velocity.Y += 1;
    }

    if (Input.IsActionPressed("move_up"))
    {
        velocity.Y -= 1;
    }

    var animatedSprite2D = GetNode<AnimatedSprite2D>("AnimatedSprite2D");

    if (velocity.Length() > 0)
    {
        velocity = velocity.Normalized() * Speed;
        animatedSprite2D.Play();
    }
    else
    {
        animatedSprite2D.Stop();
    }
}
먼저 velocity를 (0, 0)으로 설정합니다. 기본적으로 플레이어는 움직이지 않아야 합니다. 그런 다음 각 입력을 확인하고 velocity에서 더하거나 빼서 최종 방향을 얻습니다. 예를 들어, 오른쪽 방향키와 아래쪽 방향키을 동시에 누르고 있으면 결과 velocity 벡터는 (1, 1)이 됩니다. 이 경우 동시에 수평과 수직 방향으로 이동하기 때문에 플레이어는 수평으로 이동할 때보다 대각선으로 더 빠르게 이동합니다.
우리는 velocity를 정규화(normalize)하면, 즉 velocity의 길이(length)를 1로 설정한 다음, 원하는 속도를 곱하면 이 문제를 방지할 수 있습니다. 이렇게 하면 더 이상 대각선 방향 이동속도가 더 빠르지 않습니다.
팁
이제까지 벡터 수학을 안 써봤거나 복습이 필요하다면 벡터에서 Godot에서 벡터를 어떻게 사용하는지 볼 수 있습니다. 보면 좋지만 나머지 튜토리얼을 위해 꼭 필수적인 것은 아닙니다.
We also check whether the player is moving so we can call play() or
stop() on the AnimatedSprite2D.
팁
$ is shorthand for get_node(). So in the code above,
$AnimatedSprite2D.play() is the same as
get_node("AnimatedSprite2D").play().
In GDScript, $ returns the node at the relative path from the
current node, or returns null if the node is not found. Since
AnimatedSprite2D is a child of the current node, we can use
$AnimatedSprite2D.
이동 방향이 있으므로 이제 플레이어의 위치를 업데이트할 수 있습니다. 또한 clamp()를 사용해 플레이어가 화면에서 나가는 것을 방지할 수 있습니다. 클램핑(Clamping)은 값을 주어진 범위로 제한하는 것을 의미합니다. _process 함수의 맨 아래에 다음을 추가합니다(else 아래에 들여쓰기가 되어 있지 않은지 확인하세요):
position += velocity * delta
position = position.clamp(Vector2.ZERO, screen_size)
Position += velocity * (float)delta;
Position = new Vector2(
    x: Mathf.Clamp(Position.X, 0, ScreenSize.X),
    y: Mathf.Clamp(Position.Y, 0, ScreenSize.Y)
);
팁
_process() 함수에 있는 매개변수 delta 는 (이전 프레임이 완료되는데 걸린 시간인) "프레임 길이(frame length)" 를 참조합니다. 이 값을 사용하면 프레임 레이트가 변경되어도 플레이어의 이동속도를 항상 일정하게 유지할 수 있습니다.
Click "Play Scene" (F6, Cmd + R on macOS) and confirm you can move the player around the screen in all directions.
경고
"디버거(Debugger)" 패널에 다음과 같은 오류가 표시되는 경우
Attempt to call function 'play' in base 'null instance' on a null
instance
this likely means you spelled the name of the AnimatedSprite2D node
wrong. Node names are case-sensitive and $NodeName must match
the name you see in the scene tree.
애니메이션 고르기
Now that the player can move, we need to change which animation the
AnimatedSprite2D is playing based on its direction. We have the "walk" animation,
which shows the player walking to the right. This animation should be flipped
horizontally using the flip_h property for left movement. We also have the
"up" animation, which should be flipped vertically with flip_v for downward
movement. Let's place this code at the end of the _process() function:
if velocity.x != 0:
    $AnimatedSprite2D.animation = "walk"
    $AnimatedSprite2D.flip_v = false
    # See the note below about boolean assignment.
    $AnimatedSprite2D.flip_h = velocity.x < 0
elif velocity.y != 0:
    $AnimatedSprite2D.animation = "up"
    $AnimatedSprite2D.flip_v = velocity.y > 0
if (velocity.X != 0)
{
    animatedSprite2D.Animation = "walk";
    animatedSprite2D.FlipV = false;
    // See the note below about boolean assignment.
    animatedSprite2D.FlipH = velocity.X < 0;
}
else if (velocity.Y != 0)
{
    animatedSprite2D.Animation = "up";
    animatedSprite2D.FlipV = velocity.Y > 0;
}
참고
위 코드의 불리언(boolean) 값 할당은 프로그래머를 위한 일반적인 축약입니다. 우리는 비교 테스트(boolean)를 수행하고 또한 boolean 값을 *할당*하기 때문에 두 가지를 동시에 수행할 수 있습니다. 아래 코드와 위의 한 줄 부울 할당 명령문을 비교해보세요:
if velocity.x < 0:
    $AnimatedSprite2D.flip_h = true
else:
    $AnimatedSprite2D.flip_h = false
if (velocity.X < 0)
{
    animatedSprite2D.FlipH = true;
}
else
{
    animatedSprite2D.FlipH = false;
}
씬을 다시 재생하고 애니메이션이 각 방향에서 올바른지 확인합니다.
팁
흔한 실수로 애니메이션 이름을 잘못 입력합니다. SpriteFrames 패널의 애니메이션 이름은 코드에 입력한 것과 일치해야 합니다. 애니메이션 이름을 "Walk"으로 지은 경우 코드에 대문자 "W"를 사용해야 합니다.
플레이어가 제대로 움직이고 있다고 생각하면 다음 줄을 _ready()에 추가해보세요. 게임이 시작될 때 플레이어가 숨겨집니다:
hide()
Hide();
콜리전 준비하기
우리는 Player가 적과 닿았다는 것을 감지하길 원하지만 아직 적을 만들지 않았습니다! 충돌이 작동하도록 우리는 Godot의 시그널(signal) 기능을 사용할 것이기 때문에 괜찮습니다.
Add the following at the top of the script. If you're using GDScript, add it after
extends Area2D. If you're using C#, add it after public partial class Player : Area2D:
signal hit
// Don't forget to rebuild the project so the editor knows about the new signal.

[Signal]
public delegate void HitEventHandler();
이것은 적과 충돌할 때 플레이어가 방출하는 "hit"라는 사용자 지정 시그널을 정의합니다. 충돌을 감지하기 위해 Area2D를 사용합니다. Player 노드를 선택하고 인스펙터(Inspector) 독 옆에 있는 "노드(Node)" 독을 클릭해 플레이어가 방출할 수 있는 시그널 목록을 확인해보세요:
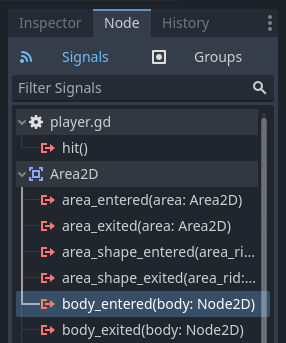
Notice our custom "hit" signal is there as well! Since our enemies are going to
be RigidBody2D nodes, we want the body_entered(body: Node2D) signal. This
signal will be emitted when a body contacts the player. Click "Connect.." and
the "Connect a Signal" window appears.
Godot will create a function with that exact name directly in script for you. You don't need to change the default settings right now.
경고
If you're using an external text editor (for example, Visual Studio Code), a bug currently prevents Godot from doing so. You'll be sent to your external editor, but the new function won't be there.
In this case, you'll need to write the function yourself into the Player's script file.

Note the green icon indicating that a signal is connected to this function; this does not mean the function exists, only that the signal will attempt to connect to a function with that name, so double-check that the spelling of the function matches exactly!
Next, add this code to the function:
func _on_body_entered(body):
    hide() # Player disappears after being hit.
    hit.emit()
    # Must be deferred as we can't change physics properties on a physics callback.
    $CollisionShape2D.set_deferred("disabled", true)
private void OnBodyEntered(Node2D body)
{
    Hide(); // Player disappears after being hit.
    EmitSignal(SignalName.Hit);
    // Must be deferred as we can't change physics properties on a physics callback.
    GetNode<CollisionShape2D>("CollisionShape2D").SetDeferred(CollisionShape2D.PropertyName.Disabled, true);
}
적이 플레이어에 충돌할 때마다 시그널이 방출됩니다. 우리는 두 번 이상 hit 시그널이 발동되지 않도록 플레이어의 콜리전을 비활성화 해야 합니다.
참고
엔진의 충돌 처리 도중에 영역의 콜리전 모양을 비활성화하면 오류가 발생할 수 있습니다. set_deferred()를 사용하면 Godot가 모양을 비활성화 하기에 안전해질 때까지 기다려줍니다.
마지막으로 새로운 게임을 시작할 때 플레이어를 초기화하기 위해 호출할 수 있는 함수를 추가합니다.
func start(pos):
    position = pos
    show()
    $CollisionShape2D.disabled = false
public void Start(Vector2 position)
{
    Position = position;
    Show();
    GetNode<CollisionShape2D>("CollisionShape2D").Disabled = false;
}
With the player working, we'll work on the enemy in the next lesson.