Up to date
This page is up to date for Godot 4.2.
If you still find outdated information, please open an issue.
물리 소개
게임 개발 중 종종 게임의 두 물체가 교차하거나 접촉할 때를 알아야 합니다. 이를 콜리전 감지라고 합니다. 콜리전이 감지될 때, 일반적이라면 무언가가 발생하길 원할겁니다. 이를 콜리전 응답이라고 합니다.
Godot는 콜리전 감지와 반응을 모두 제공하기 위해 2D와 3D로 구성된 다수의 콜리전 오브젝트를 제공합니다. 프로젝트에 이 중 어떠한 것을 사용할지 결정하려는 것은 혼란스러울 수 있습니다. 하지만 각각의 작동 방식과 장단점을 이해한다면 이러한 문제를 피하고 개발을 간소화할 수 있습니다.
이 가이드에서 다음 내용을 배울 것입니다:
Godot의 4가지 콜리전 오브젝트 유형
각 콜리전 오브젝트의 작동 방식
한 유형을 다른 유형보다 선택해야 하는 시기 및 이유
참고
이 문서의 예제에서는 2D 오브젝트를 사용합니다. 모든 2D 물리 오브젝트와 콜리전 모양은 3D에서 직접적으로 동등하며 대부분의 경우 거의 동일한 방식으로 작동합니다.
콜리전 오브젝트
Godot offers four kinds of collision objects which all extend CollisionObject2D. The last three listed below are physics bodies and additionally extend PhysicsBody2D.
- Area2D
Area2D노드는 감지(detection)와 영향력(influence)을 제공합니다. 그들은 오브젝트들이 언제 겹치는지를 감지할 수 있고, 바디가 들어가거나 나올 때 시그널을 보낼 수 있습니다.Area2D는 또한 정의된 영역에서 중력이나 제동과 같은 물리적 특성을 치환하는데 사용될 수도 있습니다.
- StaticBody2D
정적 바디는 물리 엔진에 의해 움직이지 않는 물체입니다. 그것은 콜리전 감지에는 관여하지만, 콜리전에 대응하여 움직이지는 않습니다. 이것들은 환경의 일부이거나 동적 동작이 필요하지 않은 오브젝트에 가장 많이 사용됩니다.
- RigidBody2D
이것은 시뮬레이션된 2D 물리를 구현하는 노드입니다.
RigidBody2D를 직접적으로 제어하지는 않지만, 그대신 (중력, 충격 등) 힘을 가하며 물리 엔진은 그것의 결과적인 움직임을 계산합니다. 리지드 바디 사용에 대해 더 알아보기.
- CharacterBody2D
콜리전 감지 기능을 제공하지만, 물리는 제공하지 않는 body입니다. 모든 이동 및 콜리전 반응은 코드로 구현되어야 합니다.
물리 머티리얼
Static bodies and rigid bodies can be configured to use a PhysicsMaterial. This allows adjusting the friction and bounce of an object, and set if it's absorbent and/or rough.
콜리전 모양
물리 바디는 원하는 수의 Shape2D 오브젝트를 자손으로 수용할 수 있습니다. 이러한 모양은 오브젝트의 콜리전 경계를 정의하고 다른 오브젝트와의 접촉을 감지하는 데 사용됩니다.
참고
콜리전을 감지하기 위해, 최소한 하나 이상의 Shape2D가 오브젝트에 할당되어야 합니다.
모양을 지정하는 가장 일반적인 방법은 오브젝트의 자손으로 CollisionShape2D또는 CollisionPolygon2D를 추가하는 것입니다. 이러한 노드들은 편집기 작업 공간에서 직접 모양을 그릴 수 있도록 합니다.
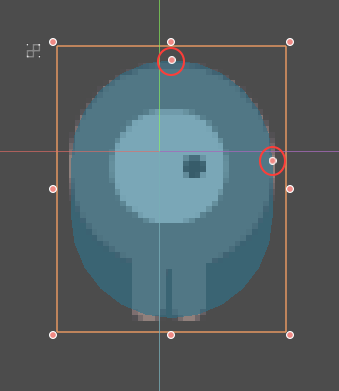
중요
편집기에서 콜리전 모양을 변경하지 않도록 주의하십시오. 인스펙터(Inspecter)의 "Scale" 속성은 (1, 1)로 유지되어야 합니다. 콜리전 모양을 변경할 때는 항상 Node2D 크기 핸들이 아닌 크기 핸들을 사용해야 합니다. 도형의 크기를 조절하는 것은 예기치 않은 콜리전 행동이 일어날 수 있습니다.
물리 프로세스 콜백
The physics engine runs at a fixed rate (a default of 60 iterations per second). This rate is typically different from the frame rate which fluctuates based on what is rendered and available resources.
It is important that all physics related code runs at this fixed rate. Therefore Godot differentiates between physics and idle processing. Code that runs each frame is called idle processing and code that runs on each physics tick is called physics processing. Godot provides two different callbacks, one for each of those processing rates.
The physics callback, Node._physics_process(),
is called before each physics step. Any code that needs to access a body's properties should
be run in here. This method will be passed a delta
parameter, which is a floating-point number equal to the time passed in
seconds since the last step. When using the default 60 Hz physics update rate,
it will typically be equal to 0.01666... (but not always, see below).
참고
It's recommended to always use the delta parameter when relevant in your
physics calculations, so that the game behaves correctly if you change the
physics update rate or if the player's device can't keep up.
콜리전 레이어와 마스크
One of the most powerful, but frequently misunderstood, collision features
is the collision layer system. This system allows you to build up complex
interactions between a variety of objects. The key concepts are layers
and masks. Each CollisionObject2D has 32 different physics layers
it can interact with.
각 속성을 차례대로 살펴보겠습니다:
- collision_layer
이것은 오브젝트가 나타나는 레이어를 형성합니다. 기본적으로 모든 바디는 레이어 ``1``에 있습니다.
- collision_mask
이것은 바디가 콜리전을 위해 스캔하는 레이어를 뜻합니다. 오브젝트가 마스크 레이어 중 하나에 있지 않으면, 바디는 이를 무시합니다. 기본적으로 모든 바디는 레이어
1을 스캔합니다.
이러한 속성은 코드를 통해, 혹은 인스펙터(Inspecter)에서 편집하여 구성할 수 있습니다.
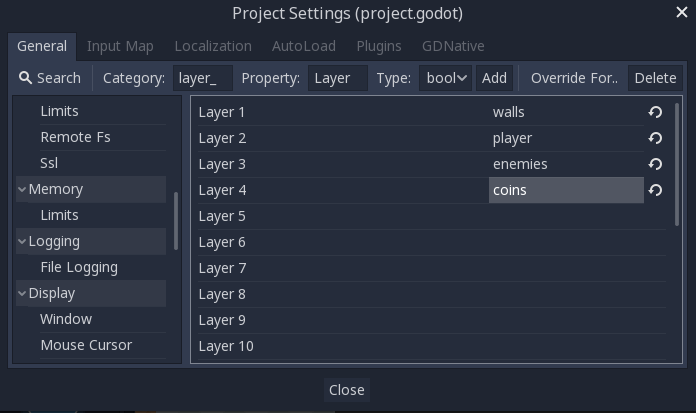
각 레이어를 사용하는 대상을 추적하는 것은 어려울 수 있으므로, 사용 중인 레이어에 이름을 지정하는 것이 유용할 수 있습니다. 이름은 프로젝트 설정 -> Layer Names에서 지정할 수 있습니다.
GUI example
당신의 게임에는 4가지의 노드 타입이 있습니다: 벽, 플레이어, 적, 코인. 플레이어와 적 모두 벽과 충돌해야 합니다. 플레이어 노드는 적과 코인의 콜리전을 모두 감지해야 하지만, 적과 코인은 서로 무시해야 합니다.
레이어 1-4를 "walls", "player", "enemies", 그리고 "coins"으로 이름을 지정하는 걸로 시작하고, "Layer" 속성을 사용하여 각 노드 타입을 각각의 레이어에 배치합니다. 그런 다음 각 노드가 상호 작용할 레이어를 선택하여 각 노드의 "Mask" 속성을 설정합니다. 예를 들어, 플레이어의 설정은 다음과 같습니다:


Code example
In function calls, layers are specified as a bitmask. Where a function enables
all layers by default, the layer mask will be given as 0xffffffff. Your code
can use binary, hexadecimal, or decimal notation for layer masks, depending
on your preference.
The code equivalent of the above example where layers 1, 3 and 4 were enabled would be as follows:
# Example: Setting mask value for enabling layers 1, 3 and 4

# Binary - set the bit corresponding to the layers you want to enable (1, 3, and 4) to 1, set all other bits to 0.
# Note: Layer 32 is the first bit, layer 1 is the last. The mask for layers 4,3 and 1 is therefore
0b00000000_00000000_00000000_00001101
# (This can be shortened to 0b1101)

# Hexadecimal equivalent (1101 binary converted to hexadecimal)
0x000d
# (This value can be shortened to 0xd)

# Decimal - Add the results of 2 to the power of (layer to be enabled - 1).
# (2^(1-1)) + (2^(3-1)) + (2^(4-1)) = 1 + 4 + 8 = 13
pow(2, 1-1) + pow(2, 3-1) + pow(2, 4-1)
Area2D
Area 노드는 감지와 영향력을 제공합니다. 그들은 물체가 중복되는 때를 감지하고 바디가 들어가거나 나올 때 시그널을 방출할 수 있습니다. Area는 정의된 영역에서 중력 또는 제동과 같은 물리적 특성을 치환하는 데 사용될 수도 있습니다.
Area2D에는 3가지 주요 용도가 있습니다:
특정 지역에서 (중력과 같은) 물리적 매개변수를 재정의 합니다.
다른 바디가 특정 지역에 들어오거나 나가는 때를 감지하거나 현재 지역에 있는 바디가 무엇인 지를 탐지합니다.
다른 영역들이 겹치는지 확인합니다.
기본적으로, 영역은 마우스 및 터치스크린 입력도 받습니다.
StaticBody2D
정적 바디는 물리 엔진에 의해 움직이지 않는 물체입니다. 그것은 콜리전 감지에는 참여하지만 콜리전에 대응하여 움직이지 않습니다. 그러나, constant_linear_velocity와 constant_angular_velocity의 특성을 이용하여 마치 움직이는 것처럼 충돌하는 바디에 움직임이나 회전을 전달할 수 있습니다.
StaticBody2D 노드는 환경에 속하거나 동적 동작을 수행할 필요가 없는 오브젝트에 가장 많이 사용됩니다.
StaticBody2D 이용 예시:
플랫폼 (이동 플랫폼 포함)
컨베이어 벨트
벽 및 기타 장애물
RigidBody2D
이것은 시뮬레이션 된 2D 물리를 구현하는 노드입니다. 당신은 RigidBody2D를 직접 제어하지는 않습니다. 대신 힘을 가하게 되면 물리 엔진은 다른 물체와의 콜리전을 포함한 결과 움직임과 바운스, 회전 등의 콜리전 반응을 계산합니다.
You can modify a rigid body's behavior via properties such as "Mass", "Friction", or "Bounce", which can be set in the Inspector.
바디의 행동은 또한 프로젝트 설정 -> Physics에서 설정한 월드 속성의 영향을 받거나 전역 물리 특성을 오버라이딩 하는 Area2D를 입력한 것에 영향을 받습니다.
리지드 바디가 쉬는 상태이고 한동안 움직이지 않으면, 잠들게 됩니다. 잠든 바디는 정적 바디처럼 작용하며, 그 힘은 물리 엔진에 의해 계산되지 않습니다. 콜리전 또는 코드를 통해 힘이 가해지면 바디가 깨어나게 됩니다.
RigidBody2D 사용하기
리지드 바디를 사용하는 것의 이점 중 하나는 코드를 쓰지 않고도 많은 행동을 "자유롭게" 할 수 있다는 것입니다. 예를 들어, 떨어지는 블록으로 "앵그리 버드"-스타일의 게임을 만드는 경우, RigidBody2D들을 만들고 해당 속성을 조정하기만 하면 됩니다. 쌓기, 낙하 및 튕김은 물리 엔진에 의해 자동으로 계산됩니다.
However, if you do wish to have some control over the body, you should take
care - altering the position, linear_velocity, or other physics properties
of a rigid body can result in unexpected behavior. If you need to alter any
of the physics-related properties, you should use the _integrate_forces()
callback instead of _physics_process(). In this callback, you have access
to the body's PhysicsDirectBodyState2D,
which allows for safely changing properties and synchronizing them with
the physics engine.
예를 들어, 다음은 "소행성" 스타일 우주선의 코드입니다:
extends RigidBody2D

var thrust = Vector2(0, -250)
var torque = 20000

func _integrate_forces(state):
    if Input.is_action_pressed("ui_up"):
        state.apply_force(thrust.rotated(rotation))
    else:
        state.apply_force(Vector2())
    var rotation_direction = 0
    if Input.is_action_pressed("ui_right"):
        rotation_direction += 1
    if Input.is_action_pressed("ui_left"):
        rotation_direction -= 1
    state.apply_torque(rotation_direction * torque)
using Godot;

public partial class Spaceship : RigidBody2D
{
    private Vector2 _thrust = new Vector2(0, -250);
    private float _torque = 20000;

    public override void _IntegrateForces(PhysicsDirectBodyState2D state)
    {
        if (Input.IsActionPressed("ui_up"))
            state.ApplyForce(_thrust.Rotated(Rotation));
        else
            state.ApplyForce(new Vector2());

        var rotationDir = 0;
        if (Input.IsActionPressed("ui_right"))
            rotationDir += 1;
        if (Input.IsActionPressed("ui_left"))
            rotationDir -= 1;
        state.ApplyTorque(rotationDir * _torque);
    }
}
linear_velocity 또는 angular_velocity를 직접 설정하는 것이 아니라 바디에 힘을 (thrust과 torque) 적용하고 그 결과적인 움직임을 물리 엔진이 계산하도록 한다는 점에 유의해야 합니다.
참고
리지드 바디가 잠에 들 때 _integrate_forces() 함수는 호출되지 않을 것입니다. 이 동작을 오버라이드 하려면 콜리전을 만들거나, 콜리전을 적용하거나, 힘을 가하거나, can_sleep 속성을 비활성화하여 바디를 깨어 있게 해야 합니다. 이것이 퍼포먼스에 안 좋은 영향을 줄 수 있으니 조심하세요.
접촉 알림
By default, rigid bodies do not keep track of contacts, because this can require a huge amount of memory if many bodies are in the scene. To enable contact reporting, set the max_contacts_reported property to a non-zero value. The contacts can then be obtained via PhysicsDirectBodyState2D.get_contact_count() and related functions.
시그널을 통한 접촉 모니터링은 contact_monitor 속성을 통해 활성화할 수 있습니다. 사용 가능한 시그널 목록은 RigidBody2D를 참조하십시오.
CharacterBody2D
CharacterBody2D bodies detect collisions with other bodies, but are not affected by physics properties like gravity or friction. Instead, they must be controlled by the user via code. The physics engine will not move a character body.
When moving a character body, you should not set its position directly.
Instead, you use the move_and_collide() or move_and_slide() methods.
These methods move the body along a given vector, and it will instantly stop
if a collision is detected with another body. After the body has collided,
any collision response must be coded manually.
Character collision response
After a collision, you may want the body to bounce, to slide along a wall, or to alter the properties of the object it hit. The way you handle collision response depends on which method you used to move the CharacterBody2D.
move_and_collide
이 함수는 move_and_collide()를 사용할 때 콜리전과 충돌하는 물체에 대한 정보가 포함된 KinematicCollision2D 오브젝트를 반환합니다. 이 정보를 사용하여 응답을 확인할 수 있습니다.
예를 들어, 콜리전이 발생한 공간의 지점을 찾으려면 다음과 같이 하면 됩니다:
extends PhysicsBody2D

var velocity = Vector2(250, 250)

func _physics_process(delta):
    var collision_info = move_and_collide(velocity * delta)
    if collision_info:
        var collision_point = collision_info.get_position()
using Godot;

public partial class Body : PhysicsBody2D
{
    private Vector2 _velocity = new Vector2(250, 250);

    public override void _PhysicsProcess(double delta)
    {
        var collisionInfo = MoveAndCollide(_velocity * (float)delta);
        if (collisionInfo != null)
        {
            var collisionPoint = collisionInfo.GetPosition();
        }
    }
}
혹은 충돌 오브젝트가 튀어나오도록 하려면 다음과 같습니다:
extends PhysicsBody2D

var velocity = Vector2(250, 250)

func _physics_process(delta):
    var collision_info = move_and_collide(velocity * delta)
    if collision_info:
        velocity = velocity.bounce(collision_info.get_normal())
using Godot;

public partial class Body : PhysicsBody2D
{
    private Vector2 _velocity = new Vector2(250, 250);

    public override void _PhysicsProcess(double delta)
    {
        var collisionInfo = MoveAndCollide(_velocity * (float)delta);
        if (collisionInfo != null)
            _velocity = _velocity.Bounce(collisionInfo.GetNormal());
    }
}
move_and_slide
슬라이딩은 일반적인 콜리전 반응입니다; 플레이어가 탑뷰 게임에서 벽을 따라 움직이거나 플랫폼 안에서 오르내리는 경사를 상상해 보십시오. move_and_collide()를 사용한 후 직접 이를 코딩할 수 있지만 move_and_slide()는 많은 코드를 작성하지 않고 슬라이딩 이동을 실행할 수 있는 편리한 방법입니다.
경고
move_and_slide() 는 자동으로 타임 스텝를 계산에 포함하므로, 속도 벡터에 delta를 곱하면 안 됩니다.
예를 들어, 다음 코드를 사용하여 지면 (경사 포함)을 따라 걸을 수 있고 지면에 있을 때 점프할 수 있는 캐릭터를 만들 수 있습니다:
extends CharacterBody2D

var run_speed = 350
var jump_speed = -1000
var gravity = 2500

func get_input():
    velocity.x = 0
    var right = Input.is_action_pressed('ui_right')
    var left = Input.is_action_pressed('ui_left')
    var jump = Input.is_action_just_pressed('ui_select')

    if is_on_floor() and jump:
        velocity.y = jump_speed
    if right:
        velocity.x += run_speed
    if left:
        velocity.x -= run_speed

func _physics_process(delta):
    velocity.y += gravity * delta
    get_input()
    move_and_slide()
using Godot;

public partial class Body : CharacterBody2D
{
    private float _runSpeed = 350;
    private float _jumpSpeed = -1000;
    private float _gravity = 2500;

    private void GetInput()
    {
        var velocity = Velocity;
        velocity.X = 0;

        var right = Input.IsActionPressed("ui_right");
        var left = Input.IsActionPressed("ui_left");
        var jump = Input.IsActionPressed("ui_select");

        if (IsOnFloor() && jump)
            velocity.Y = _jumpSpeed;
        if (right)
            velocity.X += _runSpeed;
        if (left)
            velocity.X -= _runSpeed;

        Velocity = velocity;
    }

    public override void _PhysicsProcess(double delta)
    {
        var velocity = Velocity;
        velocity.Y += _gravity * (float)delta;
        Velocity = velocity;
        GetInput();
        MoveAndSlide();
    }
}
자세한 코드가 포함된 데모 프로젝트를 포함하여 move_and_slide() 사용에 대한 자세한 내용은 Kinematic character (2D)를 참조하십시오.