Up to date
This page is up to date for Godot 4.2.
If you still find outdated information, please open an issue.
씬 트리(SceneTree) 사용하기
소개
이전 튜토리얼에서는 모든 것이 노드 개념을 중심으로 진행됐습니다. 씬은 노드의 모음입니다. 노드는 씬 트리(scene tree)에 들어가면 활성화됩니다.
메인루프(MainLoop)
Godot가 내부적으로 작동하는 방식은 다음과 같습니다. 처음에 실행되는 유일한 인스턴스인 OS 클래스가 있습니다. 그 이후에 모든 드라이버, 서버, 스크립팅 언어, 씬 시스템 등을 불러옵니다.
초기화가 완료될 때 OS를 실행하려면 MainLoop가 제공되어야 합니다. 여기까지는 이 모든 것이 내부적으로 작동하는 방식입니다(내부적으로 어떻게 작동하는지 알고 싶다면 소스 코드에서 main/main.cpp 파일을 확인하세요).
사용자 프로그램, 게임은 MainLoop에서 시작됩니다. 이 클래스에는 초기화, 유휴: 프레임에 동기화된 콜백(idle: frame-synchronized callback), 고정: 물리에 동기화된 콜백(fixed: physics-synchronized callback) 및 입력에 대한 몇 가지 메서드가 있습니다. 다시 말하지만, 이는 로우 레벨이며 Godot에서 게임을 만들 때 MainLoop를 작성하는 것은 거의 의미가 없습니다.
씬트리
Godot가 어떻게 작동하는지 설명하는 방법 중 하나는 Godot가 저수준 미들웨어보다 높은 수준의 게임 엔진이라는 것입니다.
씬 시스템은 게임 엔진이고 OS와 서버는 로우 레벨 API입니다.
씬 시스템은 OS, 즉 SceneTree에 자체 메인 루프를 제공합니다. 메인 루프는 씬이 실행되는 동안 자동으로 인스턴스화되고 설정되므로 추가 작업을 수행할 필요가 없습니다.
이 클래스는 몇 가지 중요한 용도로 쓰이기 때문에 이 클래스가 존재한다는 것을 아는 것이 중요합니다:
It contains the root Viewport, to which a scene is added as a child when it's first opened to become part of the Scene Tree (more on that next).
그룹에 관한 정보가 포함되어 있어서 그룹의 모든 노드를 호출하거나 그룹의 목록을 가져옵니다.
일시 정지 모드 설정이나 프로세스 종료와 같은, 일부 전역 상태 기능이 포함되어 있습니다.
노드가 씬 트리의 일부인 경우 Node.get_tree()를 호출해서 SceneTree 싱글톤(Singleton)을 가져올 수 있습니다.
루트 뷰포트(Root viewport)
루트 Viewport는 항상 씬의 맨 위에 있습니다. 노드에서 두 가지 다른 방법으로 가져올 수 있습니다:
get_tree().root # Access via scene main loop.
get_node("/root") # Access via absolute path.
GetTree().Root // Access via scene main loop.
GetNode("/root"); // Access via absolute path.
이 노드는 메인 뷰포트를 포함합니다. Viewport의 모든 자식은 기본적으로 그 안에 그려지므로 모든 노드의 맨 위는 항상 이 타입의 노드이며 그렇지 않으면 아무 것도 보이지 않을 것입니다.
씬에 다른 뷰포트를 만들 수도 있지만(분할 화면 효과 등을 위해서) 루트 뷰포트는 유저가 만들 수 없는 유일한 노드입니다. 씬 트리에서 자동으로 생성됩니다.
씬 트리
노드가 루트 뷰포트에 직·간접적으로 연결되면 씬 트리의 일부가 됩니다.
즉, 이전 튜토리얼에서 설명했듯이 _enter_tree(), _ready() 콜백 (및 _exit_tree())을 가져옵니다.
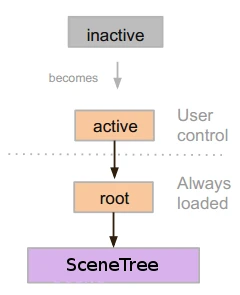
노드는 씬 트리에 들어가면 활성화됩니다. 노드는 입력을 받거나 처리하고, 2D 및 3D 오브젝트를 화면에 표시하고, 알림을 송·수신하고, 소리를 재생하는 등 필요한 모든 것에 접근할 수 있습니다. 노드가 씬 트리에서 제거되면 이러한 능력을 잃게 됩니다.
트리 순서
Most node operations in Godot, such as drawing 2D, processing, or getting notifications are done in tree order, or top to bottom as seen in the editor (also known as pre-order traversal):

For example, the top node in a scene has its _process() function
called first, then the node below it has its _process() function called,
then the node below that and so on.
An important exception is the _ready() function: each parent node has its
_ready() function called only after all its child nodes have their
_ready() functions called, so that the parent knows its children are
completely ready to be accessed. This is also known as post-order traversal.
In the above image, NameLabel would be notified first (but only after its
children, if it had any!), followed by Name, etc., and Panel would be
notified last.
The order of operations can also be overridden using the process_priority
node property. Nodes with a lower number are called first. For example, nodes
with the priorities "0, 1, 2, 3" would be called in that order from left to right.
씬 트리에 들어가서 "활성화되기"
씬은 디스크에서 불러오거나 스크립트에 의해 만들어집니다.
The root node of that scene (only one root, remember?) is added as either a child of the "root" Viewport (from SceneTree), or to any of its descendants.
Every node of the newly added scene will receive the "enter_tree" notification (
_enter_tree()callback in GDScript) in top-to-bottom order (pre-order traversal).Every node will receive the "ready" notification (
_ready()callback in GDScript) for convenience, once all its children have received the "ready" notification (post-order traversal).When a scene (or part of it) is removed, they receive the "exit scene" notification (
_exit_tree()callback in GDScript) in bottom-to-top order (the exact reverse of top-to-bottom order).
현재 씬 변경하기
After a scene is loaded, you may want to change this scene for another one. One way to do this is to use the SceneTree.change_scene_to_file() function:
func _my_level_was_completed():
    get_tree().change_scene_to_file("res://levels/level2.tscn")
public void _MyLevelWasCompleted()
{
    GetTree().ChangeSceneToFile("res://levels/level2.tscn");
}
Rather than using file paths, one can also use ready-made PackedScene resources using the equivalent function SceneTree.change_scene_to_packed(PackedScene scene):
var next_scene = preload("res://levels/level2.tscn")

func _my_level_was_completed():
    get_tree().change_scene_to_packed(next_scene)
public void _MyLevelWasCompleted()
{
    var nextScene = (PackedScene)ResourceLoader.Load("res://levels/level2.tscn");
    GetTree().ChangeSceneToPacked(nextScene);
}
These are quick and useful ways to switch scenes but have the drawback that the game will stall until the new scene is loaded and running. At some point in the development of your game, it may be preferable to create proper loading screens with progress bar, animated indicators or threaded (background) loading. This must be done manually using Singletons (Autoload) and 백그라운드 로딩.