Up to date
This page is up to date for Godot 4.2.
If you still find outdated information, please open an issue.
GDScript reference
GDScript is a high-level, object-oriented, imperative, and gradually typed programming language built for Godot. It uses an indentation-based syntax similar to languages like Python. Its goal is to be optimized for and tightly integrated with Godot Engine, allowing great flexibility for content creation and integration.
GDScript is entirely independent from Python and is not based on it.
작업 내역
참고
GDScript의 역사에 대한 문서는 자주 묻는 질문으로 이동되었습니다.
GDScript 예제
Some people can learn better by taking a look at the syntax, so here's an example of how GDScript looks.
# Everything after "#" is a comment.
# A file is a class!

# (optional) icon to show in the editor dialogs:
@icon("res://path/to/optional/icon.svg")

# (optional) class definition:
class_name MyClass

# Inheritance:
extends BaseClass


# Member variables.
var a = 5
var s = "Hello"
var arr = [1, 2, 3]
var dict = {"key": "value", 2: 3}
var other_dict = {key = "value", other_key = 2}
var typed_var: int
var inferred_type := "String"

# Constants.
const ANSWER = 42
const THE_NAME = "Charly"

# Enums.
enum {UNIT_NEUTRAL, UNIT_ENEMY, UNIT_ALLY}
enum Named {THING_1, THING_2, ANOTHER_THING = -1}

# Built-in vector types.
var v2 = Vector2(1, 2)
var v3 = Vector3(1, 2, 3)


# Functions.
func some_function(param1, param2, param3):
    const local_const = 5

    if param1 < local_const:
        print(param1)
    elif param2 > 5:
        print(param2)
    else:
        print("Fail!")

    for i in range(20):
        print(i)

    while param2 != 0:
        param2 -= 1

    match param3:
        3:
            print("param3 is 3!")
        _:
            print("param3 is not 3!")

    var local_var = param1 + 3
    return local_var


# Functions override functions with the same name on the base/super class.
# If you still want to call them, use "super":
func something(p1, p2):
    super(p1, p2)


# It's also possible to call another function in the super class:
func other_something(p1, p2):
    super.something(p1, p2)


# Inner class
class Something:
    var a = 10


# Constructor
func _init():
    print("Constructed!")
    var lv = Something.new()
    print(lv.a)
이전에 C, C++, C#과 같은 정적 타입 언어에 대한 경험이 있지만 한 번도 동적 타입 언어를 써 본 적이 없다면, 이 튜토리얼을 읽는 것이 좋습니다: GDScript: 동적 언어 소개.
언어
여기서부터 GDScript의 개요입니다. 어떤 메서드가 배열 혹은 다른 오브젝트에 이용할 수 있는지와 같은 세부 사항은 링크된 클래스 설명을 확인해주세요.
식별자(Identifier)
알파벳 문자로 제한되는 문자열 (a부터 z, A부터 Z), 숫자 (0부터 9), _는 식별자입니다. 추가로 식별자는 숫자로 시작할 수 없습니다. 식별자는 대소문자를 구분합니다 (foo는 FOO와 다릅니다).
Identifiers may also contain most Unicode characters part of UAX#31. This allows you to use identifier names written in languages other than English. Unicode characters that are considered "confusable" for ASCII characters and emoji are not allowed in identifiers.
키워드(Keyword)
다음은 언어에서 지원하는 키워드 목록입니다. 키워드는 예약된 단어(토큰)이기 때문에, 식별자로 사용할 수 없습니다. 다음 섹션에 나열된 (in, not, and 혹은 or 와 같은) 연산자와 내장 타입 이름 역시 예약된 단어입니다.
키워드는 GDScript tokenizer에 정의되어 있습니다. 정체가 궁금하다면 확인해보세요.
키워드 |
설명 |
|---|---|
if |
if/else/elif를 참고하세요. |
elif |
if/else/elif를 참고하세요. |
else |
if/else/elif를 참고하세요. |
for |
for를 참고하세요. |
while |
while을 참고하세요. |
match |
match를 참고하세요. |
break |
현재의 |
continue |
즉시 |
pass |
명령문이 문법적으로는 필요하지만 실행할 만한 코드가 마땅치 않을 때 사용됩니다. 예: 빈 함수. |
return |
함수에서 값을 반환합니다. |
클래스 |
Defines an inner class. See Inner classes. |
class_name |
Defines the script as a globally accessible class with the specified name. See Registering named classes. |
extends |
현재 클래스로 확장할 클래스를 정의합니다. |
is |
변수가 주어진 클래스를 확장하는지, 혹은 변수가 주어진 내장 유형인지 여부를 테스트합니다. |
in |
Tests whether a value is within a string, array, range, dictionary, or node. When used with |
as |
가능하다면 주어진 타입으로 값을 캐스트합니다. |
self |
현재 클래스 인스턴스를 참조합니다. |
signal |
시그널을 정의합니다. |
func |
함수를 정의합니다. |
static |
Defines a static function or a static member variable. |
const |
상수를 정의합니다. |
enum |
열거형을 정의합니다. |
var |
변수를 정의합니다. |
breakpoint |
Editor helper for debugger breakpoints. Unlike breakpoints created by clicking in the gutter, |
preload |
클래스나 변수를 미리 불러옵니다(Preload). 리소스로 취급되는 클래스를 참고하세요. |
await |
Waits for a signal or a coroutine to finish. See Awaiting for signals or coroutines. |
yield |
Previously used for coroutines. Kept as keyword for transition. |
assert |
조건을 가정(Assert)하고 실패 시 오류를 기록합니다. 디버그가 아닌 빌드에서는 무시됩니다. Assert 키워드를 참고하세요. |
void |
Used to represent that a function does not return any value. |
PI |
PI 상수. |
TAU |
TAU 상수. |
INF |
Infinity constant. Used for comparisons and as result of calculations. |
NAN |
NAN (not a number) constant. Used as impossible result from calculations. |
연산자
다음은 지원하는 연산자 목록과 우선 순위입니다.
연산자 |
설명 |
|---|---|
|
Grouping (highest priority) Parentheses are not really an operator, but allow you to explicitly specify the precedence of an operation. |
|
Subscription |
|
속성 참조 |
|
함수 호출 |
|
|
|
Type checking See also is_instance_of() function. |
|
Power Multiplies Note: In GDScript, the |
|
비트 단위 NOT |
+x-x |
Identity / Negation |
x * yx / yx % y |
곱하기 / 나누기 / 나머지 The Note: These operators have the same behavior as C++, which may be unexpected for users coming from Python, JavaScript, etc. See a detailed note after the table. |
x + yx - y |
Addition (or Concatenation) / Subtraction |
x << yx >> y |
비트 시프트 |
|
비트 단위 AND |
|
비트 단위 XOR |
|
비트 단위 OR |
x == yx != yx < yx > yx <= yx >= y |
Comparison See a detailed note after the table. |
x in yx not in y |
Inclusion checking
|
not x!x |
Boolean NOT and its unrecommended alias |
x and yx && y |
Boolean AND and its unrecommended alias |
x or yx || y |
Boolean OR and its unrecommended alias |
|
삼항 if/else |
|
|
x = yx += yx -= yx *= yx /= yx **= yx %= yx &= yx |= yx ^= yx <<= yx >>= y |
할당 (가장 낮은 우선 순위) You cannot use an assignment operator inside an expression. |
참고
The behavior of some operators may differ from what you expect:
If both operands of the
/operator are int, then integer division is performed instead of fractional. For example5 / 2 == 2, not2.5. If this is not desired, use at least one float literal (x / 2.0), cast (float(x) / y), or multiply by1.0(x * 1.0 / y).The
%operator is only available for ints, for floats use the fmod() function.For negative values, the
%operator andfmod()use truncation instead of rounding towards negative infinity. This means that the remainder has a sign. If you need the remainder in a mathematical sense, use the posmod() and fposmod() functions instead.The
**operator is left-associative. This means that2 ** 2 ** 3is equal to(2 ** 2) ** 3. Use parentheses to explicitly specify precedence you need, for example2 ** (2 ** 3).The
==and!=operators sometimes allow you to compare values of different types (for example,1 == 1.0is true), but in other cases it can cause a runtime error. If you're not sure about the types of the operands, you can safely use the is_same() function (but note that it is more strict about types and references). To compare floats, use the is_equal_approx() and is_zero_approx() functions instead.
리터럴(Literal)
Example(s) |
설명 |
|
Null value |
|
Boolean values |
|
기본 10진법 정수 |
|
기본 16진법 정수 |
|
기본 2진법 정수 |
|
부동 소수점 숫자 (실수) |
|
Regular strings |
|
Triple-quoted regular strings |
|
Raw strings |
|
Triple-quoted raw strings |
|
|
|
There are also two constructs that look like literals, but actually are not:
예제 |
설명 |
|
|
|
Shorthand for |
정수와 부동 소수점 수는 가독성을 높이기 위해 숫자를 _로 구분할 수 있습니다. 숫자를 쓰는 다음 방법은 모두 유효합니다:
12_345_678  # Equal to 12345678.
3.141_592_7  # Equal to 3.1415927.
0x8080_0000_ffff  # Equal to 0x80800000ffff.
0b11_00_11_00  # Equal to 0b11001100.
Regular string literals can contain the following escape sequences:
Escape sequence |
설명 |
|
줄 바꿈(라인 피드) |
|
수평 탭 문자 |
|
캐리지 리턴 |
|
경고(비프/벨 음) |
|
백스페이스 |
|
폼 피드(페이지 나누기) |
|
수직 탭 문자 |
|
큰 따옴표 |
|
작은 따옴표 |
|
백슬래시 |
|
UTF-16 Unicode codepoint
|
|
UTF-32 Unicode codepoint
|
There are two ways to represent an escaped Unicode character above 0xFFFF:
as a UTF-16 surrogate pair
\uXXXX\uXXXX.as a single UTF-32 codepoint
\UXXXXXX.
Also, using \ followed by a newline inside a string will allow you to continue it in the next line,
without inserting a newline character in the string itself.
A string enclosed in quotes of one type (for example ") can contain quotes of another type
(for example ') without escaping. Triple-quoted strings allow you to avoid escaping up to
two consecutive quotes of the same type (unless they are adjacent to the string edges).
Raw string literals always encode the string as it appears in the source code. This is especially useful for regular expressions. Raw strings do not process escape sequences, but you can "escape" a quote or backslash (they replace themselves).
print("\tchar=\"\\t\"")  # Prints `    char="\t"`.
print(r"\tchar=\"\\t\"") # Prints `\tchar=\"\\t\"`.
GDScript also supports format strings.
Annotations
There are some special tokens in GDScript that act like keywords but are not,
they are annotations instead. Every annotation start with the @ character
and is specified by a name. A detailed description and example for each annotation
can be found inside the GDScript class reference.
Annotations affect how the script is treated by external tools and usually don't change the behavior.
For instance, you can use it to export a value to the editor:
@export_range(1, 100, 1, "or_greater")
var ranged_var: int = 50
For more information about exporting properties, read the GDScript exports article.
Any constant expression compatible with the required argument type can be passed as an annotation argument value:
const MAX_SPEED = 120.0

@export_range(0.0, 0.5 * MAX_SPEED)
var initial_speed: float = 0.25 * MAX_SPEED
Annotations can be specified one per line or all in the same line. They affect the next statement that isn't an annotation. Annotations can have arguments sent between parentheses and separated by commas.
Both of these are the same:
@annotation_a
@annotation_b
var variable

@annotation_a @annotation_b var variable
@onready annotation
노드를 사용할 때, 씬의 일부를 변수로 참조하는 것이 일반적입니다. 씬은 활성 씬 트리에 들어갈 때만 구성되기 때문에 하위 노드는 Node._ready() 호출이 있을 때만 가져올 수 있습니다.
var my_label


func _ready():
    my_label = get_node("MyLabel")
This can get a little cumbersome, especially when nodes and external
references pile up. For this, GDScript has the @onready annotation, that
defers initialization of a member variable until _ready() is called. It
can replace the above code with a single line:
@onready var my_label = get_node("MyLabel")
경고
Applying @onready and any @export annotation to the same variable
doesn't work as you might expect. The @onready annotation will cause
the default value to be set after the @export takes effect and will
override it:
@export var a = "init_value_a"
@onready @export var b = "init_value_b"

func _init():
    prints(a, b) # init_value_a <null>

func _notification(what):
    if what == NOTIFICATION_SCENE_INSTANTIATED:
        prints(a, b) # exported_value_a exported_value_b

func _ready():
    prints(a, b) # exported_value_a init_value_b
Therefore, the ONREADY_WITH_EXPORT warning is generated, which is treated
as an error by default. We do not recommend disabling or ignoring it.
Code regions
Code regions are special types of comments that the script editor understands as foldable regions. This means that after writing code region comments, you can collapse and expand the region by clicking the arrow that appears at the left of the comment. This arrow appears within a purple square to be distinguishable from standard code folding.
The syntax is as follows:
# Important: There must be *no* space between the `#` and `region` or `endregion`.

# Region without a description:
#region
...
#endregion

# Region with a description:
#region Some description that is displayed even when collapsed
...
#endregion
팁
To create a code region quickly, select several lines in the script editor, right-click the selection then choose Create Code Region. The region description will be selected automatically for editing.
It is possible to nest code regions within other code regions.
Here's a concrete usage example of code regions:
# This comment is outside the code region. It will be visible when collapsed.
#region Terrain generation
# This comment is inside the code region. It won't be visible when collapsed.
func generate_lakes():
    pass

func generate_hills():
    pass
#endregion

#region Terrain population
func place_vegetation():
    pass

func place_roads():
    pass
#endregion
This can be useful to organize large chunks of code into easier to understand sections. However, remember that external editors generally don't support this feature, so make sure your code is easy to follow even when not relying on folding code regions.
참고
Individual functions and indented sections (such as if and for) can
always be collapsed in the script editor. This means you should avoid
using a code region to contain a single function or indented section, as it
won't bring much of a benefit. Code regions work best when they're used to
group multiple elements together.
Line continuation
A line of code in GDScript can be continued on the next line by using a backslash
(\). Add one at the end of a line and the code on the next line will act like
it's where the backslash is. Here is an example:
var a = 1 + \
2
A line can be continued multiple times like this:
var a = 1 + \
4 + \
10 + \
4
내장 타입(Built-in type)
Built-in types are stack-allocated. They are passed as values. This means a copy
is created on each assignment or when passing them as arguments to functions.
The exceptions are Object, Array, Dictionary, and packed arrays
(such as PackedByteArray), which are passed by reference so they are shared.
All arrays, Dictionary, and some objects (Node, Resource)
have a duplicate() method that allows you to make a copy.
기본 내장 타입
GDScript의 변수에는 여러 내장 타입을 할당할 수 있습니다.
null
null은 정보를 가지지 않는 빈 데이터 타입으로 어떤 값도 할당할 수 없습니다.
bool
"불리언(Boolean)"의 약자로, 오직 true 또는 false값만 가집니다.
int
Short for "integer", it stores whole numbers (positive and negative).
It is stored as a 64-bit value, equivalent to int64_t in C++.
float
Stores real numbers, including decimals, using floating-point values.
It is stored as a 64-bit value, equivalent to double in C++.
Note: Currently, data structures such as Vector2, Vector3, and
PackedFloat32Array store 32-bit single-precision float values.
String
A sequence of characters in Unicode format.
StringName
An immutable string that allows only one instance of each name. They are slower to create and may result in waiting for locks when multithreading. In exchange, they're very fast to compare, which makes them good candidates for dictionary keys.
NodePath
A pre-parsed path to a node or a node property. It can be easily assigned to, and from, a String. They are useful to interact with the tree to get a node, or affecting properties like with Tweens.
벡터 내장 타입
Vector2
2D 벡터 타입으로 x, y 필드를 가집니다. 배열로 접근할 수도 있습니다.
Vector2i
Same as a Vector2 but the components are integers. Useful for representing items in a 2D grid.
Rect2
2D 사각형 타입으로 두 개의 벡터 필드 position, size를 가집니다. 또한 position + size값인 end 필드를 가집니다.
Vector3
3D 벡터 타입으로 x, y, z 필드를 가집니다. 배열로 접근할 수도 있습니다.
Vector3i
Same as Vector3 but the components are integers. Can be use for indexing items in a 3D grid.
Transform2D
3x2 행렬(Matrix)로 2D 변형에 사용됩니다.
Plane
표준화된 형태의 3D 평면(Plane) 타입으로 normal 벡터와 d 스칼라 거리 필드를 가집니다.
Quaternion
사원수(Quaternion)는 3D 회전을 표현하기 위해 사용되는 데이터 타입입니다. 회전 값을 보간하는 용도로 사용됩니다.
AABB
축이 정렬된 경계 사각형(또는 3D 상자)로 두 개의 벡터 필드 position, size를 가집니다. 또한 position + size값인 end 필드를 가집니다.
Basis
3x3 행렬로 3D 회전과 크기 조정에 사용됩니다. 3개의 벡터 필드(x, y, z)를 가집니다. 3D 벡터의 배열로 접근할 수도 있습니다.
Transform3D
3D 변형(Transform)으로, Basis 필드 basis, Vector3 필드 origin을 가집니다.
엔진 내장 타입
Color
색상(Color) 데이터 타입으로 r, g, b, a 필드를 가집니다. 색조/채도/명도 값을 h, s, v로 접근할 수도 있습니다.
RID
리소스 ID (RID). 서버는 불투명한 데이터를 참조하기 위해 제네릭 RID를 사용합니다.
Object
내장 타입이 아닌 모든 것의 기본 클래스.
컨테이너(Container) 내장 타입
Array
다른 배열(Array)이나 딕셔너리(Dictionary)를 포함한 임의 오브젝트 타입의 일반적인 시퀀스(Sequence)입니다(아래를 참고하세요). 배열의 크기는 동적으로 조절할 수 있습니다. 배열은 인덱스 0부터 번호를 매깁니다. 번호를 음수로 하면 배열의 끝부터 셉니다.
var arr = []
arr = [1, 2, 3]
var b = arr[1] # This is 2.
var c = arr[arr.size() - 1] # This is 3.
var d = arr[-1] # Same as the previous line, but shorter.
arr[0] = "Hi!" # Replacing value 1 with "Hi!".
arr.append(4) # Array is now ["Hi!", 2, 3, 4].
Typed arrays
Godot 4.0 added support for typed arrays. On write operations, Godot checks that
element values match the specified type, so the array cannot contain invalid values.
The GDScript static analyzer takes typed arrays into account, however array methods like
front() and back() still have the Variant return type.
Typed arrays have the syntax Array[Type], where Type can be any Variant type,
native or user class, or enum. Nested array types (like Array[Array[int]]) are not supported.
var a: Array[int]
var b: Array[Node]
var c: Array[MyClass]
var d: Array[MyEnum]
var e: Array[Variant]
Array and Array[Variant] are the same thing.
참고
Arrays are passed by reference, so the array element type is also an attribute of the in-memory structure referenced by a variable in runtime. The static type of a variable restricts the structures that it can reference to. Therefore, you cannot assign an array with a different element type, even if the type is a subtype of the required type.
If you want to convert a typed array, you can create a new array and use the Array.assign() method:
var a: Array[Node2D] = [Node2D.new()]

# (OK) You can add the value to the array because `Node2D` extends `Node`.
var b: Array[Node] = [a[0]]

# (Error) You cannot assign an `Array[Node2D]` to an `Array[Node]` variable.
b = a

# (OK) But you can use the `assign()` method instead. Unlike the `=` operator,
# the `assign()` method copies the contents of the array, not the reference.
b.assign(a)
The only exception was made for the Array (Array[Variant]) type, for user convenience
and compatibility with old code. However, operations on untyped arrays are considered unsafe.
Packed arrays
GDScript 배열은 속도를 위해 선형적으로 메모리에 할당됩니다. (원소가 수만 개 이상인) 큰 배열은 메모리 단편화를 발생시킬 수 있습니다. 이것이 염려된다면 특수 타입 배열을 사용할 수 있습니다. 이 배열에는 하나의 데이터 타입만 들어갈 수 있습니다. 메모리 단편화를 방지할 뿐더러, 더 적은 메모리를 사용하지만 원자적이고 기본 배열보다 더 느리게 실행됩니다. 따라서 큰 데이터 집합을 사용할 때만 추천합니다:
PackedByteArray: An array of bytes (integers from 0 to 255).
PackedInt32Array: An array of 32-bit integers.
PackedInt64Array: An array of 64-bit integers.
PackedFloat32Array: An array of 32-bit floats.
PackedFloat64Array: An array of 64-bit floats.
PackedStringArray: An array of strings.
PackedVector2Array: An array of Vector2 values.
PackedVector3Array: An array of Vector3 values.
PackedColorArray: An array of Color values.
Dictionary
고유 키로 참조되는 값들을 가지는 연관 컨테이너입니다.
var d = {4: 5, "A key": "A value", 28: [1, 2, 3]}
d["Hi!"] = 0
d = {
    22: "value",
    "some_key": 2,
    "other_key": [2, 3, 4],
    "more_key": "Hello"
}
Lua-style table syntax is also supported. Lua-style uses = instead of :
and doesn't use quotes to mark string keys (making for slightly less to write).
However, keys written in this form can't start with a digit (like any GDScript
identifier), and must be string literals.
var d = {
    test22 = "value",
    some_key = 2,
    other_key = [2, 3, 4],
    more_key = "Hello"
}
존재하는 딕셔너리에 키를 추가하려면, 기존 키와 같은 방식으로 접근한 뒤 할당해야 합니다:
var d = {} # Create an empty Dictionary.
d.waiting = 14 # Add String "waiting" as a key and assign the value 14 to it.
d[4] = "hello" # Add integer 4 as a key and assign the String "hello" as its value.
d["Godot"] = 3.01 # Add String "Godot" as a key and assign the value 3.01 to it.

var test = 4
# Prints "hello" by indexing the dictionary with a dynamic key.
# This is not the same as `d.test`. The bracket syntax equivalent to
# `d.test` is `d["test"]`.
print(d[test])
참고
대괄호 구문은 사전뿐만 아니라 모든 Object의 속성에 접근하는 데 사용할 수 있습니다. 존재하지 않는 속성을 인덱싱하려고 할 때 스크립트 오류가 발생한다는 점에 유의하세요. 이를 방지하려면 Object.get() 및 Object.set() 메서드를 대신 사용하세요.
Signal
A signal is a message that can be emitted by an object to those who want to listen to it. The Signal type can be used for passing the emitter around.
Signals are better used by getting them from actual objects, e.g. $Button.button_up.
Callable
Contains an object and a function, which is useful for passing functions as values (e.g. when connecting to signals).
Getting a method as a member returns a callable. var x = $Sprite2D.rotate
will set the value of x to a callable with $Sprite2D as the object and
rotate as the method.
You can call it using the call method: x.call(PI).
데이터
변수(Variable)
변수는 클래스 멤버로 존재할 수도 있고 함수에 지역적으로 존재할 수도 있습니다. 이들은 var 키워드로 생성되며 초기화할 때 값을 할당받을 수도 있습니다.
var a # Data type is 'null' by default.
var b = 5
var c = 3.8
var d = b + c # Variables are always initialized in direct order (see below).
변수는 타입을 지정할 수도 있습니다. 타입을 지정하면 항상 같은 타입을 가지도록 강제되며, 호환되지 않는 값을 할당하려고 하면 오류가 발생합니다.
타입은 변수 선언 시 변수 이름 뒤에 :(콜론) 기호를 사용해 지정하고 그 뒤에 타입을 지정합니다.
var my_vector2: Vector2
var my_node: Node = Sprite2D.new()
변수가 선언과 동시에 초기화되면 타입을 유추할 수 있으므로 타입 이름을 생략할 수 있습니다:
var my_vector2 := Vector2() # 'my_vector2' is of type 'Vector2'.
var my_node := Sprite2D.new() # 'my_node' is of type 'Sprite2D'.
타입 유추는 할당된 값에 정의된 타입이 있는 경우에만 가능하며, 그렇지 않으면 오류가 발생합니다.
올바른 타입은 다음과 같습니다:
내장 타입(Array, Vector2, int, String 등).
엔진 클래스 (Node, Resource, Reference 등).
스크립트 리소스가 포함된 상수 이름(
const MyScript = preload("res://my_script.gd")를 선언한 경우에MyScript가 여기에 속합니다).같은 스크립트의 스코프 안에 있는 다른 클래스들(같은 스코프에서
class InnerClass안에class NestedClass를 선언한 경우InnerClass.NestedClass가 여기에 속합니다).class_name키워드로 선언된 스크립트 클래스.Autoloads registered as singletons.
참고
While Variant is a valid type specification, it's not an actual type. It
only means there's no set type and is equivalent to not having a static type
at all. Therefore, inference is not allowed by default for Variant,
since it's likely a mistake.
You can turn off this check, or make it only a warning, by changing it in the project settings. See GDScript 경고 시스템(Warning system) for details.
Initialization order
Member variables are initialized in the following order:
Depending on the variable's static type, the variable is either
null(untyped variables and objects) or has a default value of the type (0forint,falseforbool, etc.).The specified values are assigned in the order of the variables in the script, from top to bottom. - (Only for ``Node``-derived classes) If the
@onreadyannotation is applied to a variable, its initialization is deferred to step 5.If defined, the
_init()method is called.When instantiating scenes and resources, the exported values are assigned.
(Only for ``Node``-derived classes)
@onreadyvariables are initialized.(Only for ``Node``-derived classes) If defined, the
_ready()method is called.
경고
You can specify a complex expression as a variable initializer, including function calls. Make sure the variables are initialized in the correct order, otherwise your values may be overwritten. For example:
var a: int = proxy("a", 1)
var b: int = proxy("b", 2)
var _data: Dictionary = {}

func proxy(key: String, value: int):
    _data[key] = value
    print(_data)
    return value

func _init() -> void:
    print(_data)
Will print:
{ "a": 1 }
{ "a": 1, "b": 2 }
{  }
To fix this, move the _data variable definition above the a definition
or remove the empty dictionary assignment (= {}).
Static variables
A class member variable can be declared static:
static var a
Static variables belong to the class, not instances. This means that static variables share values between multiple instances, unlike regular member variables.
From inside a class, you can access static variables from any function, both static and non-static. From outside the class, you can access static variables using the class or an instance (the second is not recommended as it is less readable).
참고
The @export and @onready annotations cannot be applied to a static variable.
Local variables cannot be static.
The following example defines a Person class with a static variable named max_id.
We increment the max_id in the _init() function. This makes it easy to keep track
of the number of Person instances in our game.
# person.gd
class_name Person

static var max_id = 0

var id
var name

func _init(p_name):
    max_id += 1
    id = max_id
    name = p_name
In this code, we create two instances of our Person class and check that the class
and every instance have the same max_id value, because the variable is static and accessible to every instance.
# test.gd
extends Node

func _ready():
    var person1 = Person.new("John Doe")
    var person2 = Person.new("Jane Doe")

    print(person1.id) # 1
    print(person2.id) # 2

    print(Person.max_id)  # 2
    print(person1.max_id) # 2
    print(person2.max_id) # 2
Static variables can have type hints, setters and getters:
static var balance: int = 0

static var debt: int:
    get:
        return -balance
    set(value):
        balance = -value
A base class static variable can also be accessed via a child class:
class A:
    static var x = 1

class B extends A:
    pass

func _ready():
    prints(A.x, B.x) # 1 1
    A.x = 2
    prints(A.x, B.x) # 2 2
    B.x = 3
    prints(A.x, B.x) # 3 3
@static_unload annotation
Since GDScript classes are resources, having static variables in a script prevents it from being unloaded even if there are no more instances of that class and no other references left. This can be important if static variables store large amounts of data or hold references to other project resources, such as scenes. You should clean up this data manually, or use the @static_unload annotation if static variables don't store important data and can be reset.
경고
Currently, due to a bug, scripts are never freed, even if @static_unload annotation is used.
Note that @static_unload applies to the entire script (including inner classes)
and must be placed at the top of the script, before class_name and extends:
@static_unload
class_name MyNode
extends Node
See also Static functions and Static constructor.
캐스팅(Casting)
타입이 지정된 변수에는 호환 가능한 타입의 값을 할당해야 합니다. 값을 특정 타입으로 강제 변환해야 하는 경우, 특히 객체 타입의 경우 캐스팅 연산자 as를 사용할 수 있습니다.
오브젝트 타입 간 캐스팅에서 오브젝트의 값 타입이 캐스팅할 타입과 같거나 캐스팅할 타입의 서브타입인 경우 캐스팅하면 동일한 오브젝트가 생성됩니다.
var my_node2D: Node2D
my_node2D = $Sprite2D as Node2D # Works since Sprite2D is a subtype of Node2D.
값이 캐스팅 타입의 서브타입이 아니라면 캐스팅 연산 결과값은 null이 됩니다.
var my_node2D: Node2D
my_node2D = $Button as Node2D # Results in 'null' since a Button is not a subtype of Node2D.
내장 타입의 경우 가능하다면 강제로 타입을 변환하지만, 불가능하다면 오류를 발생합니다.
var my_int: int
my_int = "123" as int # The string can be converted to int.
my_int = Vector2() as int # A Vector2 can't be converted to int, this will cause an error.
캐스팅은 씬 트리와 상호 작용할 때 더 나은 타입 안전한 변수를 만드는 데 유용합니다:
# Will infer the variable to be of type Sprite2D.
var my_sprite := $Character as Sprite2D

# Will fail if $AnimPlayer is not an AnimationPlayer, even if it has the method 'play()'.
($AnimPlayer as AnimationPlayer).play("walk")
상수
상수는 게임이 실행 중일 때 변경할 수 없는 값입니다. 상수 값은 컴파일 시간에 정해져야 합니다. const 키워드를 사용하면 상수 값에 이름을 지정할 수 있습니다. 선언된 상수에 값을 할당하려고 하면 오류가 발생합니다.
값이 변경되지 않는다면 상수를 사용하는 것이 좋습니다.
const A = 5
const B = Vector2(20, 20)
const C = 10 + 20 # Constant expression.
const D = Vector2(20, 30).x # Constant expression: 20.
const E = [1, 2, 3, 4][0] # Constant expression: 1.
const F = sin(20) # 'sin()' can be used in constant expressions.
const G = x + 20 # Invalid; this is not a constant expression!
const H = A + 20 # Constant expression: 25 (`A` is a constant).
상수의 타입은 할당되는 값에서 유추할 수 있지만 명시적으로 지정할 수도 있습니다:
const A: int = 5
const B: Vector2 = Vector2()
호환되지 않는 타입의 값을 할당하면 오류가 발생합니다.
You can also create constants inside a function, which is useful to name local magic values.
참고
Since objects, arrays and dictionaries are passed by reference, constants are "flat". This means that if you declare a constant array or dictionary, it can still be modified afterwards. They can't be reassigned with another value though.
열거형(Enum)
열거형은 기본적으로 상수의 축약형으로, 연속적인 정수를 일부 상수에 할당할 때 꽤 유용합니다.
enum {TILE_BRICK, TILE_FLOOR, TILE_SPIKE, TILE_TELEPORT}

# Is the same as:
const TILE_BRICK = 0
const TILE_FLOOR = 1
const TILE_SPIKE = 2
const TILE_TELEPORT = 3
If you pass a name to the enum, it will put all the keys inside a constant Dictionary of that name. This means all constant methods of a dictionary can also be used with a named enum.
중요
Keys in a named enum are not registered
as global constants. They should be accessed prefixed
by the enum's name (Name.KEY).
enum State {STATE_IDLE, STATE_JUMP = 5, STATE_SHOOT}

# Is the same as:
const State = {STATE_IDLE = 0, STATE_JUMP = 5, STATE_SHOOT = 6}
# Access values with State.STATE_IDLE, etc.

func _ready():
    # Access values with Name.KEY, prints '5'
    print(State.STATE_JUMP)
    # Use dictionary methods:
    # prints '["STATE_IDLE", "STATE_JUMP", "STATE_SHOOT"]'
    print(State.keys())
    # prints '{ "STATE_IDLE": 0, "STATE_JUMP": 5, "STATE_SHOOT": 6 }'
    print(State)
    # prints '[0, 5, 6]'
    print(State.values())
함수(Function)
함수는 항상 클래스에 속합니다. 변수 조회 범위 우선 순위는 지역(local) → 클래스 멤버 → 전역 순입니다. self 변수는 항상 사용할 수 있고 클래스 멤버에 접근할 수 있는 옵션으로 제공되지만 항상 필수적이지는 않습니다(Python과 달리 함수의 첫 번째 인수로 보내면 안 됩니다).
func my_function(a, b):
    print(a)
    print(b)
    return a + b  # Return is optional; without it 'null' is returned.
함수는 언제든지 반환(return)할 수 있습니다. 기본 반환 값은 null입니다.
If a function contains only one line of code, it can be written on one line:
func square(a): return a * a

func hello_world(): print("Hello World")

func empty_function(): pass
그리고 함수는 인수와 반환 값의 타입을 지정할 수 있습니다. 인수의 타입은 변수와 비슷한 방식으로 추가할 수 있습니다:
func my_function(a: int, b: String):
    pass
함수 인수가 기본 값을 가진다면 타입을 유추할 수 있습니다:
func my_function(int_arg := 42, String_arg := "string"):
    pass
함수의 반환 타입은 화살표 토큰 (->)을 사용헤 인수 목록 뒤에 지정할 수 있습니다:
func my_int_function() -> int:
    return 0
반환 타입이 있는 함수는 반드시 그에 맞는 값을 반환해야 합니다. 타입을 void로 설정하면 함수는 아무 것도 반환하면 안 됩니다. Void 함수는 return 키워드로 함수에서 일찍 반환할 수 있지만, 값을 반환하면 안 됩니다.
func void_function() -> void:
    return # Can't return a value.
참고
void가 아닌 함수는 항상 값을 반환해야 하므로 코드에 분기 문이 있는 경우(예: if/else 구조) 가능한 모든 경로에서 반환해야 합니다. 예를 들어, if 블록 안에 return이 있지만 그 이후에는 없는 경우 블록이 실행되지 않으면 함수가 반환할 유효한 값을 가지지 않기 때문에 에디터에서 오류가 발생합니다.
함수 참조하기(Referencing functions)
Functions are first-class items in terms of the Callable object. Referencing a function by name without calling it will automatically generate the proper callable. This can be used to pass functions as arguments.
func map(arr: Array, function: Callable) -> Array:
    var result = []
    for item in arr:
        result.push_back(function.call(item))
    return result

func add1(value: int) -> int:
    return value + 1;

func _ready() -> void:
    var my_array = [1, 2, 3]
    var plus_one = map(my_array, add1)
    print(plus_one) # Prints [2, 3, 4].
참고
Callables must be called with the call method. You cannot use
the () operator directly. This behavior is implemented to avoid
performance issues on direct function calls.
Lambda functions
Lambda functions allow you to declare functions that do not belong to a class. Instead a Callable object is created and assigned to a variable directly. This can be useful to create Callables to pass around without polluting the class scope.
var lambda = func(x): print(x)
lambda.call(42) # Prints "42"
Lambda functions can be named for debugging purposes:
var lambda = func my_lambda(x):
    print(x)
Note that if you want to return a value from a lambda, an explicit return
is required (you can't omit return):
var lambda = func(x): return x ** 2
print(lambda.call(2)) # Prints `4`.
Lambda functions capture the local environment. Local variables are passed by value, so they won't be updated in the lambda if changed in the local function:
var x = 42
var my_lambda = func(): print(x)
my_lambda.call() # Prints "42"
x = "Hello"
my_lambda.call() # Prints "42"
참고
The values of the outer scope behave like constants. Therefore, if you declare an array or dictionary, it can still be modified afterwards.
정적 함수(Static functions)
A function can be declared static. When a function is static, it has no access to the instance member variables or self.
A static function has access to static variables. Also static functions are useful to make libraries of helper functions:
static func sum2(a, b):
    return a + b
Lambdas cannot be declared static.
See also Static variables and Static constructor.
명령문(Statement)과 제어 흐름(Control Flow)
명령문은 표준으로 할당(Assignment), 함수 호출(Function Call), 제어 흐름 (Control Flow) 구조 등이 될 수 있습니다. 명령문 구분 기호인 ;의 사용은 자유입니다.
Expressions
Expressions are sequences of operators and their operands in orderly fashion. An expression by itself can be a statement too, though only calls are reasonable to use as statements since other expressions don't have side effects.
Expressions return values that can be assigned to valid targets. Operands to some operator can be another expression. An assignment is not an expression and thus does not return any value.
Here are some examples of expressions:
2 + 2 # Binary operation.
-5 # Unary operation.
"okay" if x > 4 else "not okay" # Ternary operation.
x # Identifier representing variable or constant.
x.a # Attribute access.
x[4] # Subscript access.
x > 2 or x < 5 # Comparisons and logic operators.
x == y + 2 # Equality test.
do_something() # Function call.
[1, 2, 3] # Array definition.
{A = 1, B = 2} # Dictionary definition.
preload("res://icon.png") # Preload builtin function.
self # Reference to current instance.
Identifiers, attributes, and subscripts are valid assignment targets. Other expressions cannot be on the left side of an assignment.
if/else/elif
간단한 조건은 if/else/elif 구문을 사용해 만들 수 있습니다. 조건문 주변에 괄호를 씌워도 되지만 필수는 아닙니다. 탭 기반 들여쓰기의 특성을 감안하면 else/if 대신 elif를 사용해서 들여쓰기 수준을 유지할 수 있습니다.
if (expression):
    statement(s)
elif (expression):
    statement(s)
else:
    statement(s)
간단한 명령문은 조건처럼 같은 줄에 적을 수 있습니다:
if 1 + 1 == 2: return 2 + 2
else:
    var x = 3 + 3
    return x
때로는 불리언(Boolean) 표현식을 기반으로 초기 값을 다르게 할당해야 하는 경우가 있습니다. 이 경우에는 삼항 표현식을 쓰면 됩니다:
var x = (value) if (expression) else (value)
y += 3 if y < 10 else -1
삼항 if 표현식은 2개 이상의 분기를 처리하기 위해 중첩될 수 있습니다. 삼항 if 표현식을 중첩할 때 가독성을 유지하기 위해 전체 표현식을 여러 줄로 감싸는 것이 좋습니다:
var count = 0

var fruit = (
        "apple" if count == 2
        else "pear" if count == 1
        else "banana" if count == 0
        else "orange"
)
print(fruit)  # banana

# Alternative syntax with backslashes instead of parentheses (for multi-line expressions).
# Less lines required, but harder to refactor.
var fruit_alt = \
        "apple" if count == 2 \
        else "pear" if count == 1 \
        else "banana" if count == 0 \
        else "orange"
print(fruit_alt)  # banana
You may also wish to check if a value is contained within something. You can
use an if statement combined with the in operator to accomplish this:
# Check if a letter is in a string.
var text = "abc"
if 'b' in text: print("The string contains b")

# Check if a variable is contained within a node.
if "varName" in get_parent(): print("varName is defined in parent!")
while
Simple loops are created by using while syntax. Loops can be broken
using break or continued using continue (which skips to the next
iteration of the loop without executing any further code in the current iteration):
while (expression):
    statement(s)
for
배열이나 테이블과 같은 범위의 반복에는 for 루프가 사용됩니다. 배열을 반복할 때 현재 배열 요소는 루프 변수에 저장됩니다. 딕셔너리를 반복할 때 key는 루프 변수에 저장됩니다.
for x in [5, 7, 11]:
    statement # Loop iterates 3 times with 'x' as 5, then 7 and finally 11.

var dict = {"a": 0, "b": 1, "c": 2}
for i in dict:
    print(dict[i]) # Prints 0, then 1, then 2.

for i in range(3):
    statement # Similar to [0, 1, 2] but does not allocate an array.

for i in range(1, 3):
    statement # Similar to [1, 2] but does not allocate an array.

for i in range(2, 8, 2):
    statement # Similar to [2, 4, 6] but does not allocate an array.

for i in range(8, 2, -2):
    statement # Similar to [8, 6, 4] but does not allocate an array.

for c in "Hello":
    print(c) # Iterate through all characters in a String, print every letter on new line.

for i in 3:
    statement # Similar to range(3).

for i in 2.2:
    statement # Similar to range(ceil(2.2)).
If you want to assign values on an array as it is being iterated through, it
is best to use for i in array.size().
for i in array.size():
        array[i] = "Hello World"
The loop variable is local to the for-loop and assigning to it will not change the value on the array. Objects passed by reference (such as nodes) can still be manipulated by calling methods on the loop variable.
for string in string_array:
    string = "Hello World" # This has no effect

for node in node_array:
    node.add_to_group("Cool_Group") # This has an effect
match
match 명령문은 프로그램의 실행을 분기하는 데 사용됩니다. 다른 많은 언어에서 볼 수 있는 switch 명령문과 유사하지만 몇 가지 추가 기능을 제공합니다.
경고
match is more type strict than the == operator. For example 1 will not match 1.0. The only exception is String vs StringName matching:
for example, the String "hello" is considered equal to the StringName &"hello".
Basic syntax
match <expression>:
    <pattern(s)>:
        <block>
    <pattern(s)> when <guard expression>:
        <block>
    <...>
Crash-course for people who are familiar with switch statements
switch를match로 바꾸세요.case를 제거하세요.Remove any
breaks.default를 하나의 밑줄로 변경하세요.
Control flow
The patterns are matched from top to bottom.
If a pattern matches, the first corresponding block will be executed. After that, the execution continues below the match statement.
참고
The special continue behavior in match supported in 3.x was removed in Godot 4.0.
The following pattern types are available:
- Literal pattern
Matches a literal:
match x:
    1:
        print("We are number one!")
    2:
        print("Two are better than one!")
    "test":
        print("Oh snap! It's a string!")
- Expression pattern
Matches a constant expression, an identifier, or an attribute access (
A.B):match typeof(x): TYPE_FLOAT: print("float") TYPE_STRING: print("text") TYPE_ARRAY: print("array")
- 와일드카드 패턴(Wildcard pattern)
이 패턴은 모든 것에 매치됩니다. 하나의 밑줄로 쓸 수 있습니다.
다른 언어의
switch명령문의default와 같은 의미로 쓰입니다:match x: 1: print("It's one!") 2: print("It's one times two!") _: print("It's not 1 or 2. I don't care to be honest.")
- 바인딩 패턴(Binding pattern)
바인딩 패턴은 새 변수를 도입합니다. 와일드카드 패턴과 마찬가지로 모든 것에 매치됩니다. 그리고 값에 이름을 부여합니다. 이는 특히 배열 패턴과 딕셔너리 패턴에 유용합니다:
match x:
    1:
        print("It's one!")
    2:
        print("It's one times two!")
    var new_var:
        print("It's not 1 or 2, it's ", new_var)
- 배열 패턴(Array pattern)
배열을 비교합니다. 배열 패턴의 각 단일 요소도 패턴이므로, 패턴을 중첩할 수 있습니다.
배열의 길이가 패턴과 같은지 테스트하고, 같지 않다면 패턴이 일치하지 않습니다.
개방형 배열(Open-ended array): 배열의 마지막 서브패턴을
..으로 만들어서 패턴보다 배열이 더 커질 수 있습니다.각 서브패턴은 쉼표로 구분해야 합니다.
match x:
    []:
        print("Empty array")
    [1, 3, "test", null]:
        print("Very specific array")
    [var start, _, "test"]:
        print("First element is ", start, ", and the last is \"test\"")
    [42, ..]:
        print("Open ended array")
- 딕셔너리 패턴(Dictionary pattern)
배열 패턴과 같은 방식으로 작동합니다. 모든 키는 일정한 패턴이어야 합니다.
딕셔너리의 길이가 패턴과 같은지 테스트하고, 같지 않다면 패턴이 일치하지 않습니다.
개방형 딕셔너리(Open-ended dictionary): 딕셔너리의 마지막 서브패턴을
..으로 만들어서 패턴보다 딕셔너리가 더 커질 수 있습니다.모든 서브패턴은 쉼표로 구분되어야 합니다.
값을 지정하지 않으면, 키의 존재 여부만 확인됩니다.
값 패턴과 키 패턴은
:로 분리됩니다.match x: {}: print("Empty dict") {"name": "Dennis"}: print("The name is Dennis") {"name": "Dennis", "age": var age}: print("Dennis is ", age, " years old.") {"name", "age"}: print("Has a name and an age, but it's not Dennis :(") {"key": "godotisawesome", ..}: print("I only checked for one entry and ignored the rest")
- 다중 패턴(Multiple patterns)
여러 패턴을 쉼표로 구분해서 지정할 수 있습니다. 이 패턴들 사이에서 바인딩은 허용되지 않습니다.
match x:
    1, 2, 3:
        print("It's 1 - 3")
    "Sword", "Splash potion", "Fist":
        print("Yep, you've taken damage")
Pattern guards
Only one branch can be executed per match. Once a branch is chosen, the rest are not checked.
If you want to use the same pattern for multiple branches or to prevent choosing a branch with too general pattern,
you can specify a guard expression after the list of patterns with the when keyword:
match point:
    [0, 0]:
        print("Origin")
    [_, 0]:
        print("Point on X-axis")
    [0, _]:
        print("Point on Y-axis")
    [var x, var y] when y == x:
        print("Point on line y = x")
    [var x, var y] when y == -x:
        print("Point on line y = -x")
    [var x, var y]:
        print("Point (%s, %s)" % [x, y])
If there is no matching pattern for the current branch, the guard expression is not evaluated and the patterns of the next branch are checked.
If a matching pattern is found, the guard expression is evaluated.
If it's true, then the body of the branch is executed and
matchends.If it's false, then the patterns of the next branch are checked.
클래스
기본적으로 모든 스크립트 파일은 이름 없는 클래스입니다. 이 경우 상대 경로나 절대 경로를 사용한 파일 경로를 통해서만 참조할 수 있습니다. 예를 들어 스크립트 파일의 이름을 characrer.gd로 지은 경우 다음과 같이 참조합니다:
# Inherit from 'character.gd'.

extends "res://path/to/character.gd"

# Load character.gd and create a new node instance from it.

var Character = load("res://path/to/character.gd")
var character_node = Character.new()
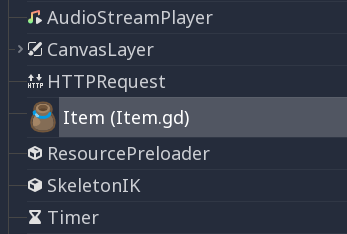
Registering named classes
You can give your class a name to register it as a new type in Godot's
editor. For that, you use the class_name keyword. You can optionally use
the @icon annotation with a path to an image, to use it as an icon. Your
class will then appear with its new icon in the editor:
# item.gd

@icon("res://interface/icons/item.png")
class_name Item
extends Node
팁
SVG images that are used as custom node icons should have the Editor > Scale With Editor Scale and Editor > Convert Icons With Editor Theme import options enabled. This allows icons to follow the editor's scale and theming settings if the icons are designed with the same color palette as Godot's own icons.
클래스 파일 예제입니다:
# Saved as a file named 'character.gd'.

class_name Character


var health = 5


func print_health():
    print(health)


func print_this_script_three_times():
    print(get_script())
    print(ResourceLoader.load("res://character.gd"))
    print(Character)
If you want to use extends too, you can keep both on the same line:
class_name MyNode extends Node
참고
Godot initializes non-static variables every time you create an instance, and this includes arrays and dictionaries. This is in the spirit of thread safety, since scripts can be initialized in separate threads without the user knowing.
상속(Inheritance)
(파일로 저장한) 클래스는 여기서 상속될 수 있습니다:
전역 클래스(Global class).
다른 클래스 파일.
다른 클래스 파일의 내부 클래스.
다중 상속은 허용되지 않습니다.
extends 키워드를 사용해 상속합니다:
# Inherit/extend a globally available class.
extends SomeClass

# Inherit/extend a named class file.
extends "somefile.gd"

# Inherit/extend an inner class in another file.
extends "somefile.gd".SomeInnerClass
참고
If inheritance is not explicitly defined, the class will default to inheriting RefCounted.
주어진 인스턴스가 주어진 클래스로부터 상속받았는지 확인하려면, is 키워드를 사용할 수 있습니다:
# Cache the enemy class.
const Enemy = preload("enemy.gd")

# [...]

# Use 'is' to check inheritance.
if entity is Enemy:
    entity.apply_damage()
To call a function in a super class (i.e. one extend-ed in your current
class), use the super keyword:
super(args)
This is especially useful because functions in extending classes replace
functions with the same name in their super classes. If you still want to
call them, you can use super:
func some_func(x):
    super(x) # Calls the same function on the super class.
If you need to call a different function from the super class, you can specify the function name with the attribute operator:
func overriding():
    return 0 # This overrides the method in the base class.

func dont_override():
    return super.overriding() # This calls the method as defined in the base class.
경고
One of the common misconceptions is trying to override non-virtual engine methods
such as get_class(), queue_free(), etc. This is not supported for technical reasons.
In Godot 3, you can shadow engine methods in GDScript, and it will work if you call this method in GDScript. However, the engine will not execute your code if the method is called inside the engine on some event.
In Godot 4, even shadowing may not always work, as GDScript optimizes native method calls.
Therefore, we added the NATIVE_METHOD_OVERRIDE warning, which is treated as an error by default.
We strongly advise against disabling or ignoring the warning.
Note that this does not apply to virtual methods such as _ready(), _process() and others
(marked with the virtual qualifier in the documentation and the names start with an underscore).
These methods are specifically for customizing engine behavior and can be overridden in GDScript.
Signals and notifications can also be useful for these purposes.
클래스 생성자(Class Constructor)
The class constructor, called on class instantiation, is named _init. If you
want to call the base class constructor, you can also use the super syntax.
Note that every class has an implicit constructor that it's always called
(defining the default values of class variables). super is used to call the
explicit constructor:
func _init(arg):
   super("some_default", arg) # Call the custom base constructor.
예제를 통해서 더 쉽게 설명해 보겠습니다. 다음 시나리오를 생각해보세요:
# state.gd (inherited class).
var entity = null
var message = null


func _init(e=null):
    entity = e


func enter(m):
    message = m


# idle.gd (inheriting class).
extends "state.gd"


func _init(e=null, m=null):
    super(e)
    # Do something with 'e'.
    message = m
유의해야 할 몇 가지 사항이 있습니다:
If the inherited class (
state.gd) defines a_initconstructor that takes arguments (ein this case), then the inheriting class (idle.gd) must define_initas well and pass appropriate parameters to_initfromstate.gd.idle.gdcan have a different number of arguments than the base classstate.gd.In the example above,
epassed to thestate.gdconstructor is the sameepassed in toidle.gd.If
idle.gd's_initconstructor takes 0 arguments, it still needs to pass some value to thestate.gdbase class, even if it does nothing. This brings us to the fact that you can pass expressions to the base constructor as well, not just variables, e.g.:# idle.gd func _init(): super(5)
Static constructor
A static constructor is a static function _static_init that is called automatically
when the class is loaded, after the static variables have been initialized:
static var my_static_var = 1

static func _static_init():
    my_static_var = 2
A static constructor cannot take arguments and must not return any value.
내부 클래스(Inner Class)
클래스 파일은 내부 클래스를 가질 수 있습니다. 내부 클래스는 class 키워드로 정의합니다. 내부 클래스는 ClassName.new() 함수로 인스턴스화 될 수 있습니다.
# Inside a class file.

# An inner class in this class file.
class SomeInnerClass:
    var a = 5


    func print_value_of_a():
        print(a)


# This is the constructor of the class file's main class.
func _init():
    var c = SomeInnerClass.new()
    c.print_value_of_a()
리소스로 취급되는 클래스
파일로 저장된 클래스는 리소스로 취급됩니다. 다른 클래스에서 접근하려면 반드시 디스크에서 불러와야 합니다. 불러오려면 load나 preload 함수를 사용할 수 있습니다 (아래를 참고하세요). 불러온 클래스 리소스를 인스턴스화 하려면 클래스 오브젝트에 new 함수를 호출해야 합니다:
# Load the class resource when calling load().
var MyClass = load("myclass.gd")

# Preload the class only once at compile time.
const MyClass = preload("myclass.gd")


func _init():
    var a = MyClass.new()
    a.some_function()
내보내기(Export)
참고
내보내기에 관한 서술은 GDScript exported properties로 옮겨졌습니다.
Properties (setters and getters)
Sometimes, you want a class' member variable to do more than just hold data and actually perform some validation or computation whenever its value changes. It may also be desired to encapsulate its access in some way.
For this, GDScript provides a special syntax to define properties using the set and get
keywords after a variable declaration. Then you can define a code block that will be executed
when the variable is accessed or assigned.
Example:
var milliseconds: int = 0
var seconds: int:
    get:
        return milliseconds / 1000
    set(value):
        milliseconds = value * 1000
참고
Unlike setget in previous Godot versions, the properties setter and getter are always called (except as noted below),
even when accessed inside the same class (with or without prefixing with self.). This makes the behavior
consistent. If you need direct access to the value, use another variable for direct access and make the property
code use that name.
Alternative syntax
Also there is another notation to use existing class functions if you want to split the code from the variable declaration or you need to reuse the code across multiple properties (but you can't distinguish which property the setter/getter is being called for):
var my_prop:
    get = get_my_prop, set = set_my_prop
This can also be done in the same line:
var my_prop: get = get_my_prop, set = set_my_prop
The setter and getter must use the same notation, mixing styles for the same variable is not allowed.
참고
You cannot specify type hints for inline setters and getters. This is done on purpose to reduce the boilerplate. If the variable is typed, then the setter's argument is automatically of the same type, and the getter's return value must match it. Separated setter/getter functions can have type hints, and the type must match the variable's type or be a wider type.
When setter/getter is not called
When a variable is initialized, the value of the initializer will be written directly to the variable.
Including if the @onready annotation is applied to the variable.
Using the variable's name to set it inside its own setter or to get it inside its own getter will directly access the underlying member, so it won't generate infinite recursion and saves you from explicitly declaring another variable:
signal changed(new_value)
var warns_when_changed = "some value":
    get:
        return warns_when_changed
    set(value):
        changed.emit(value)
        warns_when_changed = value
This also applies to the alternative syntax:
var my_prop: set = set_my_prop

func set_my_prop(value):
    my_prop = value # No infinite recursion.
경고
The exception does not propagate to other functions called in the setter/getter. For example, the following code will cause an infinite recursion:
var my_prop:
    set(value):
        set_my_prop(value)

func set_my_prop(value):
    my_prop = value # Infinite recursion, since `set_my_prop()` is not the setter.
툴 모드(Tool mode)
By default, scripts don't run inside the editor and only the exported
properties can be changed. In some cases, it is desired that they do run
inside the editor (as long as they don't execute game code or manually
avoid doing so). For this, the @tool annotation exists and must be
placed at the top of the file:
@tool
extends Button

func _ready():
    print("Hello")
자세한 설명은 편집기에서 코드 실행하기를 참고하세요.
경고
Tool 스크립트에서 queue_free() 또는 free()로 노드를 해제할 때 (특히 해제할 노드가 스크립트 소유자 자체일 때) 주의하세요. Tool 스크립트는 에디터에서 코드를 실행하기 때문에 잘못 사용하면 에디터가 고장날 수 있습니다.
메모리 관리
Godot implements reference counting to free certain instances that are no longer
used, instead of a garbage collector, or requiring purely manual management.
Any instance of the RefCounted class (or any class that inherits
it, such as Resource) will be freed automatically when no longer
in use. For an instance of any class that is not a RefCounted
(such as Node or the base Object type), it will
remain in memory until it is deleted with free() (or queue_free()
for Nodes).
참고
If a Node is deleted via free() or queue_free(),
all of its children will also recursively be deleted.
To avoid reference cycles that can't be freed, a WeakRef function is provided for creating weak references, which allow access to the object without preventing a RefCounted from freeing. Here is an example:
extends Node

var my_file_ref

func _ready():
    var f = FileAccess.open("user://example_file.json", FileAccess.READ)
    my_file_ref = weakref(f)
    # the FileAccess class inherits RefCounted, so it will be freed when not in use

    # the WeakRef will not prevent f from being freed when other_node is finished
    other_node.use_file(f)

func _this_is_called_later():
    var my_file = my_file_ref.get_ref()
    if my_file:
        my_file.close()
또는, 참조를 사용하지 않을 때 is_instance_valid(instance)를 사용해서 오브젝트가 해제되었는지 확인할 수 있습니다.
시그널
시그널은 한 오브젝트에서 반응할 수 있는 다른 오브젝트로 메시지를 방출하는 도구입니다. 클래스에 대한 커스텀 시그널을 생성하려면 signal 키워드를 사용하세요.
extends Node


# A signal named health_depleted.
signal health_depleted
참고
시그널은 콜백 메커니즘입니다. 그리고 일반적인 프로그래밍 패턴인 옵저버(Observer)의 역할도 합니다. 자세한 정보는 Game Programming Patterns의 전자책, Observer tutorial을 참고하세요.
You can connect these signals to methods the same way you connect built-in signals of nodes like Button or RigidBody3D.
In the example below, we connect the health_depleted signal from a
Character node to a Game node. When the Character node emits the
signal, the game node's _on_character_health_depleted is called:
# game.gd

func _ready():
    var character_node = get_node('Character')
    character_node.health_depleted.connect(_on_character_health_depleted)


func _on_character_health_depleted():
    get_tree().reload_current_scene()
하나의 시그널에 원하는 만큼 많은 인수를 함께 방출할 수 있습니다.
위가 유용한 예입니다. 화면의 체력 바가 애니메이션이 적용되며 체력 변화에 반응하기를 원하지만 유저 인터페이스를 씬 트리의 플레이어와 분리하려고 한다고 가정해 보겠습니다.
In our character.gd script, we define a health_changed signal and emit
it with Signal.emit(), and from
a Game node higher up our scene tree, we connect it to the Lifebar using
the Signal.connect() method:
# character.gd

...
signal health_changed


func take_damage(amount):
    var old_health = health
    health -= amount

    # We emit the health_changed signal every time the
    # character takes damage.
    health_changed.emit(old_health, health)
...
# lifebar.gd

# Here, we define a function to use as a callback when the
# character's health_changed signal is emitted.

...
func _on_Character_health_changed(old_value, new_value):
    if old_value > new_value:
        progress_bar.modulate = Color.RED
    else:
        progress_bar.modulate = Color.GREEN

    # Imagine that `animate` is a user-defined function that animates the
    # bar filling up or emptying itself.
    progress_bar.animate(old_value, new_value)
...
Game 노드에서는 Character와 Lifebar 노드를 가져와서 시그널을 방출하는 캐릭터를 수신기인 Lifebar 노드에 연결합니다.
# game.gd

func _ready():
    var character_node = get_node('Character')
    var lifebar_node = get_node('UserInterface/Lifebar')

    character_node.health_changed.connect(lifebar_node._on_Character_health_changed)
이를 통해 Lifebar를 Character 노드에 연결하지 않고도 체력 변화에 반응할 수 있습니다.
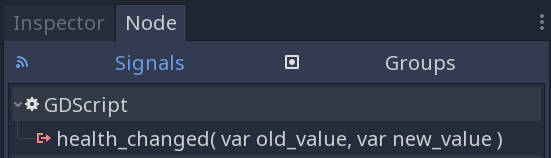
시그널을 정의한 뒤에 개별적으로 괄호 안에 인수 이름을 적을 수 있습니다:
# Defining a signal that forwards two arguments.
signal health_changed(old_value, new_value)
인수는 에디터의 노드(Node) 독에 표시되며 Godot는 이 인수로 콜백 함수를 생성할 수 있습니다. 시그널을 방출할 때 여전히 많은 수의 인수를 방출할 수 있으므로, 다시 말해 올바른 값을 방출하는 일은 여러분에게 달려 있습니다.
GDScript는 시그널과 메서드 간의 연결에 값 배열을 바인딩할 수 있습니다. 시그널이 방출되면 콜백 메서드는 바인딩된 값들을 받습니다. 이러한 바인딩된 인수는 각 연결에서 고유하며, 값들은 똑같이 유지됩니다.
방출된 시그널이 여러분이 필요한 데이터에 대한 접근을 제공하지 않는다면 이 배열의 값들로 연결에 여분의 상수 정보를 추가할 수 있습니다.
위의 예를 바탕으로 Player1이 데미지를 22 입었습니다.와 같이 각 캐릭터가 입은 데미지 로그를 화면에 표시하고 싶다고 가정해 보겠습니다. health_changed 시그널은 피해를 입은 캐릭터의 이름을 알려주지 않습니다. 따라서 게임 내 콘솔에 시그널을 연결할 때 바인딩 배열 인수에 캐릭터 이름을 추가할 수 있습니다:
# game.gd

func _ready():
    var character_node = get_node('Character')
    var battle_log_node = get_node('UserInterface/BattleLog')

    character_node.health_changed.connect(battle_log_node._on_Character_health_changed, [character_node.name])
BattleLog 노드는 바인딩 배열의 각 요소를 추가 인수로 받습니다:
# battle_log.gd

func _on_Character_health_changed(old_value, new_value, character_name):
    if not new_value <= old_value:
        return

    var damage = old_value - new_value
    label.text += character_name + " took " + str(damage) + " damage."
Awaiting for signals or coroutines
The await keyword can be used to create coroutines
which wait until a signal is emitted before continuing execution. Using the await keyword with a signal or a
call to a function that is also a coroutine will immediately return the control to the caller. When the signal is
emitted (or the called coroutine finishes), it will resume execution from the point on where it stopped.
For example, to stop execution until the user presses a button, you can do something like this:
func wait_confirmation():
    print("Prompting user")
    await $Button.button_up # Waits for the button_up signal from Button node.
    print("User confirmed")
    return true
In this case, the wait_confirmation becomes a coroutine, which means that the caller also needs to await for it:
func request_confirmation():
    print("Will ask the user")
    var confirmed = await wait_confirmation()
    if confirmed:
        print("User confirmed")
    else:
        print("User cancelled")
Note that requesting a coroutine's return value without await will trigger an error:
func wrong():
    var confirmed = wait_confirmation() # Will give an error.
However, if you don't depend on the result, you can just call it asynchronously, which won't stop execution and won't make the current function a coroutine:
func okay():
    wait_confirmation()
    print("This will be printed immediately, before the user press the button.")
If you use await with an expression that isn't a signal nor a coroutine, the value will be returned immediately and the function won't give the control back to the caller:
func no_wait():
    var x = await get_five()
    print("This doesn't make this function a coroutine.")

func get_five():
    return 5
This also means that returning a signal from a function that isn't a coroutine will make the caller await on that signal:
func get_signal():
    return $Button.button_up

func wait_button():
    await get_signal()
    print("Button was pressed")
참고
Unlike yield in previous Godot versions, you cannot obtain the function state object.
This is done to ensure type safety.
With this type safety in place, a function cannot say that it returns an int while it actually returns a function state object
during runtime.
Assert 키워드
assert 키워드는 디버그 빌드에서 조건을 확인하는 데 사용할 수 있습니다. assert는 디버그 빌드가 아니면 무시됩니다. 즉, 인수로 전달된 표현식은 릴리스 모드로 내보낸 프로젝트에서 평가되지 않습니다. 이 때문에 assert에는 부작용이 있는 표현식이 포함되어서는 안 됩니다. 그렇지 않으면 스크립트는 프로젝트가 디버그 빌드인지 여부에 따라 매우 다르게 동작할 것입니다.
# Check that 'i' is 0. If 'i' is not 0, an assertion error will occur.
assert(i == 0)
에디터에서 프로젝트를 실행할 때 assert 오류가 발생하면 프로젝트가 일시 정지됩니다.
You can optionally pass a custom error message to be shown if the assertion fails:
assert(enemy_power < 256, "Enemy is too powerful!")
주석
#부터 줄 끝까지는 주석으로 간주되어 무시됩니다.# This is a comment.팁
In the Godot script editor, special keywords are highlighted within comments to bring the user's attention to specific comments:
Critical (appears in red):
ALERT,ATTENTION,CAUTION,CRITICAL,DANGER,SECURITYWarning (appears in yellow):
BUG,DEPRECATED,FIXME,HACK,TASK,TBD,TODO,WARNINGNotice (appears in green):
INFO,NOTE,NOTICE,TEST,TESTINGThese keywords are case-sensitive, so they must be written in uppercase for them to be recognized:
The list of highlighted keywords and their colors can be changed in the Text Editor > Theme > Comment Markers section of the Editor Settings.