Up to date
This page is up to date for Godot 4.2.
If you still find outdated information, please open an issue.
Ограничения 3D-рендеринга
Введение
Из-за ориентированности на производительность движки рендеринга в реальном времени имеют множество ограничений. Визуализатор Godot - не исключение. Чтобы эффективно работать с этими ограничениями, вам необходимо их понимать.
Ограничения размера текстуры
На настольных компьютерах и ноутбуках текстуры размером более 8192 × 8192 могут не поддерживаться старыми устройствами. Вы можете узнать ограничения вашего целевого графического процессора на GPUinfo.org.
Мобильные графические процессоры обычно ограничены текстурами 4096×4096. Кроме того, некоторые мобильные графические процессоры не поддерживают повторение текстур, размер которых не равен степени двойки. Поэтому, если вы хотите, чтобы ваша текстура отображалась правильно на всех платформах, вам следует избегать использования текстур размером более 4096 × 4096 и использовать текстуры размерностью в степень двойки, если текстура должна повторяться.
To limit the size of a specific texture that may be too large to render, you can
set the Process > Size Limit import option to a value greater than 0.
This will reduce the texture's dimensions on import (preserving aspect ratio)
without affecting the source file.
Цветовая полоса
When using the Forward+ or Forward Mobile rendering methods, Godot's 3D engine renders internally in HDR. However, the rendering output will be tonemapped to a low dynamic range so it can be displayed on the screen. This can result in visible banding, especially when using untextured materials. For performance reasons, color precision is also lower when using the Forward Mobile rendering method compared to Forward+.
When using the Compatibility rendering method, HDR is not used and the color precision is the lowest of all rendering methods. This also applies to 2D rendering, where banding may be visible when using smooth gradient textures.
Есть две основные вещи, которые следует отметить:
If using the Forward+ or Forward Mobile rendering methods, enable Use Debanding in the advanced Project Settings. This applies a fullscreen debanding shader as a post-processing effect and is very cheap.
Alternatively, bake some noise into your textures. This is mainly effective in 2D, e.g. for vignetting effects. In 3D, you can also use a custom debanding shader to be applied on your materials. This technique works even if your project is rendered with low color precision, which means it will work when using the Mobile and Compatibility rendering methods.
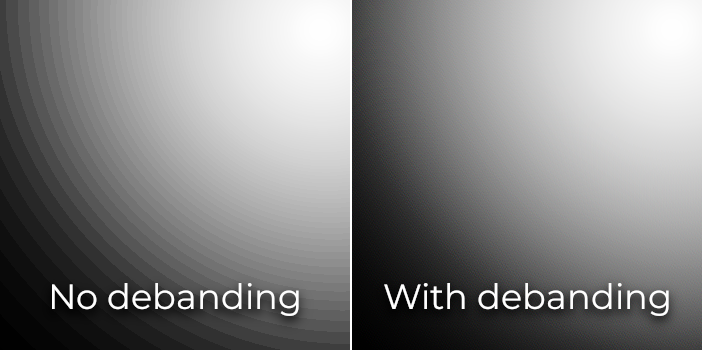
Color banding comparison (contrast increased for more visibility)
См.также
See Banding in Games: A Noisy Rant (PDF) for more details about banding and ways to combat it.
Точность буфера глубины
Для сортировки объектов в трёхмерном пространстве движки рендеринга используют буфер глубины (также называемый Z-буфером). Этот буфер имеет конечную точность: 24 разряда на настольных платформах, и иногда до 16 разрядов на мобильных платформах (по соображениям производительности). Если два разных объекта имеют одно и то же значение буфера, произойдет борьба за внимание зрителя. Это будет выглядеть как мерцающие текстуры, когда камера движется или вращается.
Чтобы сделать буфер глубины более точным по визуализируемой области, вы должны увеличить свойство Near узла Camera. Однако будьте осторожны: если вы установите его слишком высоко, игроки смогут видеть сквозь близлежащую геометрию. Вам также следует уменьшить свойство Far узла Camera до минимально допустимого значения для вашего варианта использования, но имейте в виду, что это не повлияет на точность так сильно, как свойство Near.
Если вам нужна высокая точность только тогда, когда игрок смотрит вдаль, вы можете динамически изменять её в зависимости от условий игры. Например, если игрок садится в самолёт, свойство Near может быть временно увеличено, чтобы избежать мерцания текстур на расстоянии. Затем его можно уменьшить, когда игрок покинет самолёт.
В зависимости от сцены и условий просмотра, вы также можете перемещать конкурирующие объекты дальше друг от друга, чтобы игрок не видел разницы.
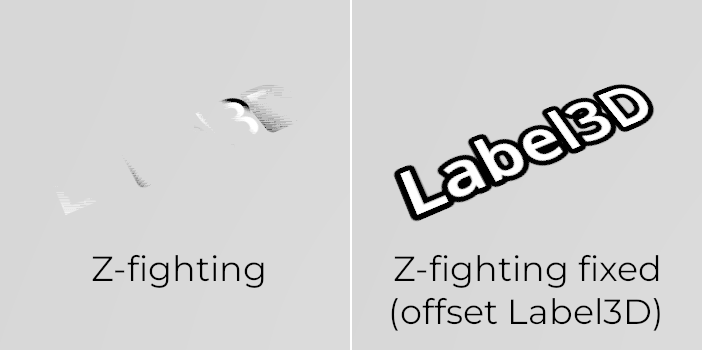
Z-fighting comparison (before and after tweaking the scene by offsetting the Label3D away from the floor)
Сортировка прозрачности
In Godot, transparent materials are drawn after opaque materials. Transparent objects are sorted back to front before being drawn based on the Node3D's position, not the vertex position in world space. Due to this, overlapping objects may often be sorted out of order. To fix improperly sorted objects, tweak the material's Render Priority property or the node's Sorting Offset. Render Priority will force specific materials to appear in front of or behind other transparent materials, while Sorting Offset will move the object forward or backward for the purpose of sorting. Even then, these may not always be sufficient.
Некоторые механизмы рендеринга используют методы независимой от порядка прозрачности, но это дорого обходится для GPU-производительности. Godot в настоящее время не предоставляет эту функцию. Есть ещё несколько способов избежать эту проблему:
Only make materials transparent if you actually need it. If a material only has a small transparent part, consider splitting it into a separate material. This will allow the opaque part to cast shadows and will also improve performance.
If your texture mostly has fully opaque and fully transparent areas, you can use alpha testing instead of alpha blending. This transparency mode is faster to render and doesn't suffer from transparency issues. Enable Transparency > Transparency to Alpha Scissor in StandardMaterial3D, and adjust Transparency > Alpha Scissor Threshold accordingly if needed. Note that MSAA will not antialias the texture's edges unless alpha antialiasing is enabled in the material's properties. However, FXAA, TAA and supersampling will be able to antialias the texture's edges regardless of whether alpha antialiasing is enabled on the material.
If you need to render semi-transparent areas of the texture, alpha scissor isn't suitable. Instead, setting the StandardMaterial3D's Transparency > Transparency property to Depth Pre-Pass can sometimes work (at a performance cost). You can also try the Alpha Hash mode.
If you want a material to fade with distance, use the StandardMaterial3D distance fade mode Pixel Dither or Object Dither instead of Pixel Alpha. This will make the material opaque, which also speeds up rendering.
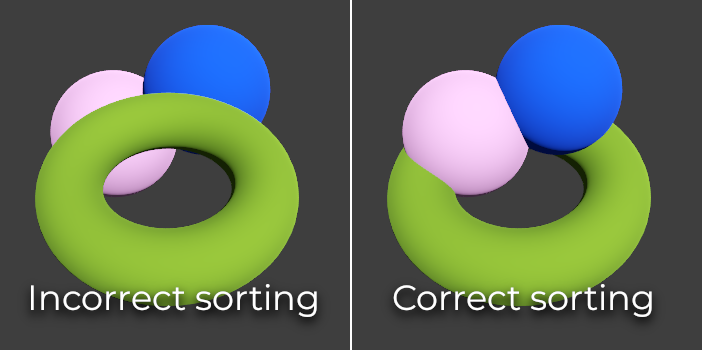
Transparency sorting comparison (alpha-blended materials on the left, alpha scissor materials on the right)
Множественная выборка сглаживания (MSAA)
См.также
Antialiasing is explained in detail on the 3D antialiasing page.
MSAA принимает несколько выборок покрытия на краях полигонов при визуализации объектов. Он не увеличивает количество образцов цвета, используемых для рендеринга сцены. Вот что это означает на практике:
Края сеток будут хорошо сглажены (как и при суперсэмплинге).
Прозрачные материалы, использующие альфа-тестирование (1-битная прозрачность), не будут сглажены.
Зеркальное наложение ("искры", появляющиеся на отражающих поверхностях) не будет уменьшено.
Есть несколько способов обойти это ограничение в зависимости от вашего бюджета производительности:
To make specular aliasing less noticeable, open the Project Settings and enable Rendering > Quality > Screen Space Filters > Screen Space Roughness Limiter. This filter has a moderate cost on performance, so it should only be enabled if you actually need it.
Enable fast approximate antialiasing (FXAA) in addition to (or instead of) MSAA. Since FXAA is a screen-space antialiasing method, it will smooth out anything. As a downside, FXAA also makes the scene appear blurrier, especially at resolutions below 1440p. FXAA also lacks temporal information, which means its impact on specular aliasing is limited.
Enable temporal antialiasing (TAA) in addition to (or instead of) MSAA. Since TAA is a screen-space antialiasing method, it will smooth out anything. As a downside, TAA also makes the scene appear blurrier, especially at resolutions below 1440p. TAA provides superior quality compared to FXAA and can effectively combat specular aliasing. However, TAA has a greater performance cost compared to FXAA, and TAA can introduce ghosting artifacts with fast movement.
Render the scene at a higher resolution by increasing the Scaling 3D > Scale project setting above
1.0. This technique is called supersample antialiasing (SSAA) and is very slow. Its use is generally only recommended for offline rendering.