Up to date
This page is up to date for Godot 4.2.
If you still find outdated information, please open an issue.
Введение в возможности анимации
Узел AnimationPlayer позволяет создавать вам что угодно, от простой до сложной анимации.
В этом руководстве Вы узнаете:
Работа с панелью анимации
Анимация любого параметра узла
Создание простой анимации
In Godot, you can animate anything available in the Inspector, such as Node transforms, sprites, UI elements, particles, visibility and color of materials, and so on. You can also modify values of script variables and even call functions.
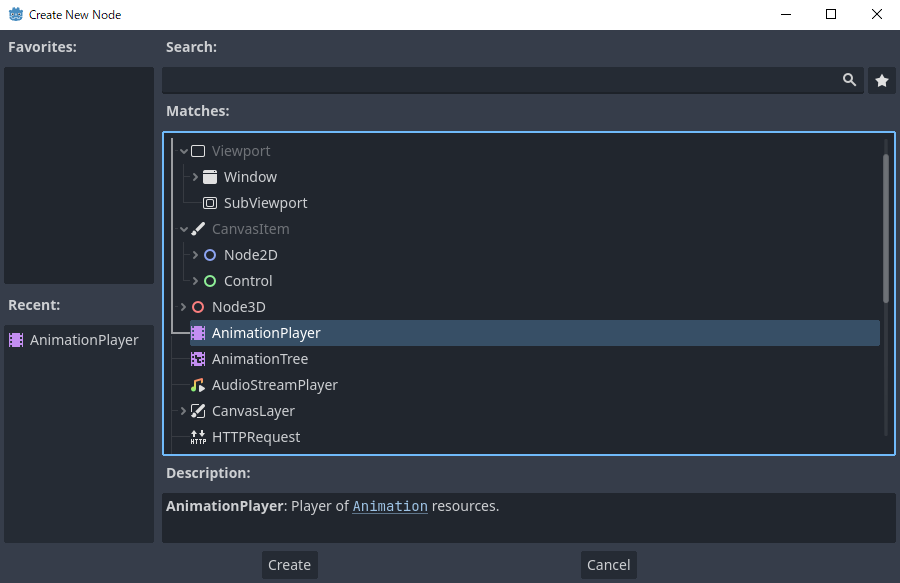
Создание узла AnimationPlayer
Чтобы использовать инструменты анимации, мы сначала должны создать узел AnimationPlayer.
The AnimationPlayer node type is the data container for your animations. One AnimationPlayer node can hold multiple animations, which can automatically transition to one another.
Узел AnimationPlayer
After you create an AnimationPlayer node, click on it to open the Animation Panel at the bottom of the viewport.

Расположение панели анимации
The animation panel consists of four parts:
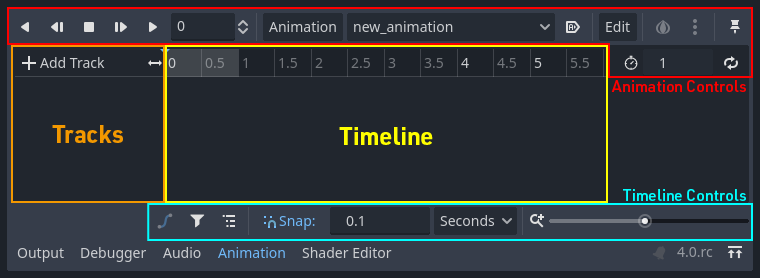
Панель анимации
Управление анимацией (т.е. добавить, загрузить, сохранить и удалить анимацию)
Список дорожек (треков)
Шкала времени (таймлайн) с ключевыми кадрами
The timeline and track controls, where you can zoom the timeline and edit tracks, for example.
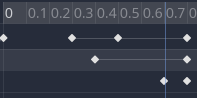
Компьютерная анимация опирается на ключевые кадры
A keyframe defines the value of a property at a point in time.
Diamond shapes represent keyframes in the timeline. A line between two keyframes indicates that the value doesn't change between them.
Ключевые кадры в Godot
You set values of a node's properties and create animation keyframes for them. When the animation runs, the engine will interpolate the values between the keyframes, resulting in them gradually changing over time.
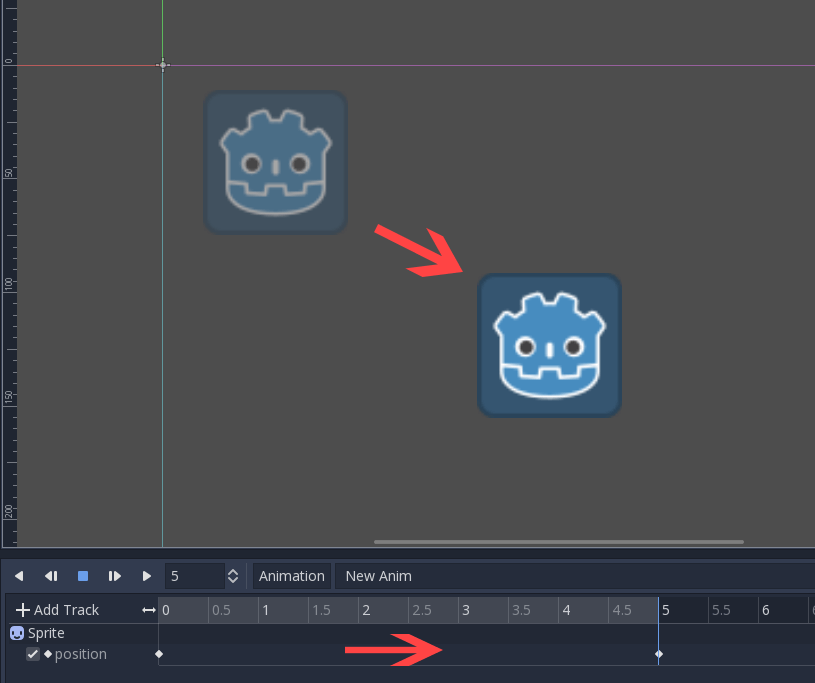
Два ключевых кадра — все, что нужно для получения плавного движения
The timeline defines how long the animation will take. You can insert keyframes at various points, and change their timing.

Шкала времени на панели анимации
Each line in the Animation Panel is an animation track that references a
Normal or Transform property of a node. Each track stores a path to
a node and its affected property. For example, the position track
in the illustration refers to the position property of the Sprite2D
node.

Пример стандартной анимационной дорожки
Совет
If you animate the wrong property, you can edit a track's path at any time
by double-clicking on it and typing the new path. Play the animation using the
"Play from beginning" button  (or pressing
Shift + D on keyboard) to see the changes instantly.
(or pressing
Shift + D on keyboard) to see the changes instantly.
Руководство: Создание простой анимации
Настройка сцены
For this tutorial, we'll create a Sprite node with an AnimationPlayer as its child. We will animate the sprite to move between two points on the screen.

Наши настройки сцены
Предупреждение
AnimationPlayer inherits from Node instead of Node2D or Node3D, which means that the child nodes will not inherit the transform from the parent nodes due to a bare Node being present in the hierarchy.
Поэтому не рекомендуется добавлять узлы с 2D/3D преобразованием в качестве дочерних узлов узла AnimationPlayer.
The sprite holds an image texture. For this tutorial, select the Sprite2D node, click Texture in the Inspector, and then click Load. Select the default Godot icon for the sprite's texture.
Adding an animation
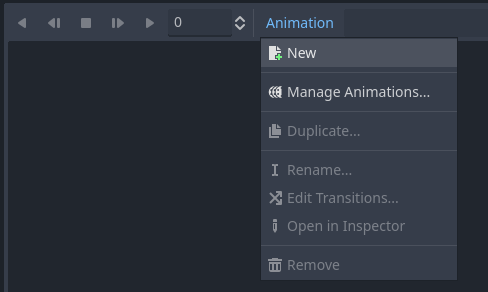
Select the AnimationPlayer node and click the "Animation" button in the
animation editor. From the list, select "New" ( ) to add a new
animation. Enter a name for the animation in the dialog box.
) to add a new
animation. Enter a name for the animation in the dialog box.
Добавление новой анимации
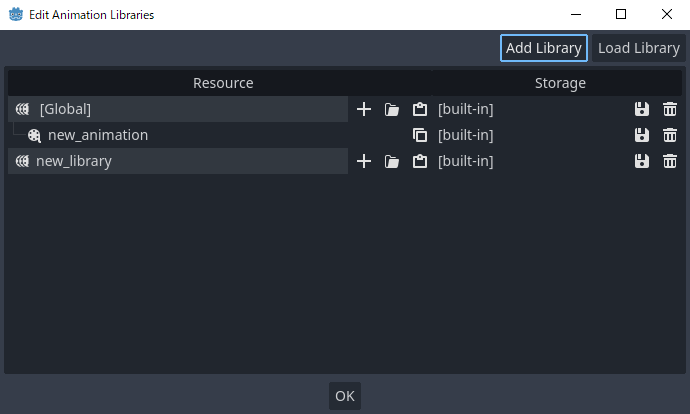
Manage an animation libraries
For reusability, the animation is registered in a list in the animation library resource. If you add an animation to AnimationPlayer without specifying any particular settings, the animation will be registered in the [Global] animation library that AnimationPlayer has by default.
Manage animations
If there are multiple animation libraries and you try to add an animation, a dialog box will appear with options.
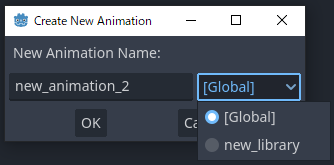
Add a new animation with library option
Добавление трека
To add a new track for our sprite, select it and take a look at the toolbar:

Удобные кнопки
These switches and buttons allow you to add keyframes for the selected node's location, rotation, and scale. Since we are only animating the sprite's position, make sure that only the location switch is selected. The selected switches are blue.
Click on the key button to create the first keyframe. Since we don't have a track set up for the Position property yet, Godot will offer to create it for us. Click Create.
Godot will create a new track and insert our first keyframe at the beginning of the timeline:

Дорожка спрайта
Второй ключевой кадр
We need to set our sprite's end location and how long it will take for it to get there.
Let's say we want it to take two seconds to move between the points. By default, the animation is set to last only one second, so change the animation length to 2 in the controls on the right side of the animation panel's timeline header.

Длительность анимации
Now, move the sprite right, to its final position. You can use the Move tool in the toolbar or set the Position's X value in the Inspector.
Click on the timeline header near the two-second mark in the animation panel and then click the key button in the toolbar to create the second keyframe.
Запуск анимации
Нажмите на кнопку «Воспроизвести с начала» ().
Ура! Наша анимация работает:
Анимация
Назад и вперед
Godot has an interesting feature that we can use in animations. When Animation Looping is set but there's no keyframe specified at the end of the animation, the first keyframe is also the last.
This means we can extend the animation length to four seconds now, and Godot will also calculate the frames from the last keyframe to the first, moving our sprite back and forth.

Цикл анимации
You can change this behavior by changing the track's loop mode. This is covered in the next chapter.
Настройки трека
Each track has a settings panel at the end, where you can set its update mode, track interpolation, and loop mode.

Настройки трека
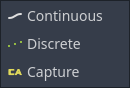
Режим обновления дорожки сообщает Godot, когда обновлять значения свойств. Это может быть:
Continuous: Update the property on each frame
Discrete: Only update the property on keyframes
Capture: if the first keyframe's time is greater than
0.0, the current value of the property will be remembered and will be blended with the first animation key. For example, you could use the Capture mode to move a node that's located anywhere to a specific location.
Режим трека
You will usually use "Continuous" mode. The other types are used to script complex animations.
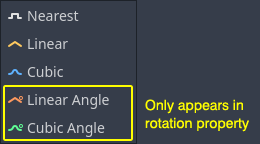
Track interpolation tells Godot how to calculate the frame values between keyframes. These interpolation modes are supported:
Ближайший(Nearest): установить значение ближайшего ключевого кадра
Линейный(Linear): установить значение на основе вычисления линейной функции между двумя ключевыми кадрами
Кубическая(Cubic): установить значение на основе вычисления кубической функции между двумя ключевыми кадрами
Linear Angle (Only appears in rotation property): Linear mode with shortest path rotation
Cubic Angle (Only appears in rotation property): Cubic mode with shortest path rotation
Переходы трека
With Cubic interpolation, animation is slower at keyframes and faster between them, which leads to more natural movement. Cubic interpolation is commonly used for character animation. Linear interpolation animates changes at a fixed pace, resulting in a more robotic effect.
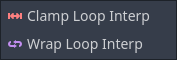
Godot supports two loop modes, which affect the animation when it's set to loop:
Режимы циклов
Обрезание Перехода Зацикливания: при выборе этого варианта анимация останавливается после последнего ключевого кадра для этой дорожки. Когда первый ключевой кадр будет достигнут снова, анимация вернется к своим значениям.
Обработка Перехода Зацикливания: Godot рассчитывает анимацию после последнего ключевого кадра, чтобы снова достичь значений первого ключевого кадра.
Ключевые кадры для других свойств
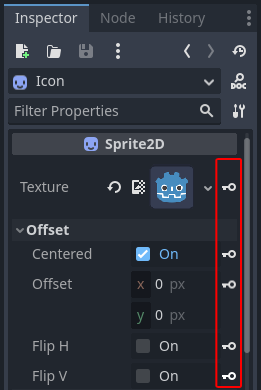
Godot's animation system isn't restricted to position, rotation, and scale. You can animate any property.
If you select your sprite while the animation panel is visible, Godot will display a small keyframe button in the Inspector for each of the sprite's properties. Click on one of these buttons to add a track and keyframe to the current animation.
Ключевые кадры для других свойств
Редактирование ключевых кадров
You can click on a keyframe in the animation timeline to display and edit its value in the Inspector.
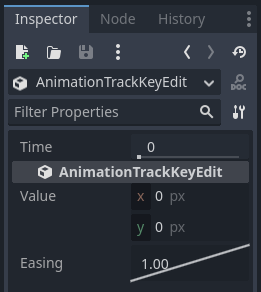
Редактор ключевых кадров для редактирования ключа
You can also edit the easing value for a keyframe here by clicking and dragging its easing curve. This tells Godot how to interpolate the animated property when it reaches this keyframe.
You can tweak your animations this way until the movement "looks right."
Using RESET tracks
Вы можете настроить специальную анимацию RESET, содержащую "позу по умолчанию". Это используется для обеспечения восстановления позы по умолчанию при сохранении сцены и повторном ее открытии в редакторе.
Для существующих дорожек можно добавить анимацию под названием "RESET" (с учетом регистра), а затем добавить дорожки для каждого свойства, которое вы хотите сбросить. Единственный ключевой кадр должен быть в момент времени 0, и задайте ему желаемое значение по умолчанию для каждой дорожки.
Если свойство AnimationPlayer Reset On Save установлено в true, сцена будет сохранена с эффектами анимации сброса (как если бы она была искана по времени 0.0). Это влияет только на сохраненный файл - треки свойств в редакторе остаются на своих местах.
If you want to reset the tracks in the editor, select the AnimationPlayer node, open the Animation bottom panel then choose Apply Reset in the animation editor's Edit dropdown menu.
При добавлении дорожек для новых анимаций редактор попросит вас автоматически создать дорожку сброса при использовании значка ключевого кадра рядом со свойством в инспекторе. Это не относится к дорожкам, созданным в версиях Godot до 3.4, поскольку функция дорожки сброса анимации была добавлена в 3.4.
Примечание
RESET tracks is also used as a reference value for blending. See also For better blending.