Up to date
This page is up to date for Godot 4.3.
If you still find outdated information, please open an issue.
Deploying to Android
Configuration
La plupart des casques autonomes fonctionnent sur Android et le support OpenXR fait son chemin vers ces plateformes.
Avant de suivre les instructions spécifiques OpenXR ici, vous devrez d'abord configurer votre système pour exporter vers Android en général, y compris :
Installing OpenJDK 17
Installing Android Studio
Creating a debug.keystore
Configuring the location of the Android SDK and debug.keystore in Godot
See Exportation pour Android for the full details, and return here when you've finished these steps.
Gradle Android build
Note
Le support officiel de la plate-forme Android n'a pas été ajouté à la spécification OpenXR, ce qui a initialement mené divers fournisseurs à créer des chargeurs personnalisés pour rendre OpenXR disponible sur leurs casques. Alors que l'attente à long terme est que tous les fournisseurs adopteront le chargeur officiel OpenXR, pour l'instant ces chargeurs doivent être ajoutés à votre projet.
In order to include the vendor-specific OpenXR loader into your project, you will need to setup a gradle Android build.
Select Install Android Build Template... from the Project menu:
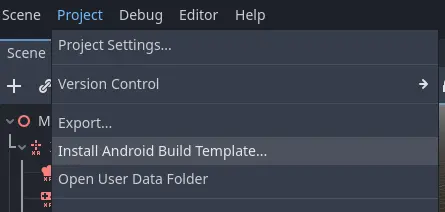
This will create a folder called android inside of your project that contains all the runtime files needed on Android. You can now customize this installation. Godot won't show this in the editor but you can find it with a file browser.
You can read more about gradle builds here: Gradle builds for Android.
Installing the vendors plugin
Avertissement
The Android plugin structure has been restructured in Godot 4.2, and the loader plugin was renamed to vendors plugin as it now includes more than just loaders. If you've previously installed the loader plugin you need to delete it from the android/plugins folder.
The vendors plugin can be downloaded from the asset library, search for "OpenXR vendors" and install the plugin:
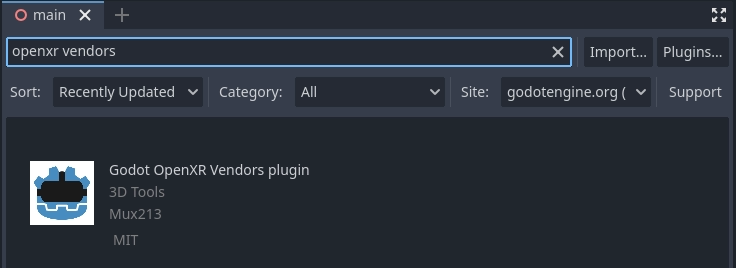
You will find the installed files inside the addons folder.
Alternatively you can manually install the vendors plugin by downloading the v2.x version of the plugin from the release page here.
You will need to copy the assets/addons/godotopenxrvendors folder from the zip file into your projects addons folder.
You can find the main repository of the vendors plugin here.
Enabling the vendors plugin
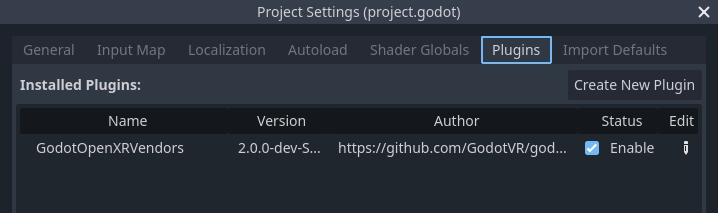
The vendors plugin needs to be enabled before the export settings become accessible. Open Project and select Project Settings.... Go to the Plugins tab. Enable the GodotOpenXRVendors plugin.
Note
This is no longer required from vendors plugin 2.0.3 onwards as it now uses GDExtension. The plugin will not be shown in this list. You can verify it is installed correctly by checking if the export presets contain the entries described below.
Creating the export presets
You will need to setup a separate export preset for each device, as each device will need its own loader included.
Open Project and select Export... Click on Add.. and select Android. Next change the name of the export preset for the device you're setting this up for, say Meta Quest. And enable Use Gradle Build. If you want to use one-click deploy (described below), ensure that Runnable is enabled.
If the vendors plugins were installed correctly you should find entries for the different headsets, select the entry for meta:
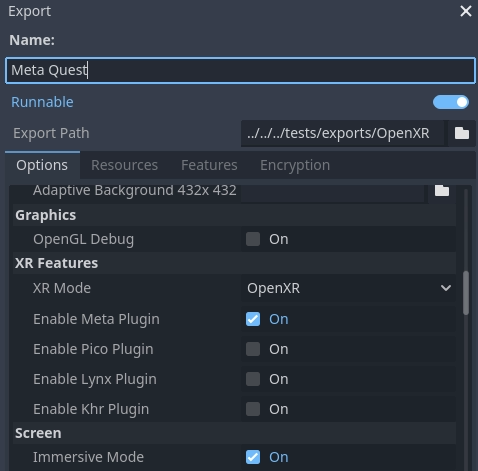
Changez également le mode XR vers OpenXR.
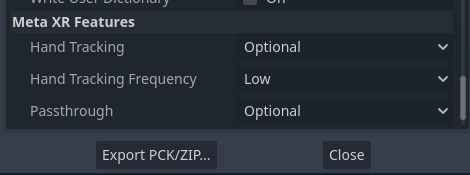
Faites défiler vers le bas de la liste et vous trouverez des sections de fonctionnalités XR supplémentaires, actuellement seulement Fonctionnalités Meta XR est disponible. Les paramètres de suivi des mains et de passthrough ici ne fonctionnent actuellement que pour le Meta Quest et vous devrez sélectionner les paramètres appropriés si vous souhaitez utiliser ces fonctionnalités.
Now you can repeat the same process for the other devices.
Note
There are separate loaders for the Meta Quest, Pico and Lynx R1 headsets.
The fourth option is the official Khronos loader, in due time all headsets should work with this loader. At the moment this loader has been tested with the Magic Leap 2 and standalone HTC headsets.
Avertissement
Bien que le renderer Mobile Vulkan a de nombreuses optimisations ciblées pour les appareils mobiles, nous travaillons toujours les détails. Il est fortement conseillé d'utiliser le rendu de compatibilité (OpenGL) pour le moment si vous ciblez les appareils XR basés sur Android.
Running on your device from the Godot editor
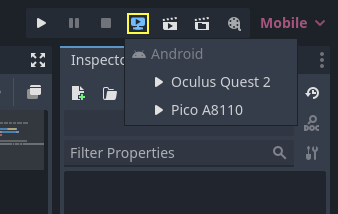
If you've setup your export settings as described above, and your headset is connected to your computer and correctly recognized, you can launch it directly from the Godot editor using Déploiement en un clic:
For some devices on some platforms, you may need to perform some extra steps in order for your device to be recognized correctly, so be sure to check the developer documentation from your headset vendor.
For example, with the Meta Quest 2, you need to enable developer mode on the headset, and if you're on Windows, you'll need to install special ADB drivers. See the official Meta Quest developer documentation for more details.
If you're having any issues with one-click deploy, check the Troubleshooting section.