2D movement overview
Introduzione
Every beginner has been there: "How do I move my character?" Depending on the style of game you're making, you may have special requirements, but in general the movement in most 2D games is based on a small number of designs.
We'll use CharacterBody2D for these examples, but the principles will apply to other node types (Area2D, RigidBody2D) as well.
Configura
Each example below uses the same scene setup. Start with a CharacterBody2D with two
children: Sprite2D and CollisionShape2D. You can use the Godot icon ("icon.png")
for the Sprite2D's texture or use any other 2D image you have.
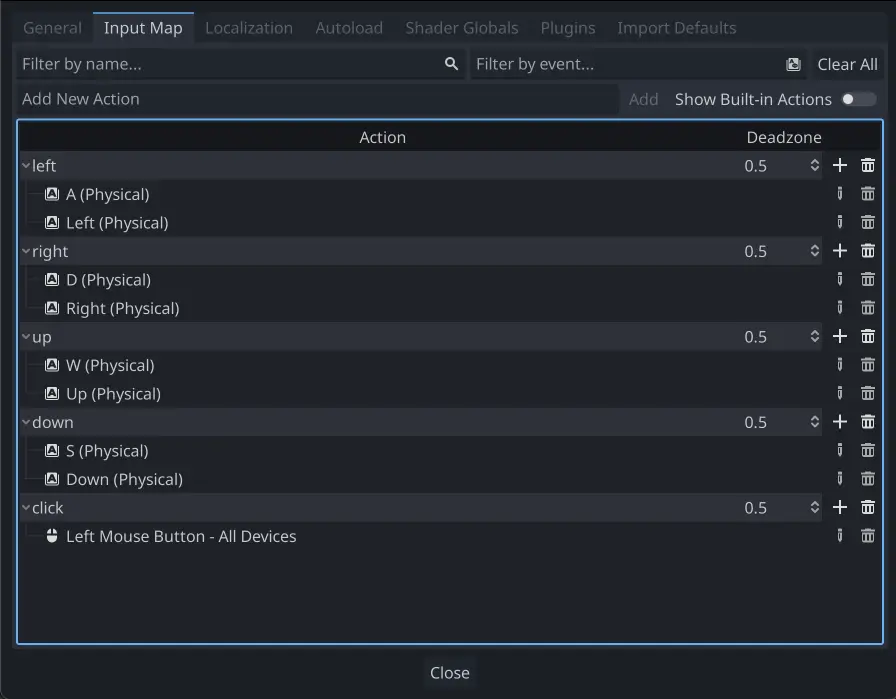
Open Project -> Project Settings and select the "Input Map" tab. Add the following
input actions (see InputEvent for details):
Movimento a 8 direzioni
In this scenario, you want the user to press the four directional keys (up/left/down/right or W/A/S/D) and move in the selected direction. The name "8-way movement" comes from the fact that the player can move diagonally by pressing two keys at the same time.
Aggiungi uno script al character body e aggiungi il seguente codice:
extends CharacterBody2D

@export var speed = 400

func get_input():
    var input_direction = Input.get_vector("left", "right", "up", "down")
    velocity = input_direction * speed

func _physics_process(delta):
    get_input()
    move_and_slide()
using Godot;

public partial class Movement : CharacterBody2D
{
    [Export]
    public int Speed { get; set; } = 400;

    public void GetInput()
    {

        Vector2 inputDirection = Input.GetVector("left", "right", "up", "down");
        Velocity = inputDirection * Speed;
    }

    public override void _PhysicsProcess(double delta)
    {
        GetInput();
        MoveAndSlide();
    }
}
In the get_input() function, we use Input get_vector() to check for the
four key events and sum return a direction vector.
We can then set our velocity by multiplying this direction vector, which has a
length of 1, by our desired speed.
Suggerimento
Se non hai esperienza di matematica vettoriale, o necessiti di un ripasso, puoi dare un'occhiata alla spiegazione sull'utilizzo dei vettori in Godot in Matematica vettoriale.
Nota
If the code above does nothing when you press the keys, double-check that you've set up input actions correctly as described in the Configura part of this tutorial.
Rotazione + Movimento
Questo tipo di movimento viene chiamato a volte "Stile-Asteroids" perché è riconducibile al classico gioco arcade. Premendo sinistra/destra si ruota il personaggio mentre su/giù si muove in avanti o indietro nella direzione in cui sta puntando.
extends CharacterBody2D

@export var speed = 400
@export var rotation_speed = 1.5

var rotation_direction = 0

func get_input():
    rotation_direction = Input.get_axis("left", "right")
    velocity = transform.x * Input.get_axis("down", "up") * speed

func _physics_process(delta):
    get_input()
    rotation += rotation_direction * rotation_speed * delta
    move_and_slide()
using Godot;

public partial class Movement : CharacterBody2D
{
    [Export]
    public int Speed { get; set; } = 400;

    [Export]
    public float RotationSpeed { get; set; } = 1.5f;

    private float _rotationDirection;

    public void GetInput()
    {
        _rotationDirection = Input.GetAxis("left", "right");
        Velocity = Transform.X * Input.GetAxis("down", "up") * Speed;
    }

    public override void _PhysicsProcess(double delta)
    {
        GetInput();
        Rotation += _rotationDirection * RotationSpeed * (float)delta;
        MoveAndSlide();
    }
}
Qui abbiamo aggiunto due nuove variabili per monitorare la rotazione e la velocità. La rotazione verrà applicata direttamente alla proprietà rotation del corpo.
To set the velocity, we use the body's transform.x which is a vector pointing
in the body's "forward" direction, and multiply that by the speed.
Rotazione + Movimento (mouse)
Questo metodo di spostamento è molto simile al precedente. Questa volta, la direzione è determinata dalla posizione del mouse anziché dalla tastiera. Il personaggio guarderà ("look_at") sempre al puntatore del mouse. Comunque gli input avanti/indietro non varieranno.
extends CharacterBody2D

@export var speed = 400

func get_input():
    look_at(get_global_mouse_position())
    velocity = transform.x * Input.get_axis("down", "up") * speed

func _physics_process(delta):
    get_input()
    move_and_slide()
using Godot;

public partial class Movement : CharacterBody2D
{
    [Export]
    public int Speed { get; set; } = 400;

    public void GetInput()
    {
        LookAt(GetGlobalMousePosition());
        Velocity = Transform.X * Input.GetAxis("down", "up") * Speed;
    }

    public override void _PhysicsProcess(double delta)
    {
        GetInput();
        MoveAndSlide();
    }
}
Qui utilizziamo il metodo di Node2D look_at() per puntare il giocatore verso la posizione del mouse. Senza utilizzare questa funzione, puoi ottenere lo stesso risultato impostando l'angolo come segue:
rotation = get_global_mouse_position().angle_to_point(position)
var rotation = GetGlobalMousePosition().AngleToPoint(Position);
Clicca e muovi
Questo ultimo esempio utilizza solo il mouse per controllare il personaggio. Cliccando sullo schermo provocherà lo spostamento del giocatore verso la posizione designata.
extends CharacterBody2D

@export var speed = 400

var target = position

func _input(event):
    # Use is_action_pressed to only accept single taps as input instead of mouse drags.
    if event.is_action_pressed(&"click"):
        target = get_global_mouse_position()

func _physics_process(delta):
    velocity = position.direction_to(target) * speed
    # look_at(target)
    if position.distance_to(target) > 10:
        move_and_slide()
using Godot;

public partial class Movement : CharacterBody2D
{
    [Export]
    public int Speed { get; set; } = 400;

    private Vector2 _target;

    public override void _Input(InputEvent @event)
    {
        // Use IsActionPressed to only accept single taps as input instead of mouse drags.
        if (@event.IsActionPressed("click"))
        {
            _target = GetGlobalMousePosition();
        }
    }

    public override void _PhysicsProcess(double delta)
    {
        Velocity = Position.DirectionTo(_target) * Speed;
        // LookAt(_target);
        if (Position.DistanceTo(_target) > 10)
        {
            MoveAndSlide();
        }
    }
}
Nota la verifica a distance_to() che facciamo prima del movimento. Senza di essa, il corpo "tremolerebbe" una volta raggiunta la posizione di destinazione, in quanto si sposta leggermente oltre la posizione e torna indietro, per poi spostarsi troppo lontano e ripetere il ciclo.
Togliendo il commento alla riga look_at() farà anche girare il corpo per puntare nella direzione del suo movimento, se preferisci.
Suggerimento
Questa tecnica può anche essere utilizzata come base per un personaggio "che segue". La posizione target può essere quella di qualsiasi oggetto si desideri raggiungere.
Sommario
Troverai questi esempi di codice utili come punto di partenza per i tuoi progetti personali. Sentiti libero di utilizzarli e sperimentare con questi per scoprire cosa puoi fare.
You can download this sample project here: 2d_movement_starter.zip