Il tuo primo shader 2D
Introduzione
Gli shader sono programmi speciali che vengono eseguiti sulla GPU e utilizzati per renderizzare la grafica. Tutto il rendering moderno è eseguiti con gli shader. Per una descrizione più dettagliata degli shader, consultare Cosa sono gli shader.
This tutorial will focus on the practical aspects of writing shader programs by walking you through the process of writing a shader with both vertex and fragment functions. This tutorial targets absolute beginners to shaders.
Nota
If you have experience writing shaders and are just looking for an overview of how shaders work in Godot, see the Shading Reference.
Configura
CanvasItem shaders are used to draw all 2D objects in Godot, while Spatial shaders are used to draw all 3D objects.
In order to use a shader it must be attached inside a Material which must be attached to an object. Materials are a type of Resource. To draw multiple objects with the same material, the material must be attached to each object.
All objects derived from a CanvasItem have a material property. This includes all GUI elements, Sprite2Ds, TileMapLayers, MeshInstance2Ds etc. They also have an option to inherit their parent's material. This can be useful if you have a large number of nodes that you want to use the same material.
To begin, create a Sprite2D node. You can use any CanvasItem, so long as it is drawing to the canvas, so for this tutorial we will use a Sprite2D, as it is the easiest CanvasItem to start drawing with.
In the Inspector, click beside "Texture" where it says "[empty]" and select "Load", then select "icon.svg". For new projects, this is the Godot icon. You should now see the icon in the viewport.
Quindi, guarda in basso nell'Ispettore, nella sezione CanvasItem, clicca accanto a "Material" e seleziona "Nuovo ShaderMaterial". Questo crea una nuova risorsa Materiale. Clicca sulla sfera che appare. Godot al momento non sa se stai scrivendo uno shader CanvasItem o uno shader Spatial e mostra in anteprima il risultato degli shader Spatial. Perciò quel che vedi è il risultato dello shader Spatial predefinito.
Nota
I materiali che ereditano dalla risorsa Material, come StandardMaterial3D e ParticleProcessMaterial, si possono convertire in un ShaderMaterial e le loro proprietà esistenti saranno convertite in uno shader di testo corrispondente. Per farlo, fai clic destro sul materiale nel pannello FileSystem e scegli Converti in ShaderMaterial. Puoi anche fare clic destro su qualsiasi proprietà che contenga un riferimento al materiale nell'ispettore.
Fai clic su "Shader" e seleziona "Nuovo Shader". Infine, fai clic sullo shader appena creato e si aprirà l'editor. Ora sei pronto per cominciare a scrivere il tuo primo shader.
Il tuo primo shader CanvasItem
In Godot, tutti gli shader iniziano con una riga che specifica il tipo di shader. Il formato utilizzato è il seguente:
shader_type canvas_item;
Poiché stiamo scrivendo uno shader CanvasItem, specifichiamo canvas_item nella prima riga. Tutto il nostro codice andrà sotto questa dichiarazione.
Questa riga indica al motore quali variabili e funzionalità integrate fornirti.
In Godot è possibile sovrascrivere tre funzioni per controllare il funzionamento dello shader: vertex, fragment e light. Questo tutorial ti guiderà nella scrittura di uno shader con funzioni sia di vertice sia di frammento. Le funzioni di luce sono vastamente più complesse delle funzioni di vertice e frammento e pertanto non saranno trattate in questo articolo.
La tua prima funzione fragment
La funzione fragment viene eseguita per ogni pixel in uno Sprite2D e determina il colore che dovrebbe avere quel pixel.
Sono limitati ai pixel coperti dallo Sprite2D, il che significa che non è possibile utilizzarne uno, ad esempio, per creare un contorno attorno a uno Sprite2D.
La funzione di frammento più basilare non fa altro che assegnare un singolo colore a ogni pixel.
We do so by writing a vec4 to the built-in variable COLOR. vec4 is
shorthand for constructing a vector with 4 numbers. For more information about
vectors see the Vector math tutorial. COLOR is both
an input variable to the fragment function and the final output from it.
void fragment(){
  COLOR = vec4(0.4, 0.6, 0.9, 1.0);
}

Congratulations! You're done. You have successfully written your first shader in Godot.
Now let's make things more complex.
There are many inputs to the fragment function that you can use for calculating
COLOR. UV is one of them. UV coordinates are specified in your Sprite2D
(without you knowing it!) and they tell the shader where to read from textures
for each part of the mesh.
In the fragment function you can only read from UV, but you can use it in
other functions or to assign values to COLOR directly.
UV varies between 0-1 from left-right and from top-bottom.
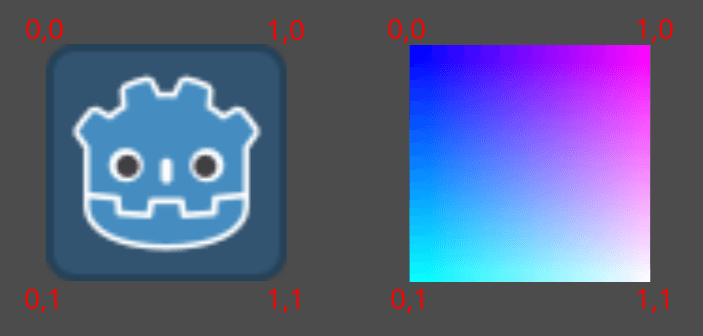
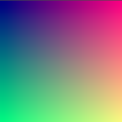
void fragment() {
  COLOR = vec4(UV, 0.5, 1.0);
}
Using TEXTURE built-in
The default fragment function reads from the set Sprite2D texture and displays it.
When you want to adjust a color in a Sprite2D you can adjust the color from the texture manually like in the code below.
void fragment(){
  // This shader will result in a blue-tinted icon
  COLOR.b = 1.0;
}
Certain nodes, like Sprite2Ds, have a dedicated texture variable that can be accessed
in the shader using TEXTURE. If you want to use the Sprite2D texture to combine
with other colors, you can use the UV with the texture function to access
this variable. Use them to redraw the Sprite2D with the texture.
void fragment(){
  COLOR = texture(TEXTURE, UV); // Read from texture again.
  COLOR.b = 1.0; //set blue channel to 1.0
}

Uniform input
Uniform input is used to pass data into a shader that will be the same across the entire shader.
You can use uniforms by defining them at the top of your shader like so:
uniform float size;
Per maggiori informazioni sull'uso vedi Shading Language doc.
Add a uniform to change the amount of blue in our Sprite2D.
uniform float blue = 1.0; // you can assign a default value to uniforms

void fragment(){
  COLOR = texture(TEXTURE, UV); // Read from texture
  COLOR.b = blue;
}
Now you can change the amount of blue in the Sprite2D from the editor. Look back at the Inspector under where you created your shader. You should see a section called "Shader Param". Unfold that section and you will see the uniform you just declared. If you change the value in the editor, it will overwrite the default value you provided in the shader.
Interacting with shaders from code
You can change uniforms from code using the function set_shader_parameter()
which is called on the node's material resource. With a Sprite2D node, the
following code can be used to set the blue uniform.
var blue_value = 1.0
material.set_shader_parameter("blue", blue_value)
var blueValue = 1.0;
((ShaderMaterial)Material).SetShaderParameter("blue", blueValue);
Note that the name of the uniform is a string. The string must match exactly with how it is written in the shader, including spelling and case.
Your first vertex function
Now that we have a fragment function, let's write a vertex function.
Use the vertex function to calculate where on the screen each vertex should end up.
The most important variable in the vertex function is VERTEX. Initially, it
specifies the vertex coordinates in your model, but you also write to it to
determine where to actually draw those vertices. VERTEX is a vec2 that
is initially presented in local-space (i.e. not relative to the camera,
viewport, or parent nodes).
You can offset the vertices by directly adding to VERTEX.
void vertex() {
  VERTEX += vec2(10.0, 0.0);
}
Combined with the TIME built-in variable, this can be used for basic
animation.
void vertex() {
  // Animate Sprite2D moving in big circle around its location
  VERTEX += vec2(cos(TIME)*100.0, sin(TIME)*100.0);
}
Conclusione
At their core, shaders do what you have seen so far, they compute VERTEX and
COLOR. It is up to you to dream up more complex mathematical strategies for
assigning values to those variables.
For inspiration, take a look at some of the more advanced shader tutorials, and look at other sites like Shadertoy and The Book of Shaders.