メインシーン
今まで作成したすべてをまとめ、遊べるゲームにするときが来ました。
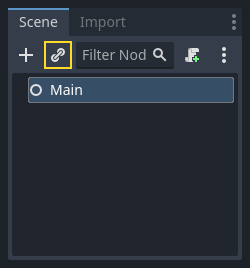
新しいシーンを作成し、 Node クラスを追加して Main という名前にします。 (Node2D ではなく、Nodeを使用する理由は、これはゲームロジックを扱うノードであり、これ自体に2D機能が不要であるためです)
インスタンス ボタン(チェーンリンクアイコン)をクリックし、保存した player.tscn を選択してください。
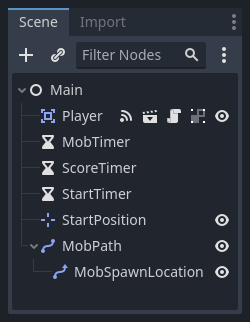
次に Main の子ノードとして以下のノードを追加し、名前を変更します:
Timer(
MobTimerという名前) - モブが出現する頻度を制御するTimer (
ScoreTimerという名前) - 一秒ごとに得点を上げるTimer (
StartTimerという名前) - 開始する前に遅延させるMarker2D (
StartPositionという名前) - プレイヤーの開始位置を示す
各 Timer ノードの Wait Time プロパティを次のように設定します (値は秒単位です):
MobTimer:0.5ScoreTimer:1StartTimer:2
さらに、 StartTimer の One Shot プロパティを「On」に設定し、 StartPosition ノードの Position を (240, 450) に設定します。
モブの生成
The Main node will be spawning new mobs, and we want them to appear at a random
location on the edge of the screen. Click the Main node in the Scene dock, then
add a child Path2D node named MobPath. When you select
Path2D, you will see some new buttons at the top of the editor:

中央のアイコン([点を空きスペースに追加])を選択し、表示されているコーナーをクリックしてポイントを追加してパスを描画します。ポイントをグリッドにスナップするには、[グリッドスナップを使う]が選択されていることを確認します。このオプションは、[選択Nodeをロック]ボタンの左側にあり、「交差する線と磁石」のアイコンで表示されています。

重要
時計回りにパスを描画します。そうしないと、モブは内側ではなく外側を向いて発生します!
画像にポイント 4 を配置した後、[曲線を閉じる] ボタンをクリックすると、パスが完成します。
パスが定義されたので、 MobPath の子としてPathFollow2Dノードを追加し、 MobSpawnLocation という名前を付けます。このノードは自動的に回転し、パスの移動に従うので、パスに沿ってランダムな位置と方向を選択できます。
シーンは次のようになります:
Mainスクリプト
Main にスクリプトをアタッチします。 スクリプトの上部に @export var mob_scene: PackedScene を追加して、インスタンス化するMobシーンを選択できるようにします。
extends Node

@export var mob_scene: PackedScene
var score
using Godot;

public partial class Main : Node
{
    // Don't forget to rebuild the project so the editor knows about the new export variable.

    [Export]
    public PackedScene MobScene { get; set; }

    private int _score;
}
Main ノードをクリックすると、インスペクタの "Main.gd" の下に Mob Scene プロパティが見えるようになっています。
このプロパティの値は、ふたつの方法で指定できます:
「ファイルシステム」パネルから
mob.tscnをドラッグし、 Mob Scene プロパティにドロップします。<空> の隣にある下矢印をクリックして「読み込み」を選び、
mob.tscnを選択します。
次に、シーンドックの Player ノードを選択し、サイドバーのノードドックにアクセスします。ノードドックでは、シグナルタブが選択されていることを確認してください。
Player ノードのシグナルのリストが表示されます。リストの中から hit のシグナルを見つけてダブルクリックしてください (または、右クリックして "接続..." を選択)。これでシグナルの接続ダイアログが開きます。ゲームが終了したときに必要な処理を行う game_over という名前の新しい関数をこれから作ります。シグナル接続ダイアログの下部にある「受信側メソッド」ボックスに「game_over」と入力し、「接続」をクリックしてください。 Player から hit シグナルが発火されたとき、 Main スクリプト側で処理できるようになります。新しい関数に以下のコードを追加し、新しいゲームのセットアップを行う new_game 関数も追加します:
func game_over():
    $ScoreTimer.stop()
    $MobTimer.stop()

func new_game():
    score = 0
    $Player.start($StartPosition.position)
    $StartTimer.start()
public void GameOver()
{
    GetNode<Timer>("MobTimer").Stop();
    GetNode<Timer>("ScoreTimer").Stop();
}

public void NewGame()
{
    _score = 0;

    var player = GetNode<Player>("Player");
    var startPosition = GetNode<Marker2D>("StartPosition");
    player.Start(startPosition.Position);

    GetNode<Timer>("StartTimer").Start();
}
Now we'll connect the timeout() signal of each Timer node (StartTimer,
ScoreTimer, and MobTimer) to the main script. For each of the three
timers, select the timer in the Scene dock, open the Signals tab of the Node
dock, then double-click the timeout() signal in the list. This will open a new
signal connection dialog. The default settings in this dialog should be fine, so
select Connect to create a new signal connection.
Once all three timers have this set up, you should be able to see each timer
have a Signal connection for their respective timeout() signal, showing in
green, within their respective Signals tabs:
(For MobTimer):
_on_mob_timer_timeout()(For ScoreTimer):
_on_score_timer_timeout()(For StartTimer):
_on_start_timer_timeout()
Now we define how each of these timers operate by adding the code below. Notice
that StartTimer will start the other two timers, and that ScoreTimer
will increment the score by 1.
func _on_score_timer_timeout():
    score += 1

func _on_start_timer_timeout():
    $MobTimer.start()
    $ScoreTimer.start()
// We also specified this function name in PascalCase in the editor's connection window.
private void OnScoreTimerTimeout()
{
    _score++;
}

// We also specified this function name in PascalCase in the editor's connection window.
private void OnStartTimerTimeout()
{
    GetNode<Timer>("MobTimer").Start();
    GetNode<Timer>("ScoreTimer").Start();
}
_on_mob_timer_timeout() では、モブのインスタンスを作成し、 Path2D に沿ってランダムに開始位置を選び、モブを動かすようにします。PathFollow2D ノードはパスに沿って自動的に回転するので、これを使ってモブの方向と位置を選択します。移動速度は 150.0 から 250.0 の間でランダムに値を選びます(すべて同じ速度で動くとつまらなくなってしまいます)。
注意点として、新しいインスタンスは add_child() を使ってシーンに追加しなければなりません。
func _on_mob_timer_timeout():
    # Create a new instance of the Mob scene.
    var mob = mob_scene.instantiate()

    # Choose a random location on Path2D.
    var mob_spawn_location = $MobPath/MobSpawnLocation
    mob_spawn_location.progress_ratio = randf()

    # Set the mob's position to the random location.
    mob.position = mob_spawn_location.position

    # Set the mob's direction perpendicular to the path direction.
    var direction = mob_spawn_location.rotation + PI / 2

    # Add some randomness to the direction.
    direction += randf_range(-PI / 4, PI / 4)
    mob.rotation = direction

    # Choose the velocity for the mob.
    var velocity = Vector2(randf_range(150.0, 250.0), 0.0)
    mob.linear_velocity = velocity.rotated(direction)

    # Spawn the mob by adding it to the Main scene.
    add_child(mob)
// We also specified this function name in PascalCase in the editor's connection window.
private void OnMobTimerTimeout()
{
    // Create a new instance of the Mob scene.
    Mob mob = MobScene.Instantiate<Mob>();

    // Choose a random location on Path2D.
    var mobSpawnLocation = GetNode<PathFollow2D>("MobPath/MobSpawnLocation");
    mobSpawnLocation.ProgressRatio = GD.Randf();

    // Set the mob's direction perpendicular to the path direction.
    float direction = mobSpawnLocation.Rotation + Mathf.Pi / 2;

    // Set the mob's position to a random location.
    mob.Position = mobSpawnLocation.Position;

    // Add some randomness to the direction.
    direction += (float)GD.RandRange(-Mathf.Pi / 4, Mathf.Pi / 4);
    mob.Rotation = direction;

    // Choose the velocity.
    var velocity = new Vector2((float)GD.RandRange(150.0, 250.0), 0);
    mob.LinearVelocity = velocity.Rotated(direction);

    // Spawn the mob by adding it to the Main scene.
    AddChild(mob);
}
重要
なぜ PI なのでしょうか?角度を必要とする関数では、Godot は度数ではなく、 ラジアン を使用します。円周率はラジアンの半回転を表し、約 3.1415 です ( 2 * PI に等しい TAU もあります) 。もし、度数を扱う方が好きであれば deg_to_rad() と rad_to_deg() という関数を使って両者を変換する必要があります。
シーンのテスト
シーンをテストして、すべてが動作していることを確認してみましょう。new_game 関数の呼び出しを _ready()に追加してください:
func _ready():
    new_game()
public override void _Ready()
{
    NewGame();
}
また、 Main を「メインシーン」として設定してみましょう。 (ゲームが起動したときに自動的に実行されるシーンです。) 「プロジェクトを実行」ボタンを押して、プロンプトが表示されたら main.tscn を選択してください。
Tip
すでに他のシーンをメインシーンに設定していた場合は、ファイルシステムドックの main.tscn を右クリックして「メインシーンとして設定」を選択してください。
プレイヤーを移動でき、モブが発生したり、モブに当たった時にプレイヤーが消えるようになっているはずです。
全て動作していることが確認できたら、 _ready() から new_game() の呼び出しを削除して、 pass に置き換えてください。
私たちのゲームには何が足りないのでしょう?それは、ユーザーインターフェイスです。次のレッスンでは、タイトル画面を追加して、プレイヤーのスコアを表示することにします。