XRのセットアップ
Godot XRシステムの説明
Godot provides a modular XR system that abstracts many of the different XR platform specifics away from the user. At the core sits the XRServer which acts as a central interface to the XR system that allows users to discover interfaces and interact with the components of the XR system.
Each supported XR platform is implemented as an XRInterface. Supported interfaces register themselves with the XRServer and can be queried with the find_interface method on the XRServer. When the desired interface is found it can be initialized by calling initialize on the interface.
警告
A registered interface means nothing more than that the interface is available, if the interface is not supported by the host system, initialization may fail and return false. This can have many reasons and sadly the reasons differ from platform to platform. It can be because the user hasn't installed the required software, or that the user simply hasn't plugged in their headset. You as a developer must thus react properly on an interface failing to initialize.
Due to the special requirements for output in XR, especially for head mounted devices that supply different images to each eye, the XRServer in Godot will override various features in the rendering system. For stand-alone devices this means the final output is handled by the XRInterface and Godot's usual output system is disabled. For desktop XR devices that work as a second screen it is possible to dedicate a separate Viewport to handle the XR output, leaving the main Godot window available for displaying alternative content.
注釈
Note that only one interface can be responsible for handling the output to an XR device, this is known as the primary interface and by default will be the first interface that is initialized. Godot currently thus only supports implementations with a single headset. It is possible, but increasingly uncommon, to have a secondary interface, for example to add tracking to an otherwise 3DOF only device.
There are three XR specific node types that you will find in nearly all XR applications:
XROrigin3D represents, for all intents and purposes, the center point of your play space. That is an oversimplified statement but we'll go into more detail later. All objects tracked in physical space by the XR platform are positioned in relation to this point.
XRCamera3D represents the (stereo) camera that is used when rendering output for the XR device. The positioning of this node is controlled by the XR system and updated automatically using the tracking information provided by the XR platform.
XRController3D represents a controller used by the player, commonly there are two, one held in each hand. These nodes give access to various states on these controllers and send out signals when the player presses buttons on them. The positioning of this node is controlled by the XR system and updated automatically using the tracking information provided by the XR platform.
There are other XR related nodes and there is much more to say about these three nodes, but we'll get into that later on.
Which Renderer to use
Godot has 3 renderer options for projects: Compatibility, Mobile, and Forward+. The current recommendation is to use the Mobile renderer for any desktop VR project, and use the Compatibility renderer for any project running on a standalone headset like the Meta Quest 3. XR projects will run with the Forward+ renderer, but it isn't well optimized for XR right now compared to the other two.
OpenXR
OpenXRは、標準化されたAPIを用いてXRアプリケーションに様々なXRプラットフォームを対応させられる新しい規格です。この規格はKhronosグループにより整備されたオープンな規格であり、そのためGodotの関心に非常によく一致しています。
The Vulkan implementation of OpenXR is closely integrated with Vulkan, taking over part of the Vulkan system. This requires tight integration of certain core graphics features in the Vulkan renderer which are needed before the XR system is setup. This was one of the main deciding factors to include OpenXR as a core interface.
This also means OpenXR needs to be enabled when Godot starts in order to set things up correctly. Check the Enabled setting in your project settings under XR > OpenXR.
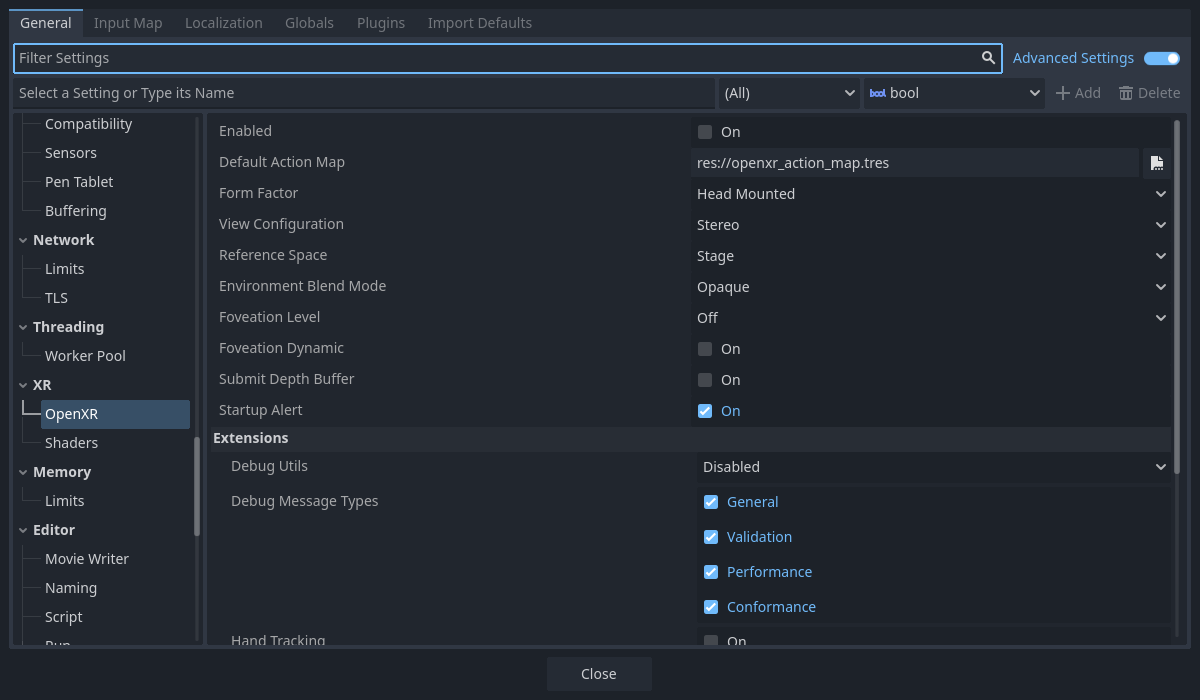
You can find several other settings related to OpenXR here as well. These can't be changed while your application is running. The default settings will get us started, but for more information on what's here see OpenXR Settings.
You'll also need to go to XR > Shaders in the project settings and check the Enabled box to enable them. Once you've done that click the Save & Restart button.

警告
Many post process effects have not yet been updated to support stereoscopic rendering. Using these will have adverse effects.
XRシーンの設定
すべてのXRアプリケーションは最低限 :ref:`XROrigin3D <class_xrorigin3d>`ノードと :ref:`XRCamera3D <class_xrcamera3d>`ノードを1つずつ持つ必要があります。大抵の場合は2つの :ref:`XRController3D <class_xrcontroller3d>`(右手と左手)も使うでしょう。cameraとcontrollerノードはoriginノードの子にすることに注意してください。これらのノードをシーンに追加し、controllerノードの名前を``LeftHand``と``RightHand``変更に変更しましょう。シーンはこのようになります:
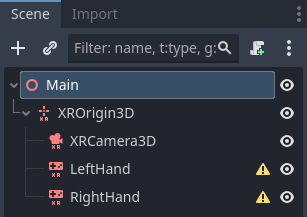
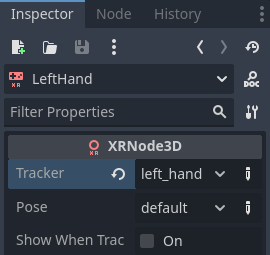
The warning icons are expected and should go away after you configure the controllers. Select the left hand and set it up as follows:
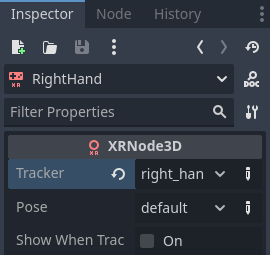
右手も同様に:
このとき全てのノードが床に置かれた状態になりますが、実行時には正しい位置に動きます。開発の際には、カメラの y を 1.7 、コントローラの座標を左右それぞれ -0.5, 1.0, -0.5 および 0.5, 1.0, -0.5 に設定しておくとよいでしょう。
次にルートノードにスクリプトを追加します。スクリプトに次のコードを追加します:
extends Node3D

var xr_interface: XRInterface

func _ready():
    xr_interface = XRServer.find_interface("OpenXR")
    if xr_interface and xr_interface.is_initialized():
        print("OpenXR initialized successfully")

        # Turn off v-sync!
        DisplayServer.window_set_vsync_mode(DisplayServer.VSYNC_DISABLED)

        # Change our main viewport to output to the HMD
        get_viewport().use_xr = true
    else:
        print("OpenXR not initialized, please check if your headset is connected")
using Godot;

public partial class MyNode3D : Node3D
{
    private XRInterface _xrInterface;

    public override void _Ready()
    {
        _xrInterface = XRServer.FindInterface("OpenXR");
        if(_xrInterface != null && _xrInterface.IsInitialized())
        {
            GD.Print("OpenXR initialized successfully");

            // Turn off v-sync!
            DisplayServer.WindowSetVsyncMode(DisplayServer.VSyncMode.Disabled);

            // Change our main viewport to output to the HMD
            GetViewport().UseXR = true;
        }
        else
        {
            GD.Print("OpenXR not initialized, please check if your headset is connected");
        }
    }
}
このコードではOpenXRを使用することを想定していますが、もし他のインターフェースを使う場合は find_interface の引数を変更してください。
警告
上記のコードでv-syncをオフにしています。OpenXRを使用すると描画結果をHMDに送信しますが、多くの場合で90Hz以上のフレームレートを要求されます。もし60Hzのモニターを使っていてv-syncがオンになっていると、フレームレート上限が60fpsになってしまいます。
OpenXRなどのXRインターフェースは独自で同期して動作します。
また、デフォルトの物理エンジンも60Hzで動作しますが、不安定になる可能性があることに注意します。 Engine.physics_ticks_per_second をより大きく設定しておきましょう。
この時点でプロジェクトを実行すると、全て動作はしますが暗闇になるでしょう。そこで、最後に DirectionalLight3D ノードと WorldEnvironment ノードをシーンに追加しましょう。controllerノードの子にメッシュインスタンスを追加して可視化するのもいいですね。world environment にはskyを設定しておきましょう。
プロジェクトを実行すると、空間上で浮遊して周囲を見渡せるようになっていると思います。
注釈
従来のレベル切り替えも確かにXRアプリケーションで利用できるのですが、セットアップを各レベルで繰り返すことになるため、多くの場合はセットアップを一度だけ行い、サブシーンとしてレベルをロードするほうが簡単です。シーンを切り替えてXRセットアップをそれぞれに複製する場合、 initialize を複数回呼んではいけません。XRインターフェースによってはその影響が予測不可能になるからです。
残りの基本のチュートリアルでは単一シーンのゲームを作ってみましょう。