From Unity3D to Godot Engine
This guide provides an overview of Godot Engine from the viewpoint of a Unity user, and aims to help you migrate your existing Unity experience into the world of Godot.
Differences
| Unity | Godot | |
|---|---|---|
| License | Proprietary, closed, free license with revenue caps and usage restrictions | MIT License, free and fully open souce without any restriction |
| OS (editor) | Windows, OSX, Linux (unofficial and unsupported) | Windows, X11 (Linux, *BSD), Haiku, OSX |
| OS (export) | Desktop: Windows, Linux/SteamOS, OSX
Mobile: Android, iOS, Windows Phone, Tizen,
Web: WebGL
Consoles: PS4, PS Vita, XBox One, XBox 360, WiiU, 3DS
VR: Occulus Rift, SteamVR, Google Cardboard, Playstation VR, Gear VR, HoloLens
TV: AndroidTV, Samsung SMARTTV, tvOS
|
Desktop: Windows, X11, OSX
Mobile: Android, iOS, Blackberry (deprecated)
Web: WebGL, HTML5 (via emscripten, broken)
|
| Scene system | Component/Scene (GameObject > Component)
Prefabs
|
Scene tree and nodes, allowing scenes to be nested and/or inherit other scenes |
| Third-party tools | Visual Studio or SharpEditor | Android SDK for Android export
External editors are possible
|
| Killer features | Huge community
Large assets store
|
Scene System
Animation Pipeline
Easy to write Shaders
Debug on Device
|
, , ,
The editor
Godot Engine provides a rich-featured editor that allows you to build your games. The pictures below display both editors with colored blocks to indicate common functionalities.

Note that Godot editor allows you to dock each panel at the side of the scene editor you wish.
While both editors may seem similar, there are many differences below the surface. Both let you organize the project using the filesystem, but Godot approach is simpler, with a single configuration file, minimalist text format, and no metadata. All this contributes to Godot being much friendlier to VCS systems such as Git, Subversion or Mercurial.
Godot’s Scene panel is similar to Unity’s Hierarchy panel but, as each node has a specific function, the approach used by Godot is more visually descriptive. In other words, it’s easier to understand what a specific scene does at a glance.
The Inspector in Godot is more minimalist and designed to only show properties. Thanks to this, objects can export a much larger amount of useful parameters to the user, without having to hide functionality in language APIs. As a plus, Godot allows animating any of those properties visually, so changing colors, textures, enumerations or even links to resources in real-time is possible without involving code.
Finally, the Toolbar at the top of the screen is similar in the sense that it allows controlling the project playback, but projects in Godot run in a separate window, as they don’t execute inside the editor (but the tree and objects can still be explored in the debugger window).
This approach has the disadvantage that the running game can’t be explored from different angles (though this may be supported in the future, and displaying collision gizmos in the running game is already possible), but in exchange has several advantages:
- Running the project and closing it is very fast (Unity has to save, run the project, close the project and then reload the previous state).
- Live editing is a lot more useful, because changes done to the editor take effect immediately in the game, and are not lost (nor have to be synced) when the game is closed. This allows fantastic workflows, like creating levels while you play them.
- The editor is more stable, because the game runs in a separate process.
Finally, the top toolbar includes a menu for remote debugging. These options make it simple to deploy to a device (connected phone, tablet or browser via HTML5), and debug/live edit on it after the game was exported.
The scene system
This is the most important difference between Unity and Godot, and actually the favourite feature of most Godot users.
Unity’s scene system consist in embedding all the required assets in a scene, and link them together by setting components and scripts to them.
Godot’s scene system is different: it actually consists in a tree made of nodes. Each node serves a purpose: Sprite, Mesh, Light… Basically, this is similar to Unity scene system. However, each node can have multiple children, which make each a subscene of the main scene. This means you can compose a whole scene with different scenes, stored in different files.
For example, think of a platformer level. You would compose it with multiple elements:
- Bricks
- Coins
- The player
- The enemies
In Unity, you would put all the GameObjects in the scene: the player, multiple instances of enemies, bricks everywhere to form the ground of the level, and multiple instances of coins all over the level. You would then add various components to each element to link them and add logic in the level: for example, you’d add a BoxCollider2D to all the elements of the scene so that they can collide. This principle is different in Godot.
In Godot, you would split your whole scene into 3 separate, smaller scenes, which you would then instance in the main scene.
- First, a scene for the Player alone.
Consider the player as a reusable element in other levels. It is composed of one node in particular: an AnimatedSprite node, which contains the sprite textures to form various animations (for example, walking animation)
- Second, a scene for the Enemy.
There again, an enemy is a reusable element in other levels. It is almost the same as the Player node - the only differences are the script (that manages AI, mostly) and sprite textures used by the AnimatedSprite.
- Lastly, the Level scene.
It is composed of Bricks (for platforms), Coins (for the player to grab) and a certain number of instances of the previous Enemy scene. These will be different, separate enemies, whose behaviour and appearance will be the same as defined in the Enemy scene. Each instance is then considered as a node in the Level scene tree. Of course, you can set different properties for each enemy node (to change its color for example).
Finally, the main scene would then be composed of one root node with 2 children: a Player instance node, and a Level instance node. The root node can be anything, generally a “root” type such as “Node” which is the most global type, or “Node2D” (root type of all 2D-related nodes), “Spatial” (root type of all 3D-related nodes) or “Control” (root type of all GUI-related nodes).
As you can see, every scene is organized as a tree. The same goes for nodes’ properties: you don’t add a collision component to a node to make it collidable like Unity does. Instead, you make this node a child of a new specific node that has collision properties. Godot features various collision types nodes, depending of the use (see the Physics introduction).
Question: What are the advantages of this system? Wouldn’t this system potentially increase the depth of the scene tree? Besides, Unity allows organizing GameObjects by putting them in empty GameObjects.
- First, this system is closer to the well-known Object-Oriented paradigm: Godot provides a number of nodes which are not clearly “Game Objects”, but they provide their children with their own capabilities: this is inheritance.
- Second, it allows the extraction a subtree of scene to make it a scene of its own, which answers to the second and third questions: even if a scene tree gets too deep, it can be split into smaller subtrees. This also allows a better solution for reusability, as you can include any subtree as a child of any node. Putting multiple nodes in an empty GameObject in Unity does not provide the same possibility, apart from a visual organization.
These are the most important concepts you need to remember: “node”, “parent node” and “child node”.
Project organization
We previously observed that there is no perfect solution to set a project architecture. Any solution will work for Unity and Godot, so this point has a lesser importance.
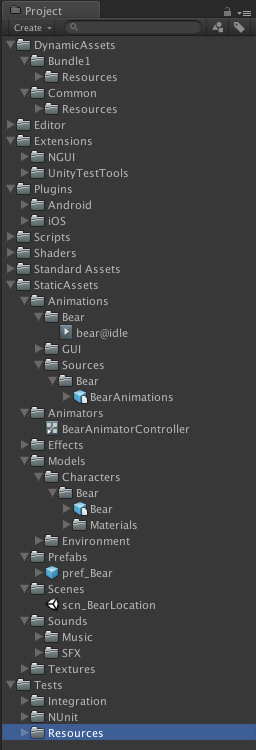
However, we often observe a common architecture for Unity projects, which consists in having one Assets folder in the root directory, that contains various folders, one per type of asset: Audio, Graphics, Models, Materials, Scripts, Scenes, etc.
As described before, Godot scene system allows splitting scenes in smaller scenes. Since each scene and subscene is actually one scene file in the project, we recommend organizing your project a bit differently. This wiki provides a page for this: Project organization.
Where are my prefabs?
The concept of prefabs as provided by Unity is a ‘template’ element of the scene. It is reusable, and each instance of the prefab that exists in the scene has an existence of its own, but all of them have the same properties as defined by the prefab.
Godot does not provide prefabs as such, but this functionality is here again filled thanks to its scene system: as we saw the scene system is organized as a tree. Godot allows you to save a subtree of a scene as its own scene, thus saved in its own file. This new scene can then be instanced as many times as you want. Any change you make to this new, separate scene will be applied to its instances. However, any change you make to the instance will not have any impact on the ‘template’ scene.
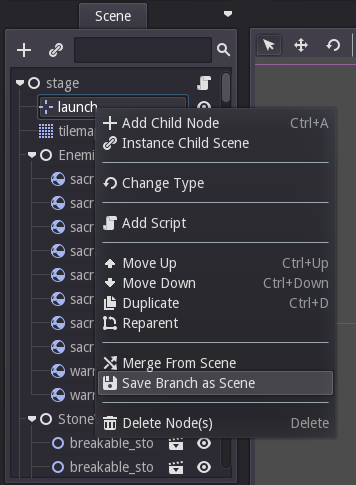
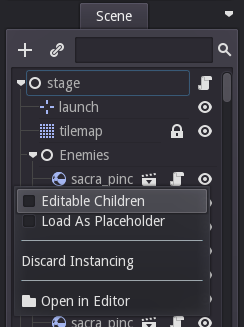
To be precise, you can modify the parameters of the instance in the Inspector panel. However, the nodes that compose this instance are locked and you can unlock them if you need to by clicking the clapperboard icon next to the instance in the Scene tree, and select “Editable children” in the menu. You don’t need to do this to add new children nodes to this node, but remember that these new children will belong to the instance, not the ‘template’ scene. If you want to add new children to all the instances of your ‘template’ scene, then you need to add it once in the ‘template’ scene.
Glossary correspondance
GameObject -> Node Add a component -> Inheriting Prefab -> Externalized branch
Scripting : From C# to GDScript
Design
As you may know already, Unity supports 2 scripting languages for its API: C# and Javascript (called UnityScript). Both languages can be used in the same project (but not in the same file, of course). Choosing one instead of the other is a matter of personal taste, as performances seem not to be affected that much by the use of Javascript as long as the project remains small. C# benefits from its integration with Visual Studio and other specific features, such as static typing.
Godot provides its own scripting language: GDScript. This language borrows its syntax to Python, but is not related to it. If you wonder about why GDScript and not Lua, C# or any other, please read GDScript and FAQ pages. GDScript is strongly attached to Godot API, but it is really easy to learn: between 1 evening for an experimented programmer and 1 week for a complete beginner.
Unity allows you to attach as many scripts as you want to a GameObject. Each script adds a behaviour to the GameObject: for example, you can attach a script so that it reacts to the player’s controls, and another that controls its specific game logic.
In Godot, you can only attach one script per node. You can use either an external GDScript file, or include it directly in the node. If you need to attach more scripts to one node, then you may consider 2 solutions, depending on your scene and on what you want to achieve:
- either add a new node between your target node and its current parent, then add a script to this new node.
- or, your can split your target node into multiple children and attach one script to each of them.
As you can see, it can be easy to turn a scene tree to a mess. This is why it is important to have a real reflection, and consider splitting a complicated scene into multiple, smaller branches.
Connections : groups and signals
You can control nodes by accessing them using a script, and call functions (built-in or user-defined) on them. But there’s more: you can also place them in a group and call a function on all nodes contained in this group! This is explained in this page.
But there’s more! Certain nodes throw signals when certain actions happen. You can connect these signals to call a specific function when they happen. Note that you can define your own signals and send them whenever you want. This feature is documented here.
Using Godot in C++
Just for your information, Godot also allows you to develop your project directly in C++ by using its API, which is not possible with Unity at the moment. As an example, you can consider Godot Engine’s editor as a “game” written in C++ using Godot API.
If you are interested in using Godot in C++, you may want to start reading the Developing in C++ page.