Managing image files
If you have read the previous tutorials on Resources and File system, at this point you know that regular image files (.png, .jpg, etc.) are treated as regular resources in Godot.
Unlike texture resources (.tex files), image files contain no extra information on tiling (texture repeat), mipmaps or filtering. Editing this information and saving the texture back will not have any effect, since such formats can’t contain that information.
Image loader
Loading of images is done by the image loader. The behavior of the loader for all image files can be changed in the Project Settings dialog (Scene -> Project Settings). There is a section with values that are used for all image resources:
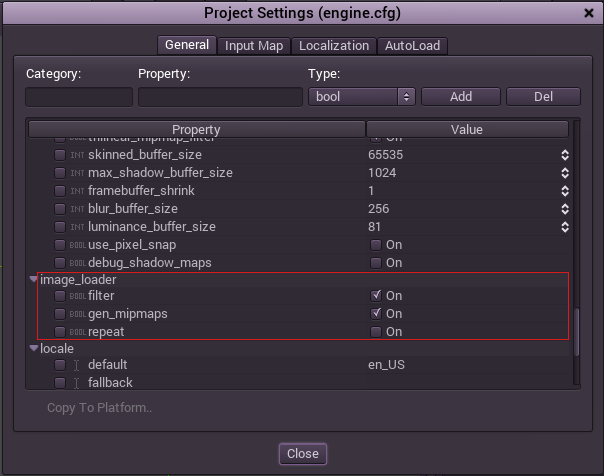
Image loader options
Filter
Filter is used when the image is stretched more than its original size, so a texel in the image is bigger than a pixel on the screen. Turning off the filter produces a retro-like look:

Repeat
Repeat is mainly used for 3D textures, so it’s off by default (textures are imported with the scenes and usually are not in the project as image files). When using UV coordinates (something not as common in 2D), and the UV value goes beyond the 0,0,1,1 rect, the texture repeats instead of clamping to the edge.
Mipmaps
When the mipmaps option is enabled, Godot will generate mipmaps. Mipmaps are versions of the image shrunk by half in both axes, recursively, until the image is 1 pixel of size. When the 3D hardware needs to shrink the image, it finds the largest mipmap it can scale from, and scales from there. This improves performance and image quality.

When mipmaps are disabled, images start distorting badly when shrunk excessively:

Alpha blending
The blending equation used by applications like Photoshop is too complex for real-time. There are better approximations such as pre-multiplied alpha, but they impose more stress in the asset pipeline. In the end, we are left with textures that have artifacts in the edges, because apps such as Photoshop store white pixels in completely transparent areas. Such white pixels end up showing thanks to the texture filter (when active).
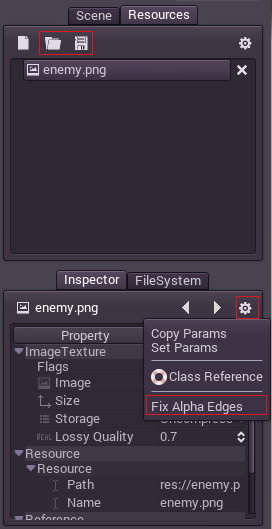
Godot has an option to fix the edges of the image (by painting invisible pixels the same color as the visible neighbours):

To do this, open the image from the resources tab, or edit it from the property editor from another node or resource, then go to the object options and select “Fix Alpha Edges”, then save it.
Since fixing this in so many images can be a little annoying, both Texture Import and Image Export can also perform this operation.
Texture import
Sometimes, it might be desirable to change the above settings per image. Unfortunately, the image loader settings are global. Texture flags also can’t be saved in a regular .png or .jpg file.
For such cases, the image can be imported as a texture (.tex), where the individual flags can be changed. Godot also keeps track of the original file and will re-import if it changes.
Importing also allows conversion to other formats (WebP, or RAM compression) which might be of use in some cases. More information on the Importing textures page.
Image export
It is also possible to convert images to other formats (WebP or RAM compression) on export, as well as instructing the exporter to create an Atlas for a set of images. It is also possible to ask the exporter to scale all images (or selected groups).
More information on the Exporting images page.
Fixing PNGs iCCP chunk
With the upgrade of libpng to 1.6.23, libpng became more strict in terms of enforcing iCC profile correctness. This means that it now warns when it comes across an image with a non-conforming iCC chunk.
WARNING: _png_warn_function: iCCP: known incorrect sRGB profile
This can be fixed by either using a tool that exports PNGs with the correct iCC profile (in some tools this profile can even be manually changed on export) or using a tool that removes/fixes the iCC chunks.
Linux/Mac
Using ImageMagicks convert or mogrify fixes these warnings.
To fix all PNGs in a project folder do:
$ find . -type f -name "*.png" -exec convert {} {} \;
pngcheck is also useful in locating the non-conforming images:
find . -type f -name "*.png" -exec pngcheck {} \;
Windows
Using optiPNG <http://optipng.sourceforge.net/> fixes these warnings on Windows. To fix a PNG inplace do:
optipng -clobber -strip all file.png