Fixed materials
Introduction
Fixed materials (originally Fixed Pipeline Materials) are the most common type of materials, using the most common material options found in 3D DCCs (such as Maya, 3DS Max or Blender). The big advantage of using them is that 3D artists are very familiar with this layout. They also allow to try out different things quickly without the need of writing shaders. Fixed Materials inherit from Material, which also has several options. If you haven’t read it before, reading the Materials tutorial is recommended.
Options
Here is the list of all the options available for fixed materials:
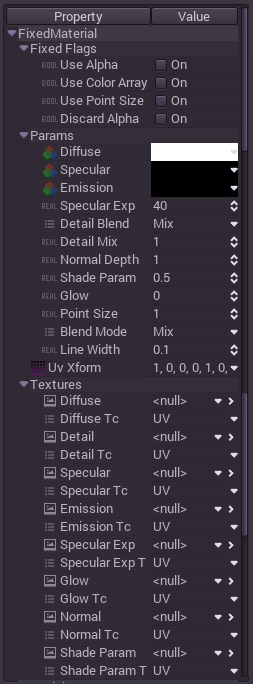
From this point, every option will be explained in detail:
Fixed flags
These are a set of flags that control general aspects of the material.
Use alpha
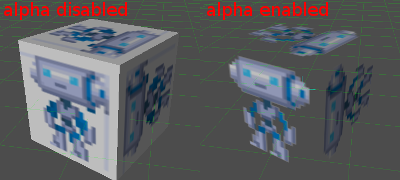
This flag needs to be active for transparent materials to blend with what is behind, otherwise display will always be opaque. Do not enable this flag unless the material really needs it, because it can severely affect performance and quality. Materials with transparency also won’t cast shadows (unless they contain opaque areas and the “opaque pre-pass” hint is turned on, see the Materials tutorial for more information).
Use vertex colors
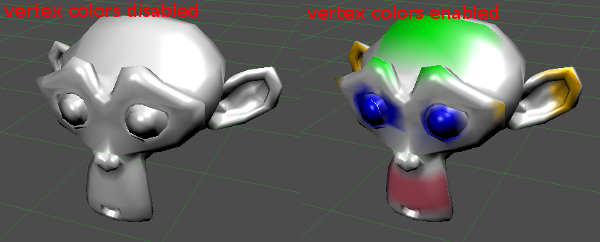
Vertex color painting is a very common technique to add detail to a geometry. 3D DCCs all support this, and many even support baking occlusion to it. Godot allows this information to be used in the fixed material by modulating the diffuse color when enabled.
Point size
Point size is used to set the point size (in pixels) for when rendering points. This feature is mostly used in tools and HUDs.
Discard alpha
When alpha is enabled (see above) the transparent pixels are blended with what is behind them. In some combinations (of using alpha to render depth) it may be possible that transparent pixels cover other objects.
If this is the case, enable this option for the material. This option is often used in combination with “opaque pre-pass” hint (see the Materials tutorial for more information).
Parameters
Diffuse, specular, emission and specular exponent
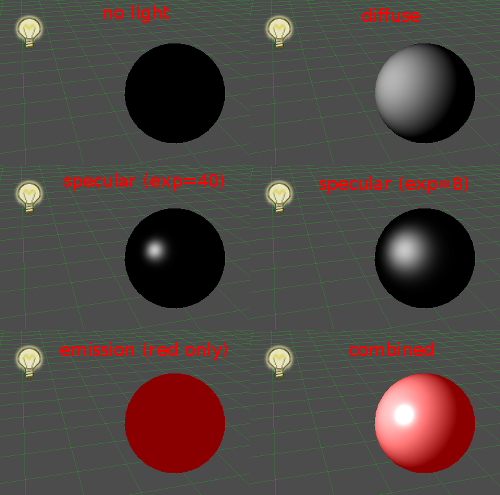
These are the base colors for the material.
- Diffuse color is responsible for the light that reaches the material, and is diffusely back-scattered then. This color varies by the angle between the face and the light and the distance to the light source (in the case of spot and omni lights). It is the color that best represents the material. It can also have alpha (transparency).
- Specular color is the color of the reflected light and responsible for shines. It is affected by the specular exponent.
- Emission is the color of the light generated within the material (although it will not lit anything else around unless baking). This color is constant.
- Specular Exponent (or “Shininess”/”Intensity” in some 3D DCCs) is the way light is reflected. If the value is high, light is reflected completely, otherwise it is diffused more and more.
Below is an example of how they interact:
Shader & shader param
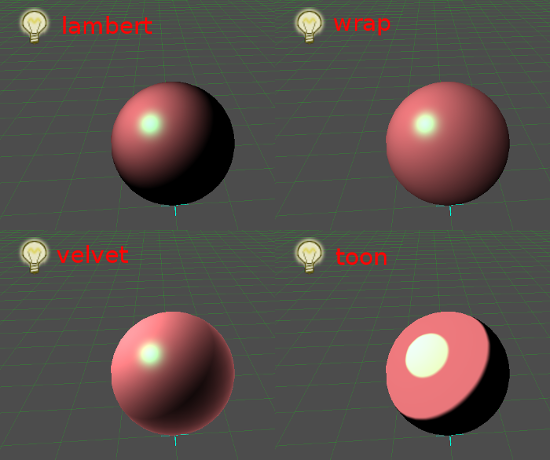
Regular shader materials allow custom lighting code. Fixed materials come with four predefined shader types:
- Lambert: The standard diffuse light, where the amount of light is proportional to the angle from the light emitter.
- Wrap: A variation on Lambert, where the “coverage” of the light can be changed. This is useful for many types of materials such as wood, clay, hair, etc.
- Velvet: This is similar to Lambert, but adds light scattering in the edges. It’s useful for leathers and some types of metals.
- Toon: Standard toon shading with a coverage parameter. The specular component also becomes toon-ized.
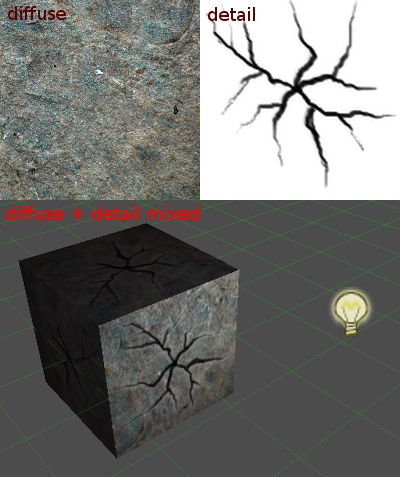
Detail & detail mix
Detail is a second diffuse texture which can be mixed with the first one (more on textures later!). Detail blend and mix control how these are added together, here’s an example of what detail textures are for:
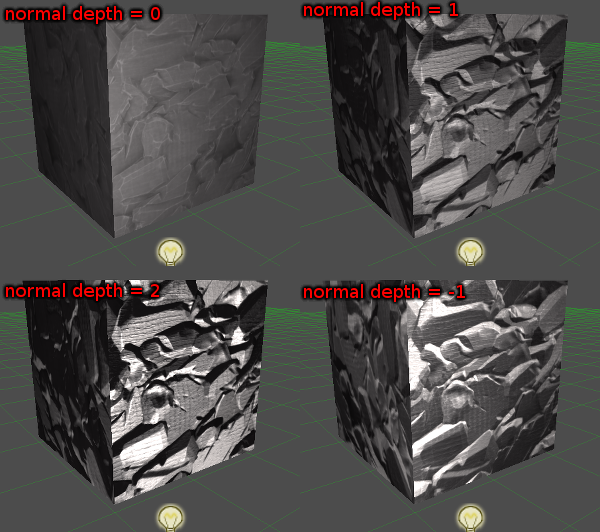
Normal depth
Normal depth controls the strength and the direction of normal-mapping. If it is set to 1 (the default), the un-scaled normal map is applied. Values larger than 1 make normal-mapping more pronounced (dents and bumps become larger), while values smaller than 1 reduce the effect. A normal depth of 0 disables normal-mapping. Negative values invert the normal map so dents become bumps and vice versa. Here is an example showing the influence of the normal depth on the outcome:
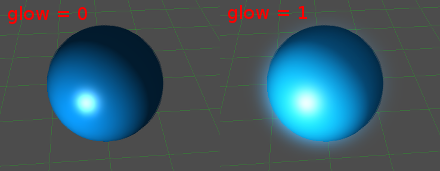
Glow
This value controls how much of the color is sent to the glow buffer. It can be greater than 1 for a stronger effect. For glow to work, a WorldEnvironment must exist with Glow activated.
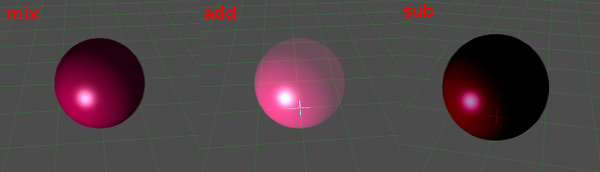
Blend mode
Objects are usually blended in Mix mode. Other blend modes (Add and Sub) exist for special cases (usually particle effects, light rays, etc.) but materials can be set to them:
Point size, line width
When drawing points or lines, the size of them can be adjusted here per material.
Textures
Almost all of the parameters above can have a texture assigned to them. There are four options to where they can get their UV coordinates:
- UV Coordinates (UV Array): This is the regular UV coordinate array that was imported with the model.
- UV x UV XForm: UV Coordinates multiplied by the UV Xform matrix.
- UV2 Coordinates: Some imported models might have come with a second set of UV coordinates. These are common for detail textures or for baked light textures.
- Sphere: Spherical coordinates (difference of the normal at the pixel by the camera normal).
The value of every pixel of the texture is multiplied by the original parameter. This means that if a texture is loaded for diffuse, it will be multiplied by the color of the diffuse color parameter. Same applies to all the others except for specular exponent, which is replaced.