Physics introduction
Our world is made of tangible matter. In our world, a piano can’t go through a wall when going into a house. It needs to use the door. Video games are often like the real world and Pac-Man can’t go through the walls of his maze (although he can teleport from the left to the right side of the screen and back).
Anyway, moving sprites around is nice but one day they have to collide properly, so let’s get to the point.
Shapes
The base collidable object in Godot’s 2D world is a Shape2D. There are many types of shapes, all of them inherit this base class:
- CircleShape2D
- RectangleShape2D
- CapsuleShape2D
- ConvexPolygonShape2D
- ConcavePolygonShape2D
- etc. (there are others check the class list).
Shapes are of type Resource, but they can be created via code easily. For example:
# Create a circle
var c = CircleShape2D.new()
c.set_radius(20)

# Create a box
var b = RectangleShape2D.new()
b.set_extents(Vector2(20,10))
The main use for shapes is checking collision/intersection and getting resolution information. Shapes are mostly convex, (except the concavepolygon one, which is just a list of segments to check collision against). This collision check is done easily with the built-in functions like:
# Check if there is a collision between two shapes, each with a transform
if b.collide(b_xform, a, a_xform):
    print("OMG Collision!")
Godot will return correct collision and collision info from the different calls to the Shape2D api. Collision between all shapes and transforms can be done this way, or even obtaining contact information, motion casting, etc.
Transforming shapes
As seen before in the collide functions, 2D shapes in Godot can be transformed by using a regular Matrix32 transform, meaning the functions can check for collisions while the shapes are scaled, moved and rotated. The only limitation to this is that shapes with curved sections (such as circle and capsule) can only be scaled uniformly. This means that circle or capsule shapes scaled in the form of an ellipse will not work properly. This is a limitation on the collision algorithm used (SAT), so make sure that your circle and capsule shapes are always scaled uniformly!

When problems begin
Even though this sounds good, reality is that collision detection alone is usually not enough in most scenarios. Many problems start arising as long as the development of the game is in progress:
Too many combinations!
Games have several dozens, hundreds, thousands! of objects that can collide and be collided. The typical approach is to test everything against everything in two for loops like this:
for i in colliders:
    for j in colliders:
        if (i.collides(j)):
            do_collision_code()
But this scales really badly. Let’s imagine there are only 100 objects in the game. This means that 100*100=10000 collisions will need to be tested each frame. This is a lot!
Visual aid
Most of the time, creating a shape via code is not enough. We need to visually place it over a sprite, draw a collision polygon, etc. It is obvious that we need nodes to create the proper collision shapes in a scene.
Collision resolution
Imagine we solved the collision issue, we can tell easily and quickly which shapes overlap. If many of them are dynamic objects that move around, or move according to newtonian physics, solving a collision of multiple objects can be really difficult code-wise.
Introducing… Godot’s physics engine!
To solve all these problems, Godot has a physics and collision engine that is well integrated into the scene system, yet it allows different levels and layers of functionality. The built-in physics engine can be used for:
- Simple Collision Detection: See Shape2D API.
- Scene Kinematics: Handle shapes, collisions, broadphase, etc as nodes. See Area2D.
- Scene Physics: Rigid bodies and constraints as nodes. See RigidBody2D, and the joint nodes.
Units of measure
It is often a problem when integrating a 2D physics engine to a game that such engines are optimized to work using meters as unit of measure. Godot uses a built-in custom 2D physics engine that is designed to function properly in pixels, so all units and default values used for stabilization are tuned for this, making development more straightforward.
CollisionObject2D
CollisionObject2D is the (virtual) base node for everything that can be collided in 2D. Area2D, StaticBody2D, KinematicBody2D and RigidBody2D all inherit from it. This node contains a list of shapes (Shape2D) and a relative transform. This means that all collisionable objects in Godot can use multiple shapes at different transforms (offset/scale/rotation). Just remember that, as mentioned before, non-uniform scale will not work for circle and capsule shapes.
A CollisionObject2D comes in different flavors: StaticBody2D, RigidBody2D, KinematicBody2D and Area2D. However, before we dig into them, let’s have a look how to define the shape of a collision object. There are two special nodes for that.
CollisionShape2D
This node is a helper node, which must be created as a direct child of a CollisionObject2D-derived node: Area2D, StaticBody2D, KinematicBody2D, RigidBody2D.
The purpose of a CollisionShape2D instance is to add collision shapes to its parent class. Multiple children of type CollisionShape2D can be added to a CollisionObject2D-derived object with the effect that the parent will simply get more collision shapes. When a CollisionShape2D is edited (or added, moved, deleted) the list of shapes in the parent node is updated.
At run time, though, this node does not exist and it can’t be accessed with
get_node(). This is because it is a helper node only for editing the collision shapes.
To access the shapes created at runtime, use the CollisionObject2D API directly.
As an example, here’s the scene from the platformer, containing an Area2D (named ‘coin’) having two children: a CollisionShape2D (named ‘collision’) and a sprite (called ‘sprite’):

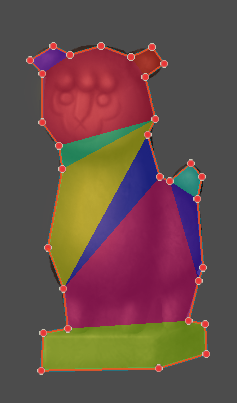
CollisionPolygon2D
This one is similar to CollisionShape2D, except that instead of assigning a shape, a polygon can be edited (drawn by the user) to determine the shape. The polygon can be convex or concave, it doesn’t matter.
Here is another scene involving a CollisionPolygon2D: A StaticBody2D has been added as a child of a sprite so that the collision object moves together with the sprite. In turn, the CollisionPolygon is a child of StaticBody2D, meaning it adds collision shapes to it.
The CollisionPolygon2D will decompose the user-defined polygon into conves shapes convex shapes (shapes can only be convex, remember?) before adding them to the CollisionObject2D. The following image shows such a decomposition:
Triggers
A CollisionShape2D or CollisionPolygon2D can be set as a trigger by setting the boolean flag with the same name. When used in a RigidBody2D or KinematicBody2D, “trigger” shapes take part in collision detection but are unaffected by physics (they don’t block movement etc). Defining a collision shape as a trigger is mostly useful in two situations:
- Collisions for a specific shape shall be disabled.
- An Area2D shall send
body_enterandbody_exitsignals when the trigger shape enters it (useful in several situations).
StaticBody2D
The simplest node in the physics engine is the StaticBody2D. This node takes part in collision detection. However, it does not move or rotate after a collision, so physics do not influence them. The node is static. Other nodes can collide against it and will be influenced accordingly.
The platformer example uses StaticBody2D objects for the floors and walls. These are the static parts of a level and shall stay right where they are even if the player jumps onto them.
KinematicBody2D
Similar to StaticBody2D, objects of type KinematicBody2D are not affected by physics (although they take part in collision detection, of course). However, KinematicBody2D are not static but can be moved via code or an animation. They have two main uses:
- Simulated Motion: When these bodies are moved manually, either from code or from an AnimationPlayer (with process mode set to fixed!), the physics will automatically compute an estimate of their linear and angular velocity. This makes them very useful for moving platforms or other AnimationPlayer-controlled objects (like a door, a bridge that opens, etc). As an example, the 2d/platformer demo uses them for moving platforms.
- Kinematic Characters: KinematicBody2D also has an API for moving
objects (the
move()function) while performing collision tests. This makes them really useful to implement characters that collide against a world, but that don’t require advanced physics. There is a tutorial about it Kinematic Character (2D).
RigidBody2D
This type of body simulates Newtonian physics. It has mass, friction, bounce, and the (0,0) coordinates simulate the center of mass. When real physics are needed, RigidBody2D is the node to use. The motion of this body is affected by gravity and/or other bodies.
Rigid bodies are usually active all the time, but when they end up in resting position and don’t move for a while, they are put to sleep until something else wakes them up. This saves an enormous amount of CPU.
RigidBody2D nodes update their transform constantly, as it is generated by the simulation from a position, linear velocity and angular velocity. As a result, [STRIKEOUT:this node can’t be scaled]. Scaling the children nodes should work fine though.
A RigidBody2D has a Mode flag to change its behavior (something
which is very common in games). It can behave like a rigid body,
a character (a rigid body without the ability to rotate so that it is
always upright), a kinematic body or a static body. This flag can be
changed dynamically according to the current situation. For example,
an enemy frozen by an ice beam becomes a static body.
The best way to interact with a RigidBody2D is during the force integration callback by overriding the function
func _integrate_forces(state):
    [use state to change the object]
The “state” parameter is of type Physics2DDirectBodyState. Please do not use the state object outside the callback as it will result in an error.
During the evaluation of the aforementioned function, the physics engine synchronizes state with the scene and allows full modification of the object’s parameters. Since physics may run in its own thread, parameter changes outside that callback will not take place until the next frame.
Contact reporting
In general, RigidBody2D will not keep track of the contacts, because this can require a huge amount of memory if thousands of rigid bodies are in the scene. To get contacts reported, simply increase the amount of the “contacts reported” property from zero to a meaningful value (depending on how many you are expecting to get). The contacts can be later obtained via the Physics2DDirectBodyState.get_contact_count() and related functions.
Contact monitoring via signals is also available (signals similar to the ones in Area2D, described below) via a boolean property.
Area2D
Areas in Godot physics have three main roles:
- Override the space parameters for objects entering them (ie. gravity, gravity direction, gravity type, density, etc).
- Monitor when rigid or kinematic bodies enter or exit the area.
- Monitor other areas (this is the simplest way to get overlap test)
The second function is the most common. For it to work, the “monitoring” property must be enabled (it is by default). There are two types of signals emitted by this node:
# Simple, high level notification
body_enter(body:PhysicsBody2D)
body_exit(body:PhysicsBody2D)
area_enter(area:Area2D)
area_exit(body:Area2D)

# Low level shape-based notification
# Notifies which shape specifically in both the body and area are in contact
body_enter_shape(body_id:int,body:PhysicsBody2D,body_shape_index:int,area_shape_index:idx)
body_exit_shape(body_id:int,body:PhysicsBody2D,body_shape_index:int,area_shape_index:idx)
area_enter_shape(area_id:int,area:Area2D,area_shape_index:int,self_shape_index:idx)
area_exit_shape(area_id:int,area:Area2D,area_shape_index:int,self_shape_index:idx)
By default, areas also receive mouse/touchscreen input, providing a lower-level way than controls to implement this kind of input in a game. Bodies support this but it’s disabled by default.
In case of overlap, who receives collision information?
Remember that not every combination of two bodies can “report” contacts. Static bodies are passive and will not report contacts when hit. Kinematic Bodies will report contacts but only against Rigid/Character bodies. Area2D will report overlap (not detailed contacts) with bodies and with other areas. The following table should make it more visual:
| Type | RigidBody | CharacterBody | KinematicBody | StaticBody | Area |
|---|---|---|---|---|---|
| RigidBody | Both | Both | Both | Rigidbody | Area |
| CharacterBody | Both | Both | Both | CharacterBody | Area |
| KinematicBody | Both | Both | None | None | Area |
| StaticBody | RigidBody | CharacterBody | None | None | None |
| Area | Area | Area | Area | None | Both |
Physics global variables
A few global variables can be tweaked in the project settings for adjusting how 2D physics works:

Leaving them alone is best (except for the gravity, that needs to be adjusted in most games), but there is one specific parameter that might need tweaking which is the “cell_size”. Godot 2D physics engine used by default a space hashing algorithm that divides space in cells to compute close collision pairs more efficiently.
If a game uses several colliders that are really small and occupy a small portion of the screen, it might be necessary to shrink that value (always to a power of 2) to improve efficiency. Likewise if a game uses few large colliders that span a huge map (of several screens of size), increasing that value a bit might help save resources.
Fixed process callback
The physics engine may spawn multiple threads to improve performance, so it can use up to a full frame to process physics. Because of this, when accessing physics variables such as position, linear velocity, etc. they might not be representative of what is going on in the current frame.
To solve this, Godot has a fixed process callback, which is like process but it’s called once per physics frame (by default 60 times per second). During this time, the physics engine is in synchronization state and can be accessed directly and without delays.
To enable a fixed process callback, use the set_fixed_process()
function, example:
extends KinematicBody2D

func _fixed_process(delta):
    move(direction * delta)

func _ready():
    set_fixed_process(true)
Casting rays and motion queries
It is very often desired to “explore” the world around from our code. Throwing rays is the most common way to do it. The simplest way to do this is by using the RayCast2D node, which will throw a ray every frame and record the intersection.
At the moment there isn’t a high level API for this, so the physics server must be used directly. For this, the Physics2DDirectspaceState class must be used. To obtain it, the following steps must be taken:
- It must be used inside the
_fixed_process()callback, or at_integrate_forces() - The 2D RIDs for the space and physics server must be obtained.
The following code should work:
func _fixed_process(delta):
    var space = get_world_2d().get_space()
    var space_state = Physics2DServer.space_get_direct_state(space)
Enjoy doing space queries!