Importing 3D scenes
Introduction
Most game engines just import 3D objects, which may contain skeletons or animations, and then all further work is done in the engine UI, like object placement, full scene animations, etc. In Godot, given the node system is very similar to how 3D DCC tools (such as Maya, 3DS Max or Blender) work, full 3D scenes can be imported in all their glory. Additionally, by using a simple language tag system, it is possible to specify that objects are imported as several things, such as collidable, rooms and portals, vehicles and wheels, LOD distances, billboards, etc.
This allows for some interesting features:
- Importing simple scenes, rigged objects, animations, etc.
- Importing full scenes. Entire scenarios can be created and updated in the 3D DCC and imported to Godot each time they change, then only little editing is needed from the engine side.
- Full cutscenes can be imported, including multiple character animation, lighting, camera motion, etc.
- Scenes can be further edited and scripted in the engine, where shaders and environment effects can be added, enemies can be instanced, etc. The importer will update geometry changes if the source scene changes but keep the local changes too (in real-time while using the Godot editor!)
- Textures can be all batch-imported and updated when the source scene changes.
This is achieved by using a very simple language tag that will be explained in detail later.
Exporting DAE files
Why not FBX?
Most game engines use the FBX format for importing 3D scenes, which is definitely one of the most standardized in the industry. However, this format requires the use of a closed library from Autodesk which is distributed with a more restrictive licensing terms than Godot. The plan is, sometime in the future, to implement an external conversion binary, but meanwhile FBX is not really supported.
Exporting DAE files from Maya and 3DS Max
Autodesk added built-in collada support to Maya and 3DS Max, but it’s really broken and should not be used. The best way to export this format is by using the OpenCollada plugins. They work really well, although they are not always up-to date with the latest version of the software.
Exporting DAE files from Blender
Blender also has built-in collada support, but it’s really broken and should not be used either.
Godot provides a Python Plugin that will do a much better job at exporting the scenes.
The import process
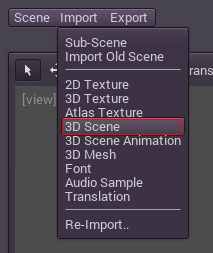
Import process begins with the 3D scene import menu:
That opens what is probably the biggest of all the import dialogs:
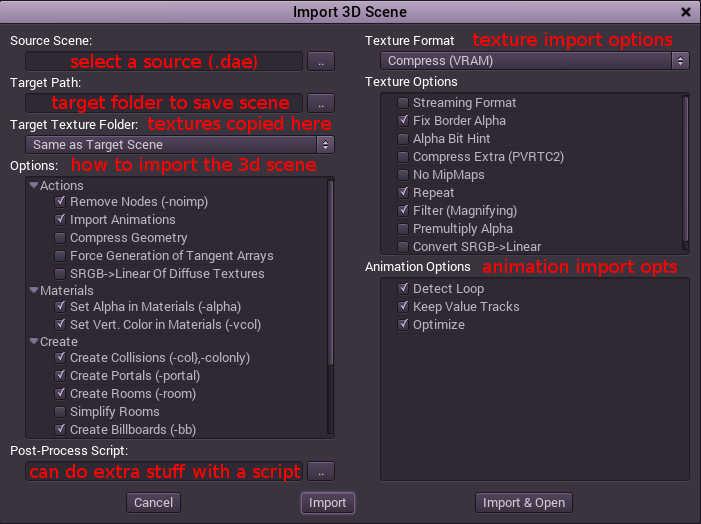
Many options exist in there, so each section will be explained as follows:
Source & target paths
To import, two options are needed. The first is a source .dae file (“Digital Asset Exchange”, the extension of the Collada standard). More import formats will eventually added, but Collada is the most complete open format as of this writing.
A target folder needs to be provided, so the importer can import the scene there. The imported scene will have the same filename as the source one, except for the .scn extension, so make sure you pick good names when you export!
The textures will be copied and converted. Textures in 3D applications are usually just PNG or JPG files. Godot will convert them to video memory texture compression format (s3tc, pvrtc, ericsson, etc.) by default to improve performance and save resources.
Since the original textures, 3D file and textures are usually not needed, it’s recommended to keep them outside the project. For some hints on how to do this the best way, you can check the Project organization tutorial.
Two options for textures are provided. They can be copied to the same place as the scene, or they can be copied to a common path (configurable in the project settings). If you choose this, make sure no two textures are named the same.
3D rigging tips
Before going into the options, here are some tips for making sure your rigs import properly
- Only up to 4 weights are imported per vertex, if a vertex depends of more than 4 bones, only the 4 most important bones (the one with the most weight) will be imported. For most models this usually works fine, but just keep it in mind.
- Do not use non-uniform scale in bone animation, as this will likely not import properly. Try to accomplish the same effect with more bones.
- When exporting from Blender, make sure that objects modified by a skeleton are children of it. Many objects can be modified by a single skeleton, but they all should be direct children.
- The same way, when using Blender, make sure that the relative transform of children nodes to the skeleton is zero (no rotation, no translation, no scale. All zero and scale at 1.0). The position of both objects (the little orange dot) should be at the same place.
3D import options
This section contains many options to change the way import workflow works. Some (like HDR) will be better explained in other sections, but in general a pattern can be visible in the options and that is, many of the options end with “-something”. For example:
- Remove Nodes (-noimp)
- Set Alpha in Materials (-alpha)
- Create Collisions (-col).
This means that the object names in the 3D DCC need to have those options appended at the end for the importer to tell what they are. When imported, Godot will convert them to what they are meant to be.
Note: Maya users must use “_” (underscore) instead of “-” (minus).
Here is an example of how a scene in the 3D DCC looks (using Blender), and how it is imported to Godot:
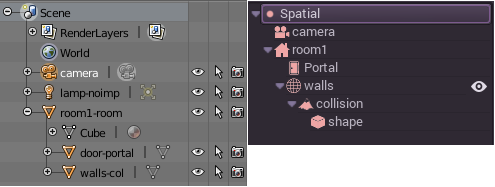
Notice that:
- The camera was imported normally.
- A Room was created (-room).
- A Portal was created (-portal).
- The Mesh got static collision added (-col).
- The Light was not imported (-noimp).
Options in detail
Following is a list of most import options and what they do in more detail.
Remove nodes (-noimp)
Node names that have this at the end will be removed at import time, mo matter their type. Erasing them afterwards is most of the times pointless because the will be restored if the source scene changes.
Import animations
Some scene formats (.dae) support one or more animations. If this is checked, an AnimationPlayer node will be created, containing the animations.
Compress geometry
This option (disabled [STRIKEOUT:or more like, always enabled] at the moment at the time of writing this) will compress geometry so it takes less space and renders faster (at the cost of less precision).
Force generation of tangent arrays
The importer detects when you have used a normalmap texture, or when the source file contains tangent/binormal information. These arrays are needed for normalmapping to work, and most exporters know what they do when they export this. However, it might be possible to run into source scenes that do not have this information which, as a result, make normal-mapping not work. If you notice that normal-maps do not work when importing the scene, turn this on!
SRGB -> linear of diffuse textures
When rendering using HDR (High Dynamic Range) it might be desirable to use linear-space textures to achieve a more real-life lighting. Otherwise, colors may saturate and contrast too much when exposure changes. This option must be used together with the SRGB option in WorldEnvironment. The texture import options also have the option to do this conversion, but if this one is turned on, conversion will always be done to diffuse textures (usually what is desired). For more information, read the High dynamic range tutorial.
Set alpha in materials (-alpha)
When working with most 3D DCCs, its pretty obvious when a texture is transparent and has opacity and this rarely affects the workflow or final rendering. However, when dealing with real-time rendering, materials with alpha blending are usually less optimal to draw, so they must be explicitly marked as such.
Originally Godot detected this based on whether if the source texture had an alpha channel, but most image manipulation applications like Photoshop or Gimp will export this channel anyway even if not used. Code was added later to check manually if there really was any transparency in the texture, but artists will anyway and very often lay uvmaps into opaque parts of a texture and leave unused areas (where no UV exists) transparent, making this detection worthless.
Finally, it was decided that it’s best to import everything as opaque and leave artists to fix materials that need transparency when it’s obvious that they are not looking right (see the Materials tutorial).
As a helper, since every 3D DCC allows naming the materials and keeping their name upon export, the (-alpha) modifier in their name will hint the 3D scene importer in Godot that this material will use the alpha channel for transparency.
Set vert. color in materials (-vcol)
Most 3D DCCs support vertex color painting. This is generally applied as multiplication or screen blending. However, it is also often the case that your exporter will export this information as all 1s, or export it as something else and you will not realize it. Since most of the cases this option is not desired, just add this to any material to confirm that vertex colors are desired.
Create collisions (-col, -colonly)
Option “-col” will work only for Mesh nodes. If it is detected, a child static collision node will be added, using the same geometry as the mesh.
However, it is often the case that the visual geometry is too complex or too un-smooth for collisions, which end up not working well. To solve this, the “-colonly” modifier exists, which will remove the mesh upon import and create a StaticBody collision instead. This helps the visual mesh and actual collision to be separated.
Option “-colonly” can be also used with Blender’s empty objects. On import it will create a StaticBody with collision node as a child. Collision node will have one of predefined shapes, depending on the Blender’s empty draw type:
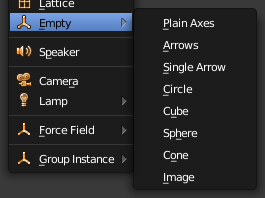
- Single arrow will create RayShape
- Cube will create BoxShape
- Image will create PlaneShape
- Sphere (and other non-listed) will create SphereShape
For better visibility in Blender’s editor user can set “X-Ray” option on collision empties and set some distinct color for them in User Preferences / Themes / 3D View / Empty.
Create rooms (-room)
This is used to create a room. As a general rule, any node that is a child of this node will be considered inside the room (including portals).
There are two ways in which this modifier can be used. The first is using a Dummy/Empty node in the 3D application with the “-room” tag. For this to work, the “interior” of the room must be closed (geometry of the children should contain walls, roof, floor, etc. and the only holes to the outside should be covered with portals). The importer will then create a simplified version of the geometry for the room.
The second way is to use the “-room” modifier on a mesh node. This will use the mesh as the base for the BSP tree that contains the room bounds. Make sure that the mesh shape is closed, all normals point outside and that the geometry is not self-intersecting, otherwise the bounds may be computed wrong (BSP Trees are too picky and difficult to work with, which is why they are barely used anymore..).
Anyway, the room will need portals, which are described next.
Create portals (-portal)
Portals are the view to look outside a room. They are always some flat shape on the surface of a room. If the portal is left alone, it is used to activate occlusion when looking inside<->outside the room.
Basically, the conditions to make and import a portal from the 3D DCC are:
- It should be a child of a room.
- It should lay on the surface of the room (this doesn’t need to be super exact, just make it as close as you can by eye and Godot will adjust it)
- It must be a flat, convex shape, any flat and convex shape is okay, no matter the axis or size.
- Normals for the flat shape faces must all point towards the OUTSIDE of the room.
Here is how it usually looks:
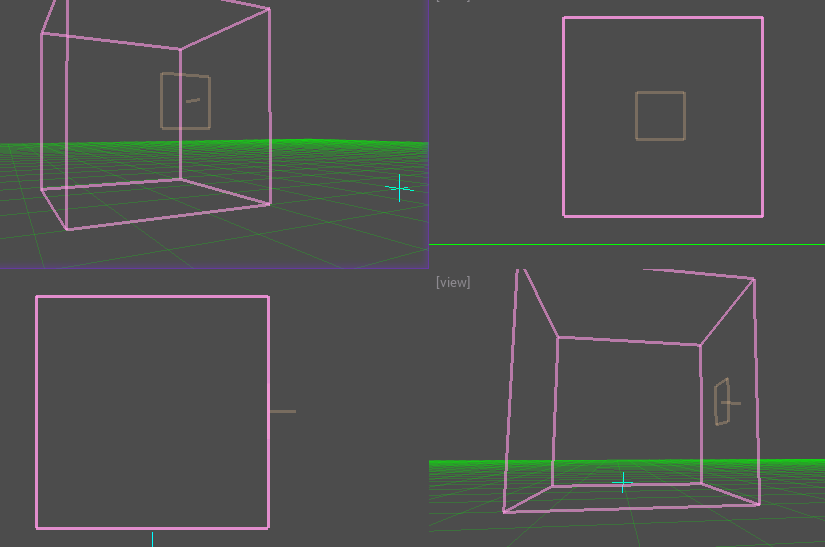
To connect to rooms, simply make two identical portals for both rooms and place them overlapped. This does not need to be perfectly exact, again, as Godot will fix it.
[..]
The rest of the tags in this section should be rather obvious, or will be documented/changed in the future.
Double-sidedness
Collada and other formats support specifying the double-sidedness of the geometry (in other words, when not double-sided, back-faces are not drawn). Godot supports this option per Material, not per Geometry.
When exporting from 3D DCCs that work with per-object double-sidedness (such as Blender of Maya), make sure that the double sided objects do not share a material with the single sided ones or the importer will not be able to discern.
Animation options
Some things to keep in mind when importing animations. 3D DCCs allow animating with curves for every x,y,z component, doing IK constraints and other stuff. When imported for real-time, animations are sampled (at small intervals) so all this information is lost. Sampled animations are fast to process, but can use considerable amounts of memory.
Because of this, the “Optimize” option exists but, in some cases, this option might break an animation, so make it sure to disable it if you notice any issues.
Some animations are meant to be cycled (like walk animations) if this is the case, animation names that end in “-cycle” or “-loop” are automatically set to loop.
Import script
Creating a script to parse the imported scene is actually really simple. This is great for post processing, changing materials, doing funny stuff with the geometry, etc.
Create a script that basically looks like this:
tool # needed so it runs in editor
extends EditorScenePostImport

func post_import(scene):
  # do your stuff here
  return scene # remember to return the imported scene
The post-import function takes the imported scene as parameter (the parameter is actually the root node of the scene).
Update logic
Other types of resources (like samples, meshes, fonts, images, etc.) are re-imported entirely when changed and user changes are not kept.
Because of 3D Scenes can be really complex, they use a different update strategy. The user might have done local changes to take advantage of the engine features and it would be really frustrating if everything is lost on re-import because the source asset changed.
This led to the implementation of a special update strategy. The idea behind is that the user will not lose anything he or she did, and only added data or data that can’t be edited inside Godot will be updated.
It works like this:
Strategy
Upon changes on the source asset (ie: .dae), and on re-import, the editor will remember the way the scene originally was, and will track your local changes like renaming nodes, moving them or reparenting them. Finally, the following will be updated:
- Mesh Data will be replaced by the data from the updated scene.
- Materials will be kept if they were not modified by the user.
- Portal and Room shapes will be replaced by the ones from the updated scene.
- If the user moved a node inside Godot, the transform will be kept. If the user moved a node in the source asset, the transform will be replaced. Finally, if the node was moved in both places, the transform will be combined.
In general, if the user deletes anything from the imported scene (node, mesh, material, etc.), updating the source asset will restore what was deleted. This is a good way to revert local changes to anything. If you really don’t want a node anymore in the scene, either delete it from both places or add the “-noimp” tag to it in the source asset.
Fresh re-import
It can also happen that the source asset changed beyond recognition and a full fresh re-import is desired. If so, simply re-open the 3D scene import dialog from the Import -> Re-Import menu and perform re-import.