Simple 2D game
Pong
In this tutorial, a basic game of Pong will be created. There are plenty of more complex examples in the demos included with the engine, but this should get you introduced to the basic functionalities for 2D Games.
To begin with, run the Godot Engine and start a new project.
Assets
Some assets are included for this tutorial:
pong_assets.zip. Unzip its content
in your project folder.
Scene setup
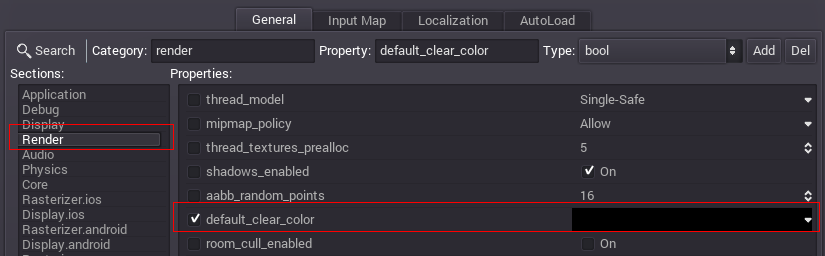
For the sake of the old times, the game will be in 640x400 pixels resolution. This can be configured in the Project Settings (see Configuring the project) under Scene/Project settings menu. The default background color should be set to black:
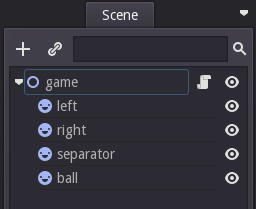
Create a Node2D node for the project root. Node2D is the base type for the 2D engine. After this, add some sprites (Sprite node) for the left and right paddles, the separator and ball. You can set a custom name for each node, and set the texture for each sprite in the Inspector.
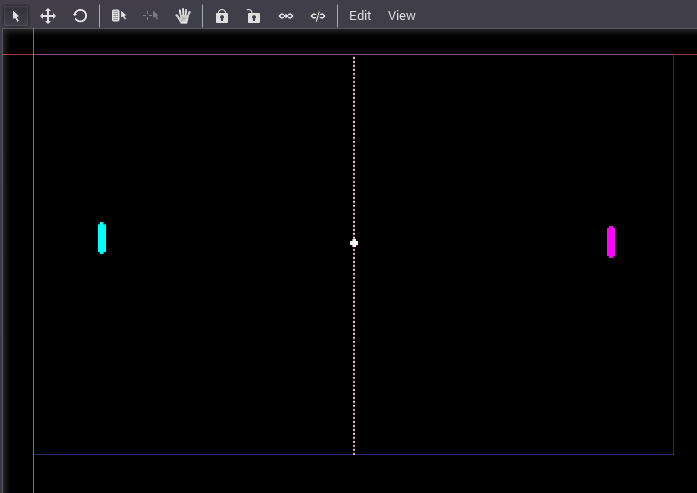
- Set nodes positions:
- “left” node: (67, 183)
- “right” node: (577, 187)
- “separator” node: (320, 200)
- “ball” node: (320, 188)
The final scene layout should look similar to this (note: the ball is in the middle!):
Save the scene as “pong.tscn” and set it as the main scene in the project properties.
Input actions setup
Video games can be played using various input methods: Keyboard, Joypad, Mouse, Touchscreen (multitouch)… Godot is able to use them all. However, it would be interesting to define the inputs as “Input Actions” instead of hardware actions that you’d manage separately. This way, any input method can be used: each of them only require the user to connect buttons to game actions that you defined.
This is Pong. The only input that matters is for the pads going up and down.
Open the project properties dialog again (Scene/Project settings), but this time move to the “Input Map” tab.
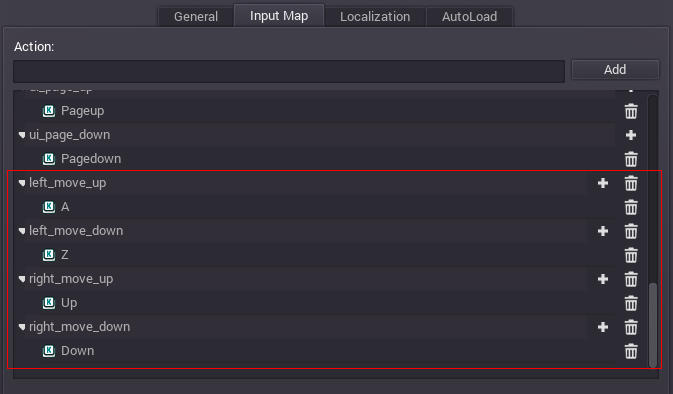
In this tab, add 4 actions:
left_move_up, left_move_down, right_move_up,
right_move_down.
Assign the keys that you desire. A/Z (for the left player) and Up/Down
(for the right player) as keys
should work in most cases.
Script
Create a script for the root node of the scene and open it (as explained in Adding a script). This script inherits Node2D:
extends Node2D

func _ready():
    pass
First things first, we need to define some members for our script so it can store useful values. Such values are the dimensions of the screen, the pad and the initial direction of the ball.
extends Node2D

# Member variables
var screen_size
var pad_size
var direction = Vector2(1.0, 0.0)

func _ready():
    pass
As you know, the _ready() function is the first function called
(after _enter_tree() which we don’t need here). In this function,
two things have to be done. The first one is to enable
processing: this is the purpose of the set_process(true) function.
The second one is to initialize our two member variables.
extends Node2D

# Member variables
var screen_size
var pad_size
var direction = Vector2(1.0, 0.0)

func _ready():
    screen_size = get_viewport_rect().size
    pad_size = get_node("left").get_texture().get_size()
    set_process(true)
We initialize the pad_size variable by getting one of the pads nodes
(the left one here), and obtain its texture size. The screen_size is
initialized using the get_viewport_rect() which returns a Rect
object corresponding to the game window, and we store its size.
Now, we need to add some other members to our script in order to make our ball move.
extends Node2D

# Member variables
var screen_size
var pad_size
var direction = Vector2(1.0, 0.0)

# Constant for ball speed (in pixels/second)
const INITIAL_BALL_SPEED = 80
# Speed of the ball (also in pixels/second)
var ball_speed = INITIAL_BALL_SPEED
# Constant for pads speed
const PAD_SPEED = 150

func _ready():
    screen_size = get_viewport_rect().size
    pad_size = get_node("left").get_texture().get_size()
    set_process(true)
Finally, the _process() function. All the code below is contained by
this function.
We have to init some useful values for computation. The first one is the
ball position (from the node), the second one is the rectangle
(Rect2) for each pad. These rectangles will be used for collision
tests between the ball and the pads. Sprites center their textures by
default, so a small adjustment of pad_size / 2 must be added.
func _process(delta):
    var ball_pos = get_node("ball").get_pos()
    var left_rect = Rect2( get_node("left").get_pos() - pad_size*0.5, pad_size )
    var right_rect = Rect2( get_node("right").get_pos() - pad_size*0.5, pad_size )
Now, let’s add some movement to the ball in the _process() function.
Since the ball position is stored in the ball_pos variable,
integrating it is simple:
# Integrate new ball position
ball_pos += direction * ball_speed * delta
This code line is called at each iteration of the _process()
function. That means the ball position will be updated at each new
frame.
Now that the ball has a new position, we need to test if it collides with anything, that is the window borders and the pads. First, the floor and the roof:
# Flip when touching roof or floor
if ((ball_pos.y < 0 and direction.y < 0) or (ball_pos.y > screen_size.y and direction.y > 0)):
    direction.y = -direction.y
Second, the pads: if one of the pads is touched, we need to invert the
direction of the ball on the X axis so it goes back, and define a new
random Y direction using the randf() function. We also increase its
speed a little.
# Flip, change direction and increase speed when touching pads
if ((left_rect.has_point(ball_pos) and direction.x < 0) or (right_rect.has_point(ball_pos) and direction.x > 0)):
    direction.x = -direction.x
    direction.y = randf()*2.0 - 1
    direction = direction.normalized()
    ball_speed *= 1.1
Finally, if the ball went out of the screen, it’s game over. That is, we test if the X position of the ball is less than 0 or greater than the screen width. If so, the game restarts:
# Check gameover
if (ball_pos.x < 0 or ball_pos.x > screen_size.x):
    ball_pos = screen_size*0.5
    ball_speed = INITIAL_BALL_SPEED
    direction = Vector2(-1, 0)
Once everything is done, the node is updated with the new position of the ball, which was computed before:
get_node("ball").set_pos(ball_pos)
Next, we allow the pads to move. We only update their position according to player input. This is done using the Input class:
# Move left pad
var left_pos = get_node("left").get_pos()

if (left_pos.y > 0 and Input.is_action_pressed("left_move_up")):
    left_pos.y += -PAD_SPEED * delta
if (left_pos.y < screen_size.y and Input.is_action_pressed("left_move_down")):
    left_pos.y += PAD_SPEED * delta

get_node("left").set_pos(left_pos)

# Move right pad
var right_pos = get_node("right").get_pos()

if (right_pos.y > 0 and Input.is_action_pressed("right_move_up")):
    right_pos.y += -PAD_SPEED * delta
if (right_pos.y < screen_size.y and Input.is_action_pressed("right_move_down")):
    right_pos.y += PAD_SPEED * delta

get_node("right").set_pos(right_pos)
We use the four actions previously defined in the Input actions setup section above. When the player activates the respective key, the corresponding action is triggered. As soon as this happens, we simply compute a new position for the pad in the desired direction and apply it to the node.
That’s it! A simple Pong was written with a few lines of code.