Up to date
This page is up to date for Godot 4.3.
If you still find outdated information, please open an issue.
建立內容
專案設定到位後,我們可以開始處理玩家控制的角色。
第一個場景,我們要來定義 Player 物件。把玩家做成獨立一個 Player 場景的好處是:就算遊戲其他部分還沒做好,也可以獨立測試單一場景。
節點結構
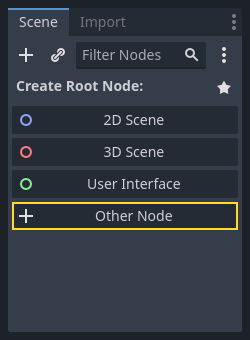
首先,我們需要選擇玩家物件的根節點。一般來說,場景的根節點通常對應了物件所需要的功能——也就是物件 是什麼。點擊 [其他節點] 按鈕,並新增 Area2D 節點至場景中。
When you add the Area2D node, Godot will display the following warning icon
next to it in the scene tree:

This warning tells us that the Area2D node requires a shape to detect collisions or overlaps.
We can ignore the warning temporarily because we will first set up the player's visuals
(using an animated sprite). Once the visuals are ready, we will add a collision shape as a child
node. This will allow us to accurately size and position the shape based on the sprite’s appearance.
有了 Area2D 節點,我們就能偵測跑到了玩家範圍內物件。我們先點兩下節點,把節點名稱改成 Player 。現在,場景根節點已經設定好了,接著來設定更多節點,新增更多功能。
Before we add any children to the Player node, we want to make sure we don't
accidentally move or resize them by clicking on them. Select the node and click
the icon to the right of the lock. Its tooltip says "Groups the selected node
with its children. This causes the parent to be selected when any child
node is clicked in 2D and 3D view."

接著保存場景。選擇 [場景] -> [保存],或是在 Windows/Linux 上按鍵盤 Ctrl + S ,在 macOS 上則是 Cmd + S 。
備註
在這個專案中,我們會遵守 Godot 的命名慣例。
GDScript :類別 (節點) 使用大駝峰法 (PascalCase),變數與函式名稱使用蛇形法 (snake_case),常數則使用全大寫 (ALL_CAPS) (詳細請參考 GDScript 風格指南)。
C# :類別與匯出的變數與方法使用大駝峰法 (PascalCase),Private 欄位使用底線加小駝峰 (_camelCase),區域變數與參數使用小駝峰法 (camelCase) (請參考 C# 風格指南 )。在連接訊號的時候請特別注意不要打錯方法名稱。
Sprite 動畫
Click on the Player node and add (Ctrl + A on Windows/Linux or
Cmd + A on macOS) a child node AnimatedSprite2D. The AnimatedSprite2D will handle the
appearance and animations for our player. Notice that there is a warning symbol
next to the node. An AnimatedSprite2D requires a SpriteFrames resource, which is a list of the animations it can
display. To create one, find the Sprite Frames property under the Animation tab in the Inspector and click
"[empty]" -> "New SpriteFrames":
Click on the SpriteFrames you just created to open the "SpriteFrames" panel:
On the left is a list of animations. Click the "default" one and rename it to
"walk". Then click the "Add Animation" button to create a second animation named
"up". Find the player images in the "FileSystem" tab - they're in the art
folder you unzipped earlier. Drag the two images for each animation, named
playerGrey_walk[1/2] and playerGrey_walk[2/2], into the "Animation Frames"
side of the panel for the corresponding animation:
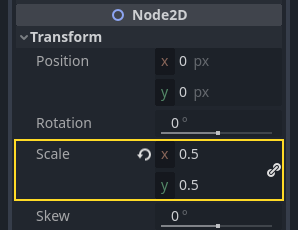
對於遊戲視窗來說,這些玩家圖片看起來有點大,所以我們需要把圖片縮小。點擊 AnimatedSprite 節點,然後把 Scale (縮放) 屬性設為 (0.5, 0.5) 。這個屬性位在屬性面板中 Node2D 標題底下。
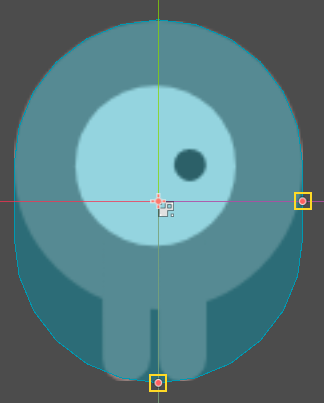
最後,在 Player 節點下新增一個 CollisionShape2D 子節點。這個節點是用來判斷玩家的「碰撞區域 (Hitbox 或 Collision Area)」。在這個角色上很適合使用 CapsuleShape2D 節點,所以我們可以到屬性面板中的 [Shape] (形狀),點擊 [空] -> [新增 CapsuleShape2D]。使用兩個控制尺寸的圓點來把大小調整至覆蓋 Sprite:
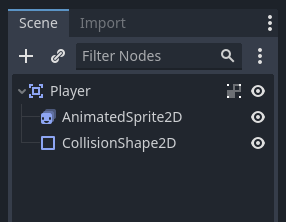
完成之後, Player 看起來應該會像這樣:
Once this is done, the warning on the Area2D node will disappear, as it now has
a shape assigned and can interact with other objects.
修改完畢後記得保存場景。
在下一部分中,我們將向玩家節點新增一個腳本,以移動它並為其新增動畫效果。然後,我們將設定碰撞偵測,以瞭解玩家何時被某些東西擊中。