Up to date
This page is up to date for Godot 4.3.
If you still find outdated information, please open an issue.
遊戲資訊顯示
我們的遊戲最後還需要使用者介面(User Interface,UI),顯示分數、“遊戲結束”資訊、重啟按鈕。
Create a new scene, click the "Other Node" button and add a CanvasLayer node named
HUD. "HUD" stands for "heads-up display", an informational display that
appears as an overlay on top of the game view.
使用 CanvasLayer 節點可以讓我們在遊戲上方的圖層上繪製 UI 元素,這樣上面顯示的資訊就不會被其他遊戲元素如玩家或怪物給蓋住。
HUD 需要顯示如下資訊:
分數,會通過
ScoreTimer來更改。訊息,如「Gamer Over」或「請準備!」
用來開始遊戲的「Start」按鈕。
UI 元素所使用的基本節點是 Control 。我們需要使用兩種類型的 Control 節點來給這個遊戲建立 UI: Label (標籤)與 Button (按鈕)。
為 HUD 節點建立下列子節點:
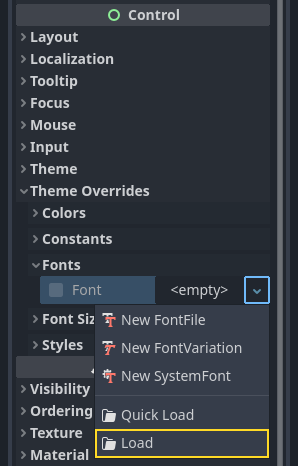
點擊 ScoreLabel 並在屬性面板中的 Text 輸入一個數字。 Control 節點的預設字形很小,而且也縮放得不是很好。遊戲素材裡有包含了一個字形檔,檔名為「Xolonium-Regular.ttf」。依照下列步驟來使用這個字形:
在“Theme Overrides > Fonts”(主題覆蓋 > 字體)中選擇“載入”,然後選中“Xolonium-Regular.ttf”檔。
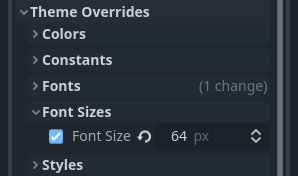
字形尺寸仍然太小,請在“Theme Overrides > Font Sizes”(主題覆蓋 > 字形大小)下將其增加到 64 。當 ScoreLabel 完成此操作後,請重複對 Message 和 StartButton 節點做同樣的修改。
備註
錨點與外邊距: Control 節點除了位置與大小之外,也可以設定錨點 (Anchor) 與外邊距 (Margin)。錨點定義原點(相對於節點邊緣的參考點)。外邊距則會在移動或縮放 Control 節點時自動更新。這兩個屬性的變化會反映出 Control 節點到錨點的距離。詳細說明請參考 doc_design_interfaces_with_the_control_nodes 。
請將節點如下圖排列。拖動節點可以手動放置,也可以使用"錨點預設(Anchor Preset)"進行更精確的定位。
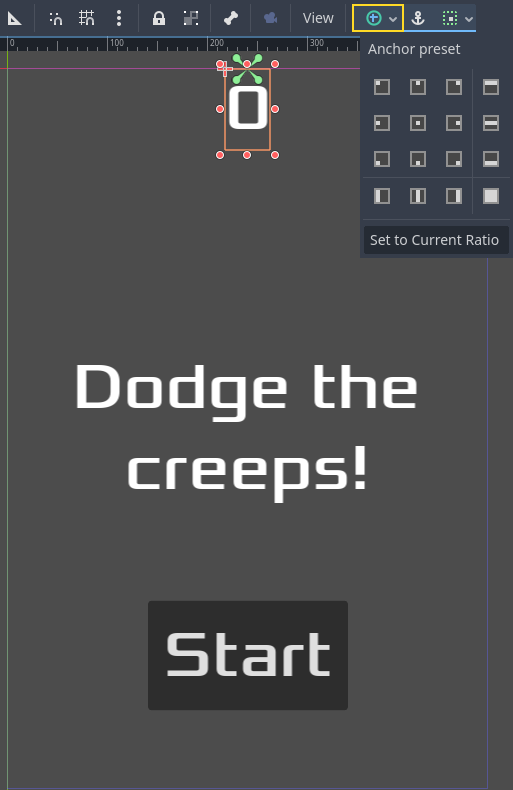
ScoreLabel
新增文字
0。將“Horizontal Alignment”和“Vertical Alignment”設定為
Center。為“Anchor Preset”選擇
Center Top。
訊息
新增文本 :
Dodge the Creeps!將“Horizontal Alignment”和“Vertical Alignment”設定為
Center。將“Autowrap Mode”設定為
Word,否則標籤只會有一行。在“Control - Layout/Transform”中將“Size X”設定為
480,使用螢幕的完整寬度。為“Anchor Preset”選擇
Center。
將 HUD 場景連接至 Main 場景
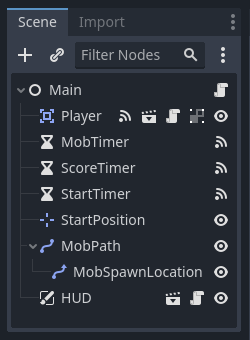
我們現在做好 HUD 場景了。讓我們回到 Main。像剛才實體化 Player 場景一樣,在 Main 場景中實體化 HUD。場景樹會看起來像這樣,檢查一下有沒有漏了什麼:
我們現在需要把 HUD 的功能連接到 Main 腳本。所以我們需要在 Main 場景內新增一點點東西:
在節點分頁中,設定 HUD 的 start_game 訊號的連接,在「連接訊號」視窗中將「Receiver 方法」設為「new_game」來將訊號連接到 Main 節點的 new_game() 函式。之後檢查看看腳本中的 ``func new_game()``旁邊有沒有出現綠色的連線圖示。
new_game() 中,需要更新分數並顯示「Get Ready」訊息:
$HUD.update_score(score)
$HUD.show_message("Get Ready")
var hud = GetNode<HUD>("HUD");
hud.UpdateScore(_score);
hud.ShowMessage("Get Ready!");
game_over() 中我們需要呼叫對應的 HUD 函式:
$HUD.show_game_over()
GetNode<HUD>("HUD").ShowGameOver();
最後,將這段程式碼加到 _on_ScoreTimer_timeout() 來讓分數改變的時候能同步顯示:
$HUD.update_score(score)
GetNode<HUD>("HUD").UpdateScore(_score);
警告
Remember to remove the call to new_game() from
_ready() if you haven't already, otherwise
your game will start automatically.
Now you're ready to play! Click the "Play the Project" button.
刪除舊的怪物
如果一直玩到「Game Over」並直接開始新遊戲的話,上一場遊戲的怪物可能還在畫面上。開始遊戲的時候如果能讓舊的怪物消失會更好。而我們只需要告訴 所有 怪物,刪除自己。我們可以在這裡使用「群組」功能。
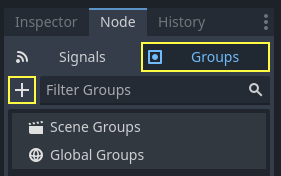
In the Mob scene, select the root node and click the "Node" tab next to the
Inspector (the same place where you find the node's signals). Next to "Signals",
click "Groups" to open the group overview
and the "+" button to open the "Create New Group" dialog.
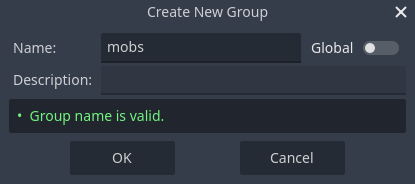
Name the group mobs and click "ok" to add a new scene group.
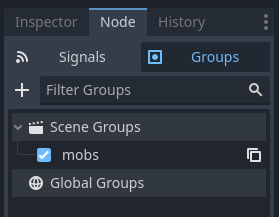
Now all mobs will be in the "mobs" group.
We can then add the following line to the new_game() function in Main:
get_tree().call_group("mobs", "queue_free")
// Note that for calling Godot-provided methods with strings,
// we have to use the original Godot snake_case name.
GetTree().CallGroup("mobs", Node.MethodName.QueueFree);
call_group() 函式會呼叫群組中所有節點的指定名稱的函式——在這裡我們用來讓所有怪物刪除自己。
遊戲在這一點上大部分已經完成。在下一部分和最後一部分中,我們將通過新增背景,迴圈音樂和一些鍵盤快捷鍵來對其進行一些潤色。