Up to date
This page is up to date for Godot 4.3.
If you still find outdated information, please open an issue.
單鍵部署
什麼是一鍵式部署?
這個功能會在有正確配置平台且將支援的裝置連接到電腦上後彈出。由於很多地方都有可能出問題 (平台可能未正確設定、可能沒正確安裝 SDK、裝置可能為正確設定…等),所以讓使用者知道有單鍵部署這功能存在也不錯。
有些平台 (在本文撰寫時,只有 Android) 可以在 USB 裝置連接到電腦上時自動偵測,並提供使用者在該裝置上自動匯出、安裝與 (以除錯模式) 執行專案的功能,用業界的流行語來說,就是「單鍵部署」。
備註
在匯出對話方塊中新增匯出範本並標記為**可執行**後便可使用一鍵部署。你可以同時將多個匯出預設項標記為可執行,但同一平臺被標記為可執行的只能有一個。如果你把該平臺的第二個預設項標記為可執行,其它預設項的標記會被取消。
支援所有平台。
Android: 將在匯出專案時啟用除錯,並在連接的裝置上運作。
另外,在建置自定匯出樣板前,依然必須依照 為 Android 匯出 中所提到的步驟進行。
如果你連接的裝置超過一台,Godot會詢問你想匯出專案到哪台裝置。
iOS: Exports the project with debugging enabled and runs it on the connected device or simulator.
Make sure to follow the steps described in 為 iOS 匯出. Otherwise, the one-click deploy button won't appear.
For each new bundle identifier, export the project, open it in the Xcode, and build at least once to create new provisioning profile or create a provisioning profile in the Apple Developer account dashboard.
如果你連接的裝置超過一台,Godot會詢問你想匯出專案到哪台裝置。
Desktop platforms: Exports the project with debugging enabled and runs it on the remote computer via SSH.
Web: Starts a local web server and runs the exported project by opening the default web browser. This is only accessible on
localhostby default. See Troubleshooting for making the exported project accessible on remote devices.
單鍵部署
- Android:
Enable developer mode on your mobile device then enable USB debugging in the device's settings.
After enabling USB debugging, connect the device to your PC using a USB cable.
如果你是高級使用者,也可以使用無線ADB。
- iOS:
Install Xcode, accept Xcode license and login with your Apple Developer account.
If you are using Xcode 14 or earlier, install ios-deploy and set path to ios-deploy in the Editor Settings (see Export ⇾ iOS ⇾ iOS Deploy).
- For running on device:
Pair your mobile device with a Mac.
Enable developer mode on your device.
Device can be connected via USB or local network.
Make sure the device is on the same local network and a correct network interface is selected in the editor settings (see Network ⇾ Debug ⇾ Remote Host). By default, the editor is listening for localhost connections only.
- For running in simulator:
Install and start simulator from the Xcode.
Device screen should be unlocked.
- Desktop platforms:
Enable SSH Remote Deploy and configure connection settings in the project export setting.
Make sure there is an export preset marked as Runnable for the target platform (Android, iOS or Web).
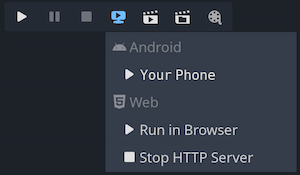
如果這些都配置正確並且沒有報告有錯,編輯器右上角會出現平臺對應的圖示。
點擊該按鈕一鍵匯出到所需的平臺。
疑難排解
Android
如果你在命令列中運作 adb devices 時無法在裝置列表中看到該裝置,那麼 Godot 就也無法看到。要解決這個問題:
請檢查是否啟用了 USB 並在該裝置上授權。請嘗試解鎖你的裝置,如果有任何授權的彈框的話請接受。如果你沒有看到這樣的彈框,在 PC 上執行
adb devices應該就會在該裝置上彈出授權提示。請嘗試在該裝置的開發者設定中`撤銷除錯授權 <https://stackoverflow.com/questions/23081263/adb-android-device-unauthorized>`__,然後再重試這些步驟。
請嘗試使用 USB 除錯而不是無線除錯,反之亦然。有時候換種方法就能更好地工作。
在 Linux 上,你可能缺少所需的 udev 規則,導致你的裝置無法被識別。
Web
By default, the web server started by the editor is only accessible from
localhost. This means the web server can't be reached by other devices on
the local network or the Internet (if port forwarding is set up on the router).
This is done for security reasons, as you may not want other devices to be able
to access the exported project while you're testing it. Binding to localhost
also prevents a firewall popup from appearing when you use one-click deploy for
the web platform.
To make the local web server accessible over the local network, you'll need to
change the Export > Web > HTTP Host editor setting to 0.0.0.0. You will
also need to enable Export > Web > Use TLS as SharedArrayBuffer requires the
use of a secure connection to work, unless connecting to localhost.
However, since other clients will be connecting to a remote device, the use of
TLS is absolutely required here.
To make the local web server accessible over the Internet, you'll also need to
forward the Export > Web > HTTP Port port specified in the Editor Settings
(8060 by default) in TCP on your router. This is usually done by accessing
your router's web interface then adding a NAT rule for the port in question. For
IPv6 connections, you should allow the port in the router's IPv6 firewall
instead. Like for local network devices, you will also need to enable Export >
Web > Use TLS.
備註
When Use TLS is enabled, you will get a warning from your web browser as Godot will use a temporary self-signed certificate. You can safely ignore it and bypass the warning by clicking Advanced and then Proceed to (address).
If you have an SSL/TLS certificate that is trusted by browsers, you can specify the paths to the key and certificate files in the Export > Web > TLS Key and Export > Web > TLS Certificate. This will only work if the project is accessed through a domain name that is part of the TLS certificate.