Up to date
This page is up to date for Godot 4.2.
If you still find outdated information, please open an issue.
Editor and documentation localization
O Godot visa tornar o desenvolvimento de jogos disponível para todos, incluindo pessoas que podem não saber ou não estar confortáveis com o inglês. Portanto, fazemos o nosso melhor para disponibilizar os recursos mais importantes em vários idiomas, graças ao esforço de tradução da comunidade.
Estes recursos incluem:
A interface do editor do Godot (cerca de 15.000 palavras).
A documentação online (manual do editor e tutoriais, cerca de 300.000 palavras).
A referência da classe, disponível tanto online quanto no editor (cerca de 200.000 palavras).
Para gerenciar as traduções, usamos o formato de arquivo GNU gettext (arquivos PO) e a plataforma de localização baseada na web de código aberto Weblate, que permite fácil colaboração de muitos contribuidores para completar a tradução dos vários componentes e mantê-los atualizados. Clique nos links em negrito acima para acessar cada recurso no Weblate.
Esta página fornece uma visão geral do fluxo de trabalho de tradução geral no Weblate e algumas instruções específicas de recursos, por exemplo, como lidar com algumas palavras-chave ou a localização(tradução) de imagens.
Dica
Traduzir todo o conteúdo oficial do Godot é uma tarefa gigantesca, por isso aconselhamos priorizar os recursos listados acima: primeiro a interface do editor, depois a documentação online e, eventualmente, a referência da classe se houver tradutores o suficiente para acompanhar as atualizações.
Usando Weblate para traduções
Embora nossas traduções eventualmente residam nos repositórios Git do motor Godot e sua documentação, todas as atualizações de tradução são tratadas por meio do Weblate e, portanto, pull requests diretas para os repositórios Git não são aceitas. As traduções são sincronizadas manualmente entre o Weblate e os repositórios do Godot pelos mantenedores.
Portanto, você deve se registrar no Weblate para contribuir com as traduções do Godot.
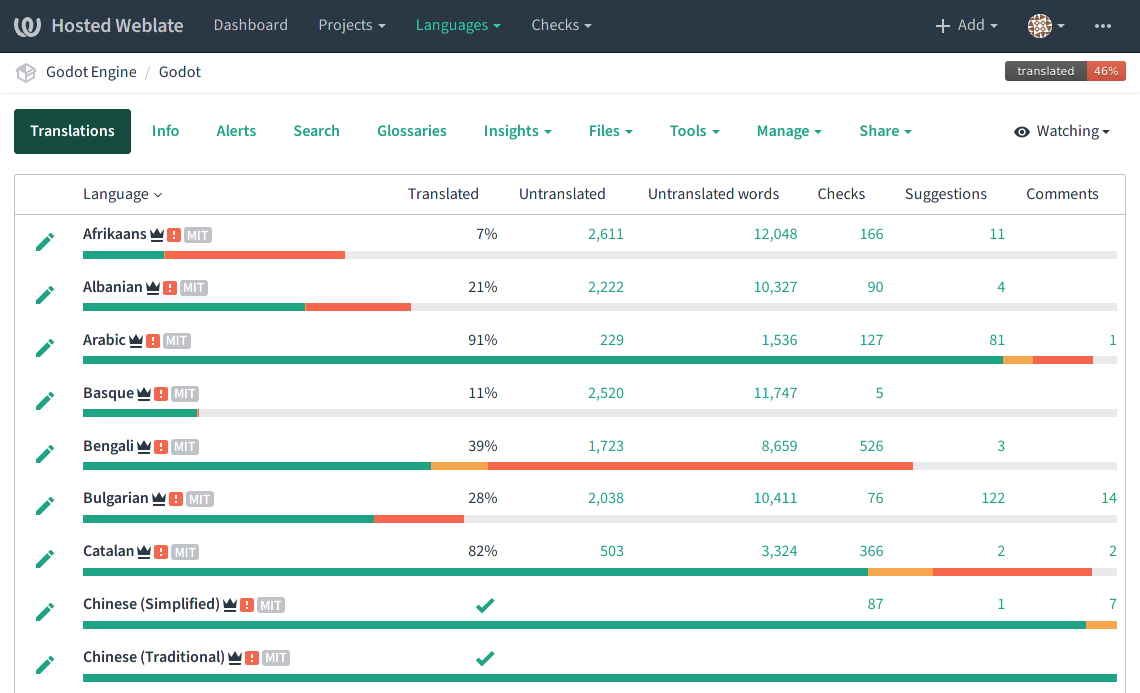
Uma vez conectado, navegue até o recurso do Godot com o qual deseja contribuir (nesta página, usaremos a tradução do editor como um exemplo) para encontrar a lista de todos os idiomas:
Ver também
Sinta-se à vontade para consultar a própria documentação do Weblate sobre o fluxo de trabalho de tradução para mais detalhes.
Adicionando um novo idioma
Se o seu idioma já estiver listado, clique em seu nome para acessar a visão geral e pule o restante desta seção.
Se o seu idioma não estiver listado, role até o final da lista de idiomas e clique no botão "Iniciar nova tradução" e selecione o idioma para o qual deseja traduzir:

Importante
Se seu idioma é falado em vários países com apenas variações regionais limitadas, considere adicioná-lo com sua variante genérica (por exemplo, fr para francês) em vez de uma variante regional (por exemplo, fr_FR para francês (França), fr_CA para francês (Canadá), ou fr_DZ para francês (Argélia)).
O Godot tem uma grande quantidade de conteúdo para traduzir, portanto, a duplicação do trabalho para variantes regionais só deve ser feita se as variações de idioma forem significativas o suficiente. Além disso, se for feita uma tradução para uma variante regional, ela só estará disponível automaticamente para usuários localizados nesta região (ou que tenham o idioma do sistema configurado para esta região).
Quando as variações regionais são significativas o suficiente para garantir traduções separadas, recomendamos focar em completar uma variante genérica primeiro, se possível, depois duplicar a tradução totalmente concluída para as variantes regionais e fazer as edições relevantes. Normalmente, essa é uma boa estratégia para, por exemplo, Espanhol (trabalhe primeiro com es, depois duplique para es_AR, es_ES, es_MX, etc. se necessário) ou Português (pt_BR vs pt_PT).
Interface de tradução
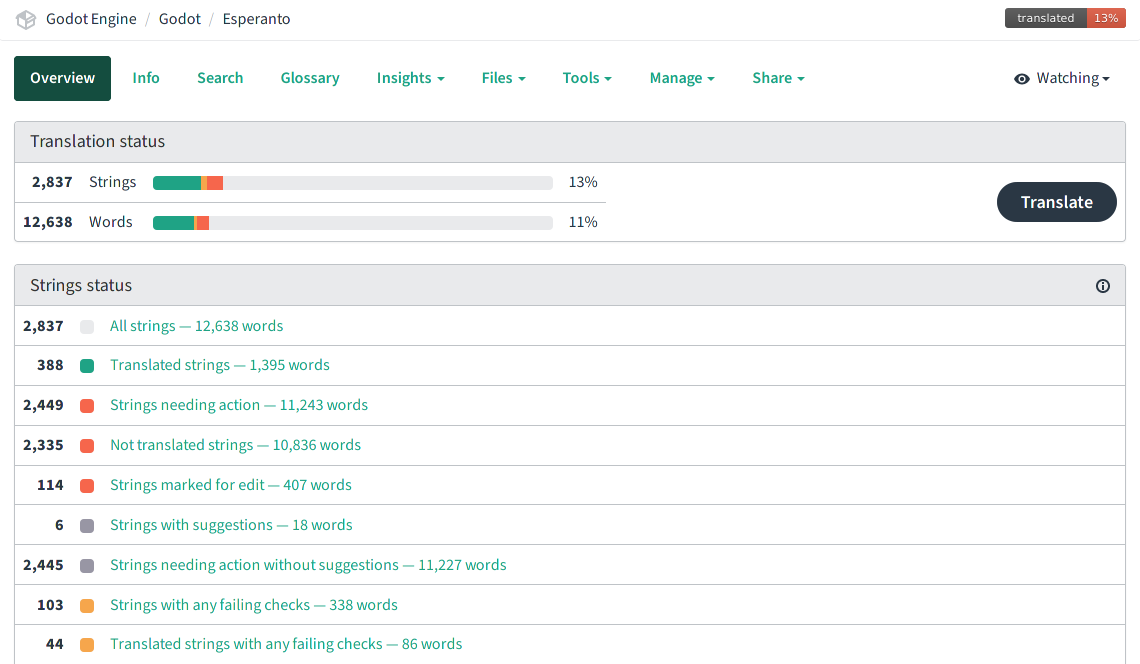
Assim que um idioma for selecionado, você terá uma visão geral do status da tradução, incluindo quantas strings faltam para traduzir ou revisar. Cada item pode ser clicado e usado para navegar pela lista correspondente. Você também pode clicar no botão "Traduzir" para começar a ver a lista de strings que precisam de ação.
Depois de selecionar uma lista clicando em "Traduzir", você verá a interface de tradução principal onde todo o trabalho acontece:
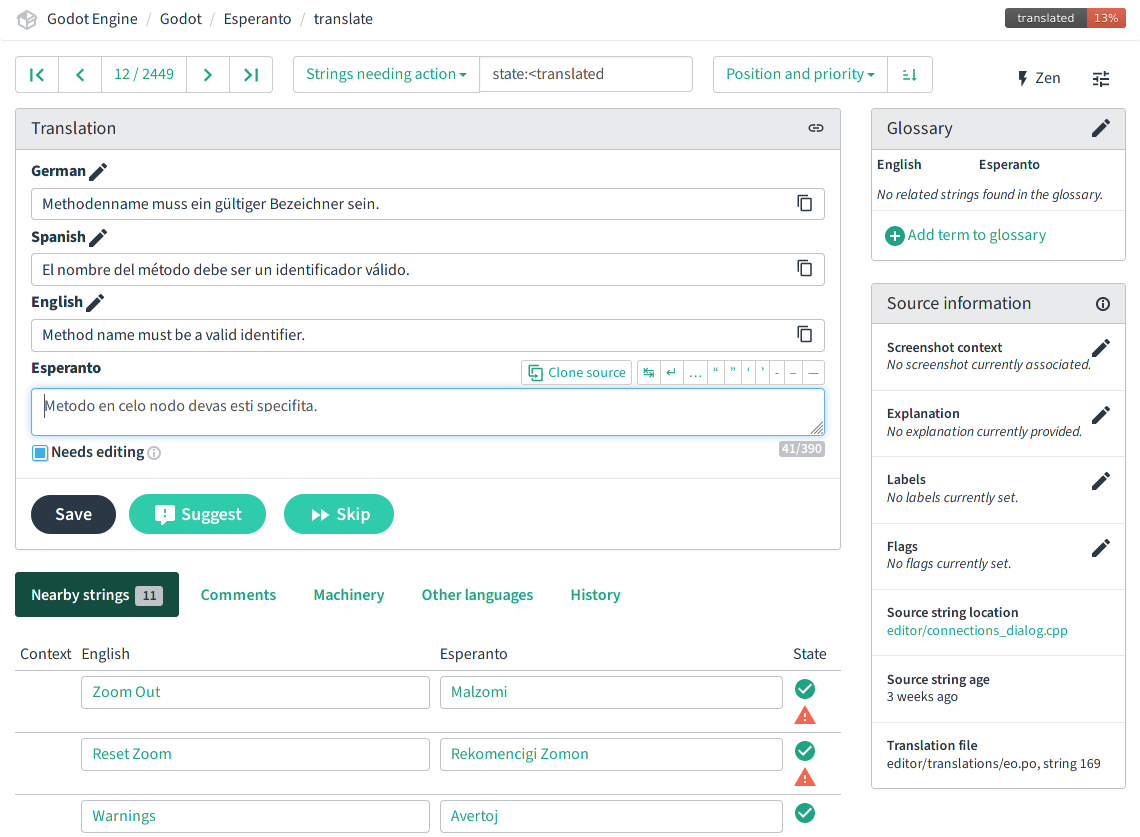
Nessa página, você tem:
A toolbar which lets you cycle through strings of the current list, change to another predefined list or do a custom search, etc. There is also a "Zen" editing mode with a simplified interface.
A string em que você está trabalhando no painel "Tradução". Por padrão, deve haver a string de origem em inglês e uma caixa de edição para o seu idioma. Se você estiver familiarizado com outros idiomas, poderá adicioná-los nas configurações do usuário para ter mais contexto para a tradução. Quando terminar de editar a string atual, pressione "Salvar" para confirmar as alterações e passar para a próxima entrada. Como alternativa, use o botão "Ignorar" para ignorá-lo. A caixa de seleção "Necessita edição" significa que a string original foi atualizada e, portanto, a tradução precisa ser revisada para levar essas alterações em consideração (no jargão PO, essas são as chamadas strings "difusas"). Essas strings não serão usadas na tradução até que sejam corrigidas.
O painel inferior tem várias ferramentas que podem ajudar com o esforço de tradução, como contexto de strings próximas (geralmente da mesma ferramenta de editor ou página de documentação, então eles podem usar termos semelhantes), comentários de outros tradutores, traduções automáticas e uma lista de todas as outras traduções existentes para essa string.
No canto superior direito, o glossário mostra os termos para os quais uma entrada foi adicionada anteriormente e que estão incluídos na string atual. Por exemplo, se você decidiu com outros tradutores usar uma tradução específica para o termo "nó" em Godot, você pode adicioná-la ao glossário para garantir que outros tradutores usem a mesma convenção.
O painel inferior direito inclui informações sobre a string de origem. O item mais relevante é a "Localização do texto fonte", que o vincula à string original no GitHub. Você pode precisar pesquisar a string na página para localizá-la e seu contexto circundante.
Localizando conteúdo original
PO files are an ordered list of source strings (msgid) and their translation
(msgstr), and by default, Weblate will present the strings in that order. It
can therefore be useful to understand how the content is organized in the PO
files to help you locate the original content and use it as a reference when
translating.
Importante
It is primordial to use the original context as reference when translating, as many words have several possible translations depending on the context. Using the wrong translation can actually be detrimental to the user and make things harder to understand than if they stayed in English. Using the context also makes the translation effort much easier and more enjoyable, as you can see directly if the translation you wrote will make sense in context.
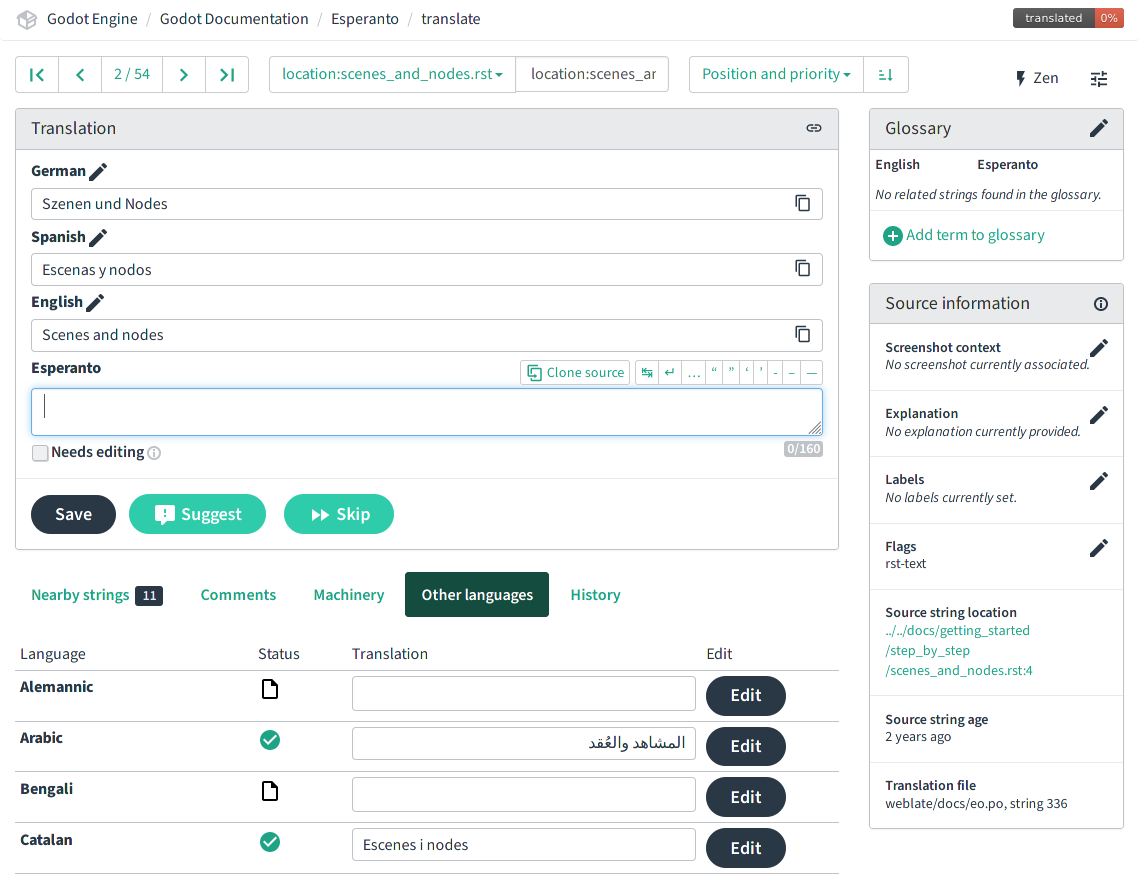
The editor interface's translation template is generated by parsing all the C++ source code in alphabetical order, so all the strings defined in a given file will be grouped together. For example, if the "source string location" indicates
editor/code_editor.cpp, the current string (and the nearby ones) is defined in theeditor/code_editor.cppcode file, and is thereby related to the code editors in Godot (GDScript, shaders).The online documentation's translation template is generated from the source RST files in the same order as seen in the table of contents, so for example the first strings are from the front page of the documentation. The recommended workflow is therefore to find a unique string corresponding to a page that you want to translate, and then translate all the strings with the same source string location while comparing with the online version of that page in English. An example of source string location could be
getting_started/step_by_step/nodes_and_scenes.rstfor the page Nós e cenas.The class reference's translation template is generated from the source XML files in alphabetical order, which is also the same as the order of the table of contents for the online version. You can therefore locate the source string corresponding to the brief description of a given class to find the first string to translate and all other descriptions from that class should be in the subsequent strings on Weblate. For example, the descriptions for the Node2D class would have the source string location
doc/classes/Node2D.xml.
A handy tool to locate specific pages/classes is to use Weblate's advanced
search feature, and especially the "Location strings" query (which can also be
used with the location: token, e.g. location:nodes_and_scenes.rst):

Nota
When a given source string is used in multiple source locations, they will
all be concatenated into one. For example, the above
location:nodes_and_scenes.rst query would land first on the
"Introduction" source string which is used in dozens of pages, including
some that come before nodes_and_scenes.rst in the template. Clicking the
"Next" button then brings us to the "Scene and nodes" title string displayed
above.
So it may happen that a given paragraph or section title is not at the
location you'd expect it when reading the online version of a page.
Respeita a sintaxe de marcação
Cada recurso da tradução se origina de um diferente formato de código , e ter algumas noções na linguagem de marcação usada para cada recurso é importante para evitar criar erros de sintâxe nas suas traduções.
Interface do editor (C++)
The editor translations originate from C++ strings, and may use:
C format specifiers such as
%s(a string) or%d(a number). These specifiers are replaced by content at runtime, and should be preserved and placed in your translation where necessary for it to be meaningful after substitution. You may need to refer to the source string location to understand what kind of content will be substituted if it's not clear from the sentence. Example (%swill be substituted with a file name or path):# PO file: "There is no '%s' file." # Weblate: There is no '%s' file.
C escape characters such as
\n(line break) or\t(tabulation). In the Weblate editor, the\ncharacters are replaced by↵(return) and\tby↹. Tabs are not used much, but you should make sure to use line breaks in the same way as the original English string (Weblate will issue a warning if you don't). Line breaks might sometimes be used for vertical spacing, or manual wrapping of long lines which would otherwise be too long especially in the editor translation). Example:# PO file: "Scene '%s' is currently being edited.\n" "Changes will only take effect when reloaded." # Weblate: Scene '%s' is currently being edited.↵ Changes will only take effect when reloaded.
Nota
Only logical order of the characters matters, in the right-to-left text, format
specifiers may be displayed as s%.
Online documentation (RST)
The documentation translations originate from reStructuredText (RST) files, which also use their own markup syntax to style text, create internal and external links, etc. Here are some examples:
# "development" is styled bold.
# "Have a look here" is a link pointing to https://docs.godotengine.org/en/latest.
# You should translate "Have a look here", but not the URL, unless there is
# a matching URL for the same content in your language.
# Note: The `, <, >, and _ characters all have a meaning in the hyperlink
# syntax and should be preserved.

Looking for the documentation of the current **development** branch?
`Have a look here <https://docs.godotengine.org/en/latest>`_.

# "|supported|" is an inline reference to an image and should stay unchanged.
# "master" uses the markup for inline code, and will be styled as such.
# Note: Inline code in RST uses 2 backticks on each side, unlike Markdown.
# Single backticks are used for hyperlinks.

|supported| Backwards-compatible new features (backported from the ``master``
branch) as well as bug, security, and platform support fixes.

# The :ref: Sphinx "role" is used for internal references to other pages of
# the documentation.
# It can be used with only the reference name of a page (which should not be
# changed), in which case the title of that page will be displayed:

See :ref:`doc_ways_to_contribute`.

# Or it can be used with an optional custom title, which should thus be translated:

See :ref:`how to contribute <doc_ways_to_contribute>`.

# You may encounter other Sphinx roles, such as :kbd: used for shortcut keys.
# You can translate the content between backticks to match the usual key names,
# if it's different from the English one.

Save the scene. Click Scene -> Save, or press :kbd:`Ctrl + S` on Windows/Linux
or :kbd:`Cmd + S` on macOS.
Ver também
See Sphinx's reStructured Text primer for a quick overview of the markup language you may find in source strings. You may encounter especially the inline markup (bold, italics, inline code) and the internal and external hyperlink markup.
Class reference (BBCode)
A referência da classe é documentada no repositório Godot principal usando arquivos XML e com marcação tipo BBCode para estilo e referências internas.
Some of the tags used are from the original BBCode (e.g. [b]Bold[/b] and
[i]Italics[/i]), while others are Godot-specific and used for advanced
features such as inline code (e.g. [code]true[/code]), linking to another
class (e.g. [Node2D]) or to a property in a given class (e.g.
[member Node2D.position]), or for multiline code blocks. Example:
Returns a color according to the standardized [code]name[/code] with [code]alpha[/code] ranging from 0 to 1.
[codeblock]
red = ColorN("red", 1)
[/codeblock]
Supported color names are the same as the constants defined in [Color].
In the above example, [code]name[/code], [code]alpha[/code], and
[Color] should not be translated, as they refer respectively to argument
names and a class of the Godot API. Similarly, the contents of the
[codeblock] should not be translated, as ColorN is a function of the
Godot API and "red" is one of the named colors it supports. At most, you can
translate the name of the variable which holds the result (red = ...).
Note também que no XML, cada linha é um paragráfo, então você não deveria adicionar quebradores de linhas se eles não são parte da tradução original.
Ver também
See our documentation for class reference writers for the list of BBCode-like tags which are used throughout the class reference.
Tradução offline e testes
Embora aconselhemos o uso da interface Weblate para escrever traduções, você também tem a possibilidade de baixar o arquivo PO localmente para traduzi-lo com seu aplicativo de edição PO preferido, como`Poedit <https://poedit.net/>`__ or Lokalize.
Para baixar o arquivo PO localmente, pesquise a visão global da tradução para sua linguagem, e selecione o primeiro item nos menu "Files":

Uma vez que você terminou uma série de edições, use o item "Enviar tradução" no mesmo menu e selecione seu arquivo. Escolha "Adicionar como uma tradução" para o modo de upload.
Nota
Se um período significativo de tempo se passou entre o download do arquivo PO e o upload da versão editada, existe o risco de substituir as traduções de autoria de outros colaboradores nesse meio tempo. É por isso que aconselhamos usar a interface online para que você trabalhe sempre com a versão mais recente.
Se você quiser testar mudanças localmente(especialmente para a tradução do editor), você pode usar o arquivo baixado PO e compile Godot from source.
Renomeie o arquivo PO para <lang>.po` (e.g. eo.po for Esperanto) e coloque-o em``editor/translations/`` folder (GitHub).
Você também pode testar referências de classes do mesmo modo renomeando o arquivo PO similiar e colocando ele em``doc/translations/`` folder (GitHub).
Localizando imagens da documentação
A documentação online inclui muitas imagens, que podem ser capturas de tela do editor Godot, gráficos personalizados ou qualquer outro tipo de conteúdo visual. Alguns deles incluem texto e, portanto, poderiam ser relevantes para localização em seu idioma.
Esta parte não é tratada via Weblate, mas diretamente no godot-docs-l10n <https://github.com/godotengine/godot-docs-l10n> _ repositório Git onde as traduções da documentação são sincronizadas a partir do Weblate.
Nota
O fluxo de trabalho não é o mais direto e requer algum conhecimento de Git. Planejamos trabalhar em uma ferramenta Web simplificada que poderia ser usada para gerenciar a localização de imagens de uma maneira conveniente, abstraindo essas etapas.
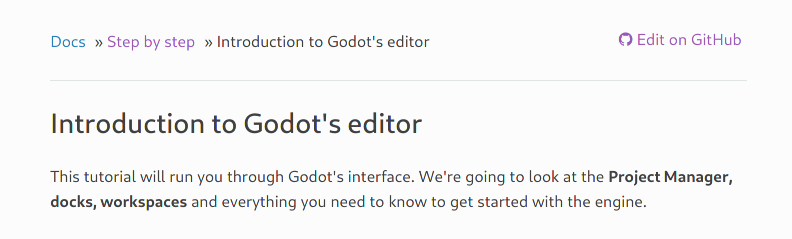
To translate an image, you should first locate it in the original English documentation. To do so, browse the relevant page in the docs, e.g. Primeiras impressões do editor do Godot. Click the "Edit on GitHub" link in the top right corner:
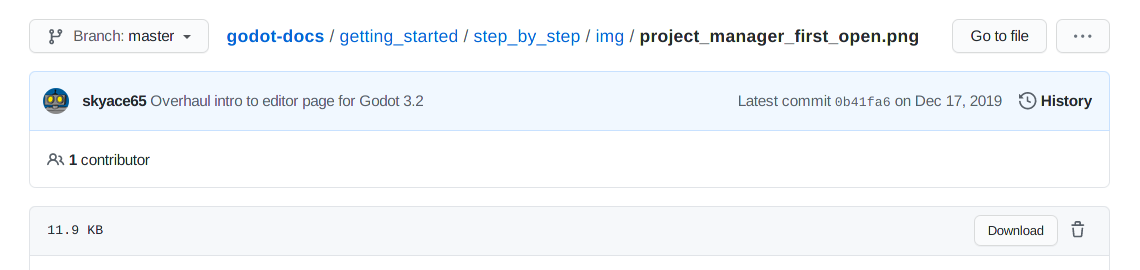
On GitHub, click on the image you want to translate. If relevant, click on
"Download" to download it locally and edit it with an image edition tool.
Note the full path to the image as it will be needed further down (here
getting_started/step_by_step/img/project_manager_first_open.png).
Create your localized version of the image, either by editing the English one,
or by taking a screenshot of the editor with your language, if it's an editor
screenshot. Some images may also have source files available in SVG format, so
you can browse the img/ folder which contains them to check for that.
Name your localized image like the original one, but with the language code
added before the extension, e.g. project_manager_first_open.png would become
project_manager_first_open.fr.png for the French localization.
Finally, on godot-docs-l10n, recreate the same folder structure as for the
original image in the images subfolder
(GitHub),
and place your translated image there. In our example, the end result should be
images/getting_started/step_by_step/img/project_manager_first_open.fr.png.
Repeat this for other images and make a Pull Request.