Up to date
This page is up to date for Godot 4.2.
If you still find outdated information, please open an issue.
Criando a cena do jogador
Com as configurações do projeto feitas, podemos começar a trabalhar no personagem controlado pelo jogador.
A primeira cena definirá o objeto Player. Um dos benefícios de criar uma cena Player separada é que podemos testá-la separadamente, mesmo antes de criarmos outras partes do jogo.
Estrutura de nós
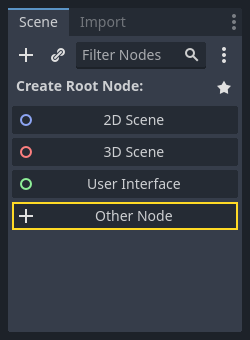
Para iniciarmos, precisamos escolher o nó raiz para o objeto jogador. Como regra geral, o nó raiz da cena deve refletir a funcionalidade desejado do objeto: o que o objeto é. Clique no botão "Outros Nós" e adicione um nó Area2D à cena.
Godot vai mostrar um ícone de aviso próximo do nó na árvore de cenas. Você pode ignorá-lo por enquanto; vamos falar disso mais tarde.
Com a Area2D, nós podemos detectar objetos que se sobreponham ou vão de encontro ao jogador. Mude seu nome para Player com um clique duplo no nome do nó. Já que nós configuramos o nó raiz, nós agora podemos inserir nós adicionais para adicionar mais funcionalidades.
Before we add any children to the Player node, we want to make sure we don't
accidentally move or resize them by clicking on them. Select the node and click
the icon to the right of the lock. Its tooltip says "Make selected node's
children not selectable."

Salve a cena. Clique em Cena -> Salvar ou pressione Ctrl + S no Windows/Linux ou Cmd + S no macOS.
Nota
Para esse projeto, vamos seguir as convenções de nomeação do Godot.
GDScript: Classes (nós) usam o estilo
PascalCase(IniciaisMaiúsculas), variáveis e funções usamsnake_case(minúsculas_separadas_por_sublinha) e constantes usamALL_CAPS(TODAS_MAIÚSCULAS) (Veja mais em Guia de Estilo GDScript).C#: Classes, variáveis de exportação e métodos usam PascalCase, campos privados usam _camelCase, variáveis locais e parâmetros usam camelCase (Veja :ref: doc_c_sharp_styleguide). Tenha o cuidado de digitar os nomes dos métodos com precisão ao conectar os sinais.
Animação por Sprites
Click on the Player node and add (Ctrl + A on Windows/Linux or
Cmd + A on macOS) a child node AnimatedSprite2D. The AnimatedSprite2D will handle the
appearance and animations for our player. Notice that there is a warning symbol
next to the node. An AnimatedSprite2D requires a SpriteFrames resource, which is a list of the animations it can
display. To create one, find the Sprite Frames property under the Animation tab in the Inspector and click
"[empty]" -> "New SpriteFrames". Click again to open the "SpriteFrames" panel:
On the left is a list of animations. Click the "default" one and rename it to
"walk". Then click the "Add Animation" button to create a second animation named
"up". Find the player images in the "FileSystem" tab - they're in the art
folder you unzipped earlier. Drag the two images for each animation, named
playerGrey_up[1/2] and playerGrey_walk[1/2], into the "Animation Frames"
side of the panel for the corresponding animation:
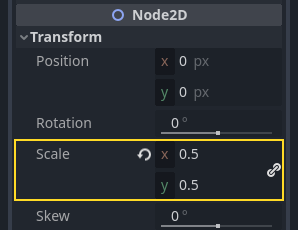
The player images are a bit too large for the game window, so we need to scale
them down. Click on the AnimatedSprite2D node and set the Scale property
to (0.5, 0.5). You can find it in the Inspector under the Node2D
heading.
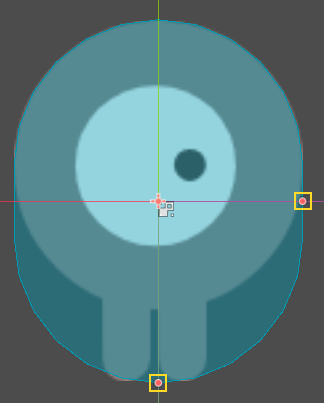
Finally, add a CollisionShape2D as a child of
Player. This will determine the player's "hitbox", or the bounds of its
collision area. For this character, a CapsuleShape2D node gives the best
fit, so next to "Shape" in the Inspector, click "[empty]" -> "New
CapsuleShape2D". Using the two size handles, resize the shape to cover the
sprite:
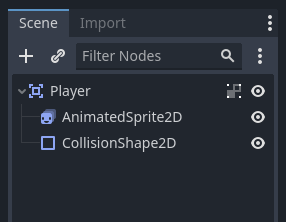
Quando tiver finalizado, sua cena Player deveria se parecer assim:
Certifique-se de salvar a cena novamente após as alterações.
Na próxima parte, adicionaremos um roteiro ao nó jogador para movê-lo e animá-lo. Depois, configuraremos a detecção de colisão para saber quando o jogador é atingido por alguma coisa.