Up to date
This page is up to date for Godot 4.2.
If you still find outdated information, please open an issue.
A cena principal do jogo
Agora é hora de juntar tudo que fizemos em uma cena jogável.
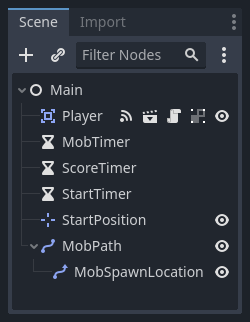
Crie uma nova cena e adicione um :ref: Node <class_Node> chamado Main. (O motivo para usarmos um Node ao invés deum Node2D é que esse será um recipiente para lidar com a lógica do jogo, por si ele não necessita de funcionalidade 2D.)
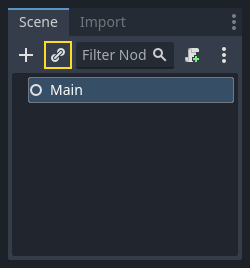
Click the Instance button (represented by a chain link icon) and select your saved
player.tscn.
Agora adicione os seguintes nós como filhos de Principal, e os nomeie como mostrado (os valores estão em segundos):
Timer (nomeado
MobTimer) - para controlar a frequência com que a turba é geradaTimer (nomeado
ScoreTimer) - para incrementar a pontuação a cada segundoTimer (nomeado
StartTimer) - para dar um atraso antes de começarMarker2D (named
StartPosition) - to indicate the player's start position
Defina a propriedade Wait Time (tempo de espera) para cada um dos nós Timer da seguinte forma:
MobTimer:0.5ScoreTimer:1StartTimer:2
Além disso, configure a propriedade One Shot ("uma só vez") de StartTimer para "Ativo" e Position do nó StartPosition para (240, 450).
Gerando monstros
O nó Principal ficará gerando novos inimigos, e nós queremos que eles apareçam em lugares aleatórios nos cantos da tela. Adicione um nó Path2D chamado CaminhoTurba como filho de Principal. Quando você selecionar Path2D, aparecerão alguns botões novos na parte superior do editor:

Select the middle one ("Add Point") and draw the path by clicking to add the points at the corners shown. To have the points snap to the grid, make sure "Use Grid Snap" and "Use Smart Snap" are both selected. These options can be found to the left of the "Lock" button, appearing as a magnet next to some dots and intersecting lines, respectively.

Importante
Desenhe o caminho em sentido horário, ou sua turba vai surgir apontando para fora em vez de para dentro!

Depois de colocar o ponto 4 na imagem, clique no botão "Fechar Curva", e sua curva estará completa.
Agora que o caminho está definido, adicione um nó PathFollow2D como filho de CaminhoTurba e dê o nome de LocalGeraçãoTurba. Esse nó vai rotacionar automaticamente e seguir o caminho conforme ele se move, para que possamos usá-lo para selecionar uma posição e uma direção aleatória ao longo do caminho.
Sua cena deve se parecer com isso:
Script principal
Add a script to Main. At the top of the script, we use
@export var mob_scene: PackedScene to allow us to choose the Mob scene we want
to instance.
extends Node

@export var mob_scene: PackedScene
var score
using Godot;

public partial class Main : Node
{
    // Don't forget to rebuild the project so the editor knows about the new export variable.

    [Export]
    public PackedScene MobScene { get; set; }

    private int _score;
}
Clique no nó Principal``e você verá a propriedade ``Cena Mob no inspetor, abaixo das Variáveis do Script.
Você pode atribuir o valor dessa propriedade de duas formas:
Drag
mob.tscnfrom the "FileSystem" dock and drop it in the Mob Scene property.Click the down arrow next to "[empty]" and choose "Load". Select
mob.tscn.
Next, select the instance of the Player scene under Main node in the Scene dock,
and access the Node dock on the sidebar. Make sure to have the Signals tab selected
in the Node dock.
You should see a list of the signals for the Player node. Find and
double-click the hit signal in the list (or right-click it and select
"Connect..."). This will open the signal connection dialog. We want to make a
new function named game_over, which will handle what needs to happen when a
game ends. Type "game_over" in the "Receiver Method" box at the bottom of the
signal connection dialog and click "Connect". You are aiming to have the hit signal
emitted from Player and handled in the Main script. Add the following code
to the new function, as well as a new_game function that will set
everything up for a new game:
func game_over():
    $ScoreTimer.stop()
    $MobTimer.stop()

func new_game():
    score = 0
    $Player.start($StartPosition.position)
    $StartTimer.start()
public void GameOver()
{
    GetNode<Timer>("MobTimer").Stop();
    GetNode<Timer>("ScoreTimer").Stop();
}

public void NewGame()
{
    _score = 0;

    var player = GetNode<Player>("Player");
    var startPosition = GetNode<Marker2D>("StartPosition");
    player.Start(startPosition.Position);

    GetNode<Timer>("StartTimer").Start();
}
Now connect the timeout() signal of each of the Timer nodes (StartTimer,
ScoreTimer, and MobTimer) to the main script. StartTimer will start
the other two timers. ScoreTimer will increment the score by 1.
func _on_score_timer_timeout():
    score += 1

func _on_start_timer_timeout():
    $MobTimer.start()
    $ScoreTimer.start()
private void OnScoreTimerTimeout()
{
    _score++;
}

private void OnStartTimerTimeout()
{
    GetNode<Timer>("MobTimer").Start();
    GetNode<Timer>("ScoreTimer").Start();
}
In _on_mob_timer_timeout(), we will create a mob instance, pick a random
starting location along the Path2D, and set the mob in motion. The
PathFollow2D node will automatically rotate as it follows the path, so we
will use that to select the mob's direction as well as its position.
When we spawn a mob, we'll pick a random value between 150.0 and
250.0 for how fast each mob will move (it would be boring if they were
all moving at the same speed).
Note que uma nova instância deve ser adicionada à cena usando add_child() (adicionar filho).
func _on_mob_timer_timeout():
    # Create a new instance of the Mob scene.
    var mob = mob_scene.instantiate()

    # Choose a random location on Path2D.
    var mob_spawn_location = get_node("MobPath/MobSpawnLocation")
    mob_spawn_location.progress_ratio = randf()

    # Set the mob's direction perpendicular to the path direction.
    var direction = mob_spawn_location.rotation + PI / 2

    # Set the mob's position to a random location.
    mob.position = mob_spawn_location.position

    # Add some randomness to the direction.
    direction += randf_range(-PI / 4, PI / 4)
    mob.rotation = direction

    # Choose the velocity for the mob.
    var velocity = Vector2(randf_range(150.0, 250.0), 0.0)
    mob.linear_velocity = velocity.rotated(direction)

    # Spawn the mob by adding it to the Main scene.
    add_child(mob)
private void OnMobTimerTimeout()
{
    // Note: Normally it is best to use explicit types rather than the `var`
    // keyword. However, var is acceptable to use here because the types are
    // obviously Mob and PathFollow2D, since they appear later on the line.

    // Create a new instance of the Mob scene.
    Mob mob = MobScene.Instantiate<Mob>();

    // Choose a random location on Path2D.
    var mobSpawnLocation = GetNode<PathFollow2D>("MobPath/MobSpawnLocation");
    mobSpawnLocation.ProgressRatio = GD.Randf();

    // Set the mob's direction perpendicular to the path direction.
    float direction = mobSpawnLocation.Rotation + Mathf.Pi / 2;

    // Set the mob's position to a random location.
    mob.Position = mobSpawnLocation.Position;

    // Add some randomness to the direction.
    direction += (float)GD.RandRange(-Mathf.Pi / 4, Mathf.Pi / 4);
    mob.Rotation = direction;

    // Choose the velocity.
    var velocity = new Vector2((float)GD.RandRange(150.0, 250.0), 0);
    mob.LinearVelocity = velocity.Rotated(direction);

    // Spawn the mob by adding it to the Main scene.
    AddChild(mob);
}
Importante
Why PI? In functions requiring angles, Godot uses radians,
not degrees. Pi represents a half turn in radians, about
3.1415 (there is also TAU which is equal to 2 * PI).
If you're more comfortable working with degrees, you'll need to
use the deg_to_rad() and rad_to_deg() functions to
convert between the two.
Testando a cena
Vamos testar a cena para garantir que tudo esta funcionando. Adicione essa chamada new_game{ ao _ready():
func _ready():
    new_game()
public override void _Ready()
{
    NewGame();
}
Let's also assign Main as our "Main Scene" - the one that runs automatically
when the game launches. Press the "Play" button and select main.tscn when
prompted.
Dica
If you had already set another scene as the "Main Scene", you can right
click main.tscn in the FileSystem dock and select "Set As Main Scene".
Você deve ser capaz de mover o jogador, ver os inimigos nascendo, e ver o jogador desaparecer quando atingido por um inimigo.
Quando tiver certeza que tudo esta funcionando, remova a chamada de new_game() em _ready().
O que nos falta? Uma interface de usuário! Na próxima lição, nós adicionaremos uma tela de título e mostraremos a pontuação do jogador.