Up to date
This page is up to date for Godot 4.2.
If you still find outdated information, please open an issue.
Limitações da renderização 3D
Introdução
Devido a seu foco no desempenho, os motores de renderização em tempo real têm muitas limitações. O renderizador Godot não é exceção. Para trabalhar eficazmente com essas limitações, você precisa compreendê-las.
Limites de tamanho da textura
Em desktops e laptops, texturas maiores que 8192×8192 podem não ser suportadas em dispositivos mais antigos. Você pode verificar as limitações de sua GPU de destino em GPUinfo.org.
As GPUs mobiles são tipicamente limitadas a 4096×4096 texturas. Além disso, algumas GPUs mobiles não suportam a repetição de texturas sem poder de dois tamanhos. Portanto, se você quiser que sua textura seja exibida corretamente em todas as plataformas, você deve evitar usar texturas maiores que 4096×4096 e usar uma potência de dois tamanhos se a textura precisar repetir.
To limit the size of a specific texture that may be too large to render, you can
set the Process > Size Limit import option to a value greater than 0.
This will reduce the texture's dimensions on import (preserving aspect ratio)
without affecting the source file.
Faixas de cores
When using the Forward+ or Forward Mobile rendering methods, Godot's 3D engine renders internally in HDR. However, the rendering output will be tonemapped to a low dynamic range so it can be displayed on the screen. This can result in visible banding, especially when using untextured materials. For performance reasons, color precision is also lower when using the Forward Mobile rendering method compared to Forward+.
When using the Compatibility rendering method, HDR is not used and the color precision is the lowest of all rendering methods. This also applies to 2D rendering, where banding may be visible when using smooth gradient textures.
Existem duas maneiras principais de aliviar as bandas:
If using the Forward+ or Forward Mobile rendering methods, enable Use Debanding in the advanced Project Settings. This applies a fullscreen debanding shader as a post-processing effect and is very cheap.
Alternatively, bake some noise into your textures. This is mainly effective in 2D, e.g. for vignetting effects. In 3D, you can also use a custom debanding shader to be applied on your materials. This technique works even if your project is rendered with low color precision, which means it will work when using the Mobile and Compatibility rendering methods.
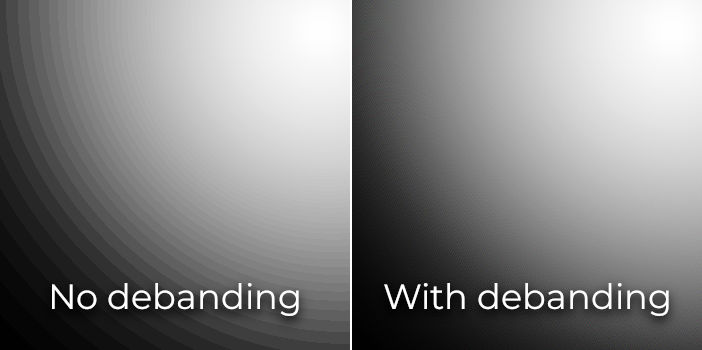
Color banding comparison (contrast increased for more visibility)
Ver também
See Banding in Games: A Noisy Rant (PDF) for more details about banding and ways to combat it.
Precisão do buffer de profundidade
Para classificar objetos no espaço 3D, os motores de renderização dependem de um buffer de profundidade * (também chamado *Z-buffer). Este buffer tem uma precisão finita: 24 bits em plataformas desktop, às vezes 16 bits em plataformas móveis (por razões de desempenho). Se dois objetos diferentes terminarem no mesmo valor de buffer, então ocorrerá a luta Z. Isto se materializará em texturas cintilantes para frente e para trás à medida que a câmera se move ou gira.
Para tornar o buffer de profundidade mais preciso sobre a área renderizada, você deve aumentar a propriedade Near do nó da câmera. No entanto, tenha cuidado: se você definir muito alto, os jogadores poderão ver através da geometria próxima. Você também deve diminuir a propriedade Far do nó Câmera para o menor valor permitido para o seu caso de uso, embora tenha em mente que isso não afetará a precisão tanto quanto a propriedade Near.
Se você só precisa de alta precisão quando o jogador pode ver de longe, você pode mudá-lo dinamicamente com base nas condições do jogo. Por exemplo, se o jogador entrar em um avião, a propriedade Perto pode ser temporariamente aumentada para evitar a luta Z na distância. Ela pode então ser diminuída quando o jogador deixa o avião.
Dependendo da cena e das condições de visualização, você também pode ser capaz de mover os objetos na luta em Z mais distantes, sem que a diferença seja visível para o jogador.
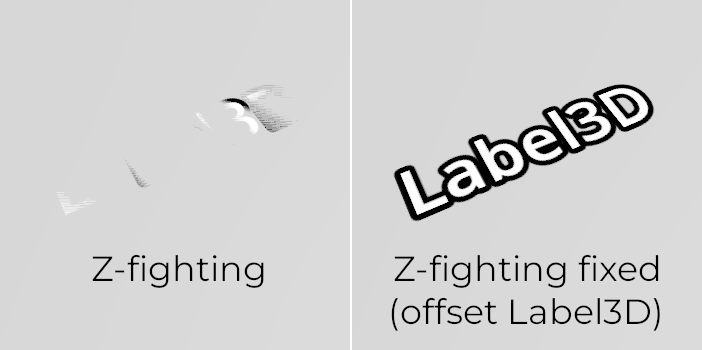
Z-fighting comparison (before and after tweaking the scene by offsetting the Label3D away from the floor)
Classificação por transparência
In Godot, transparent materials are drawn after opaque materials. Transparent objects are sorted back to front before being drawn based on the Node3D's position, not the vertex position in world space. Due to this, overlapping objects may often be sorted out of order. To fix improperly sorted objects, tweak the material's Render Priority property or the node's Sorting Offset. Render Priority will force specific materials to appear in front of or behind other transparent materials, while Sorting Offset will move the object forward or backward for the purpose of sorting. Even then, these may not always be sufficient.
Alguns mecanismos de renderização apresentam técnicas de transparência independente da ordem para aliviar isso, mas isso é caro para a GPU. Godot atualmente não fornece esse recurso. Ainda existem várias maneiras de evitar esse problema:
Only make materials transparent if you actually need it. If a material only has a small transparent part, consider splitting it into a separate material. This will allow the opaque part to cast shadows and will also improve performance.
If your texture mostly has fully opaque and fully transparent areas, you can use alpha testing instead of alpha blending. This transparency mode is faster to render and doesn't suffer from transparency issues. Enable Transparency > Transparency to Alpha Scissor in StandardMaterial3D, and adjust Transparency > Alpha Scissor Threshold accordingly if needed. Note that MSAA will not antialias the texture's edges unless alpha antialiasing is enabled in the material's properties. However, FXAA, TAA and supersampling will be able to antialias the texture's edges regardless of whether alpha antialiasing is enabled on the material.
If you need to render semi-transparent areas of the texture, alpha scissor isn't suitable. Instead, setting the StandardMaterial3D's Transparency > Transparency property to Depth Pre-Pass can sometimes work (at a performance cost). You can also try the Alpha Hash mode.
If you want a material to fade with distance, use the StandardMaterial3D distance fade mode Pixel Dither or Object Dither instead of Pixel Alpha. This will make the material opaque, which also speeds up rendering.
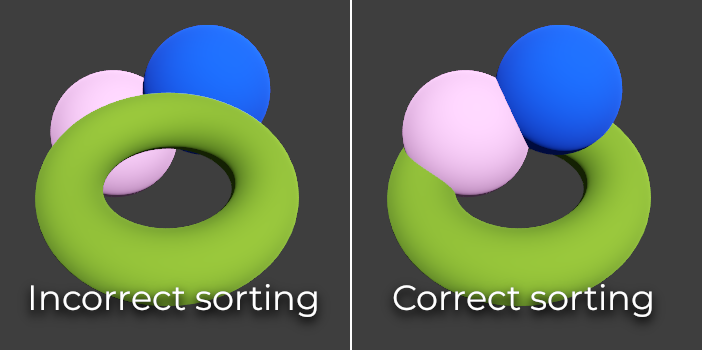
Transparency sorting comparison (alpha-blended materials on the left, alpha scissor materials on the right)
Anti-serrilhamento de múltiplas amostras
Ver também
Antialiasing is explained in detail on the 3D antialiasing page.
O suavização de serrilhado de várias amostras (MSAA) usa várias amostras de cobertura nas bordas dos polígonos ao renderizar objetos. Ele não aumenta o número de amostras coloridas usadas para renderizar uma cena. Veja o que isso significa na prática:
As bordas das malhas serão bem suavizadas (assim como a superamostragem).
Os materiais transparentes que usam teste alfa (transparência de 1 bit) não serão suavizados.
O aliasing especular ("brilhos" que aparecem em superfícies reflexivas) não será reduzido.
Há várias maneiras de contornar essa limitação, dependendo da margem de uso de desempenho que tenha:
To make specular aliasing less noticeable, open the Project Settings and enable Rendering > Quality > Screen Space Filters > Screen Space Roughness Limiter. This filter has a moderate cost on performance, so it should only be enabled if you actually need it.
Enable fast approximate antialiasing (FXAA) in addition to (or instead of) MSAA. Since FXAA is a screen-space antialiasing method, it will smooth out anything. As a downside, FXAA also makes the scene appear blurrier, especially at resolutions below 1440p. FXAA also lacks temporal information, which means its impact on specular aliasing is limited.
Enable temporal antialiasing (TAA) in addition to (or instead of) MSAA. Since TAA is a screen-space antialiasing method, it will smooth out anything. As a downside, TAA also makes the scene appear blurrier, especially at resolutions below 1440p. TAA provides superior quality compared to FXAA and can effectively combat specular aliasing. However, TAA has a greater performance cost compared to FXAA, and TAA can introduce ghosting artifacts with fast movement.
Render the scene at a higher resolution by increasing the Scaling 3D > Scale project setting above
1.0. This technique is called supersample antialiasing (SSAA) and is very slow. Its use is generally only recommended for offline rendering.