Work in progress
The content of this page was not yet updated for Godot
4.2
and may be outdated. If you know how to improve this page or you can confirm
that it's up to date, feel free to open a pull request.
2D particle systems
Introdução
Particle systems are used to simulate complex physical effects, such as sparks, fire, magic particles, smoke, mist, etc.
A ideia é que uma "partícula" seja emitida em um intervalo fixo e com um tempo de vida fixo. Durante sua vida útil, cada partícula terá o mesmo comportamento de base. O que torna cada partícula diferente do resto e proporciona uma aparência mais orgânica é a "aleatoriedade" associada a cada parâmetro. Em essência, criar um sistema de partículas significa definir parâmetros físicos básicos e, em seguida, adicionar aleatoriedade a eles.
Nós de partículas
Godot provides two different nodes for 2D particles, GPUParticles2D and CPUParticles2D. GPUParticles2D is more advanced and uses the GPU to process particle effects. CPUParticles2D is a CPU-driven option with near-feature parity with GPUParticles2D, but lower performance when using large amounts of particles. On the other hand, CPUParticles2D may perform better on low-end systems or in GPU-bottlenecked situations.
While GPUParticles2D is configured via a ParticleProcessMaterial (and optionally with a custom shader), the matching options are provided via node properties in CPUParticles2D (with the exception of the trail settings).
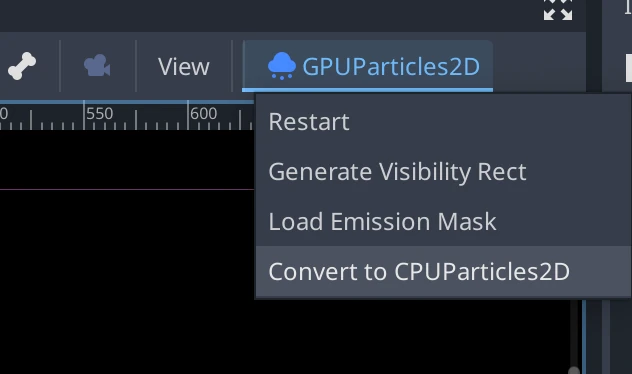
You can convert a GPUParticles2D node into a CPUParticles2D node by clicking on the node in the inspector, selecting the 2D viewport, and selecting GPUParticles2D > Convert to CPUParticles2D in the viewport toolbar.
The rest of this tutorial is going to use the GPUParticles2D node. First, add a GPUParticles2D node to your scene. After creating that node you will notice that only a white dot was created, and that there is a warning icon next to your GPUParticles2D node in the scene dock. This is because the node needs a ParticleProcessMaterial to function.
ParticleProcessMaterial
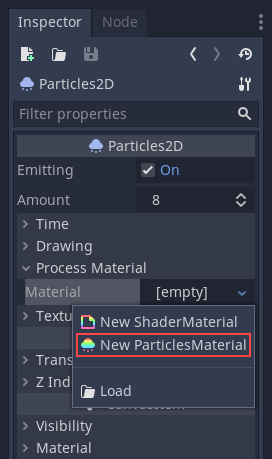
To add a process material to your particles node, go to Process Material in
your inspector panel. Click on the box next to Material, and from the dropdown
menu select New ParticleProcessMaterial.
Your GPUParticles2D node should now be emitting white points downward.

Textura
A particle system can use a single texture or an animation flipbook. A flipbook is a texture that contains several frames of animation that can be played back, or chosen at random during emission. This is equivalent to a spritesheet for particles.
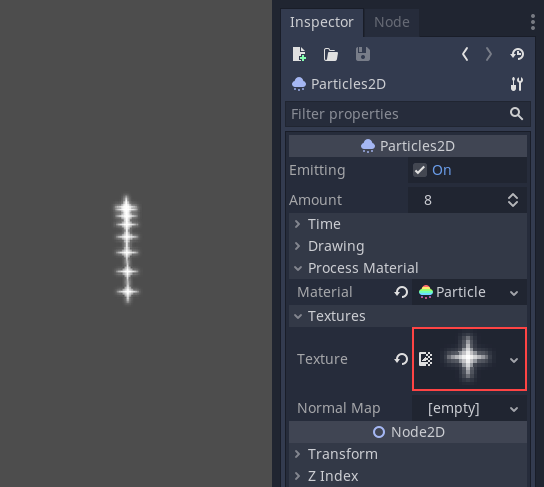
The texture is set via the Texture property:
Using an animation flipbook
Particle flipbooks are suited to reproduce complex effects such as smoke, fire, explosions. They can also be used to introduce random texture variation, by making every particle use a different texture. You can find existing particle flipbook images online, or pre-render them using external tools such as Blender or EmberGen.
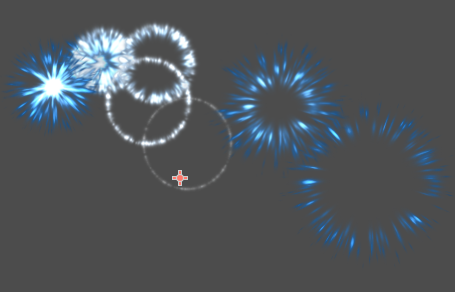
Example of a particle system that uses a flipbook texture
Using an animation flipbook requires additional configuration compared to a single texture. For demonstration purposes, we'll use this texture with 5 columns and 7 rows (right-click and choose Save as…):
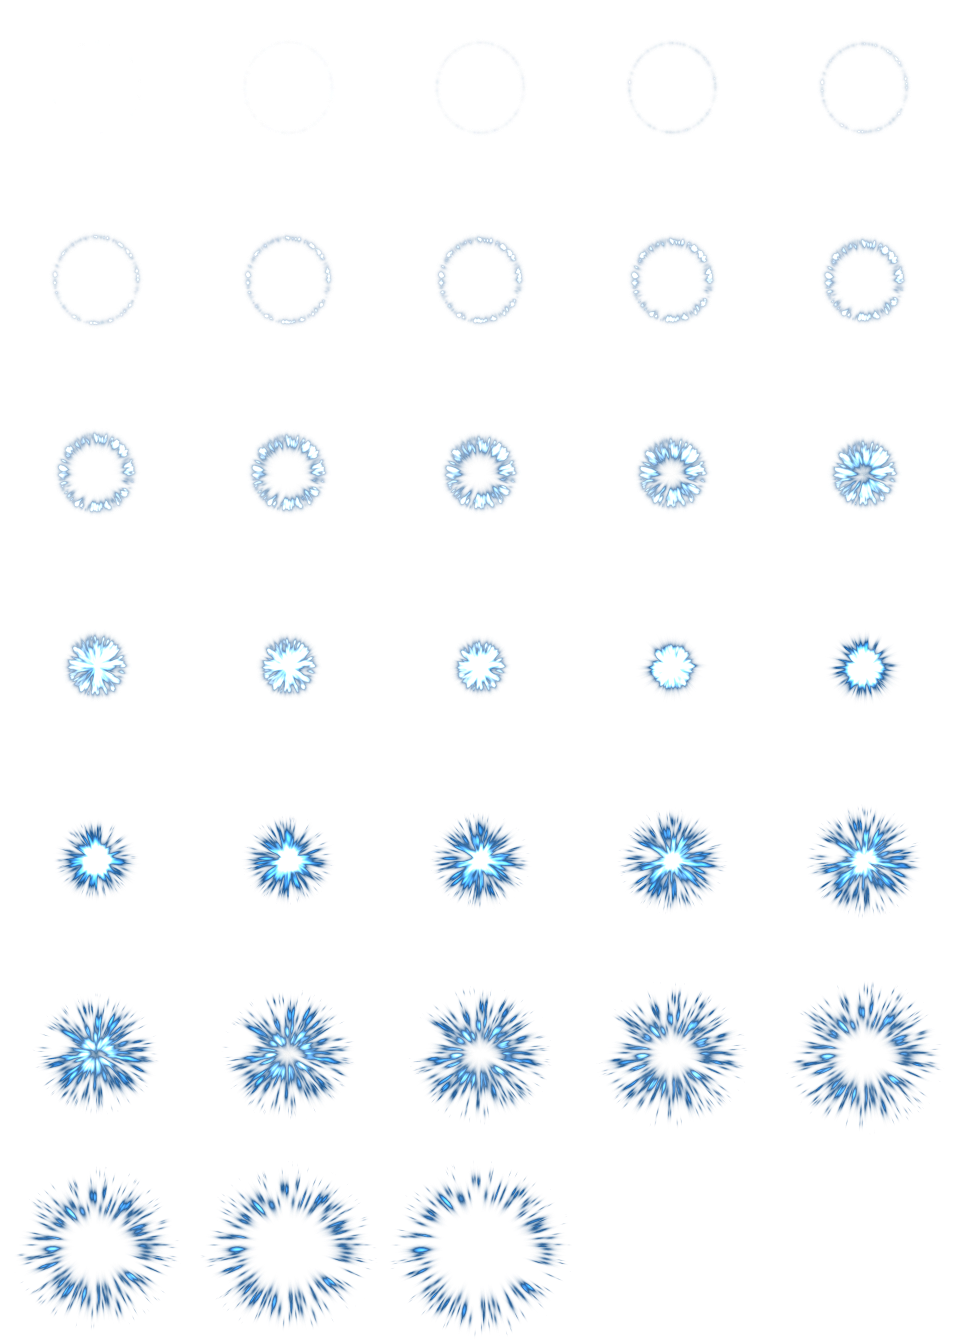
Credit: JoesAlotofthings (CC BY 4.0)
To use an animation flipbook, you must create a new CanvasItemMaterial in the Material section of the GPUParticles2D (or CPUParticles2D) node:
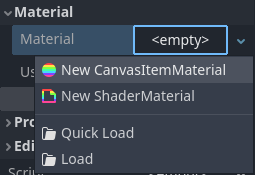
Creating a CanvasItemMaterial at the bottom of the particles node inspector
In this CanvasItemMaterial, enable Particle Animation and set H Frames and V Frames to the number of columns and rows present in your flipbook texture:
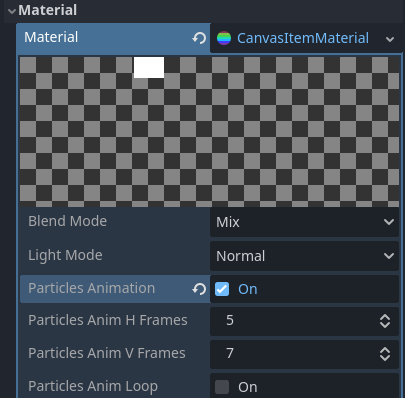
Configuring the CanvasItemMaterial for the example flipbook texture
Once this is done, the Animation section in ParticleProcessMaterial (for GPUParticles2D) or in the CPUParticles2D inspector will be effective.
Dica
If your flipbook texture has a black background instead of a transparent background, you will also need to set the blend mode to Add instead of Mix for correct display. Alternatively, you can modify the texture to have a transparent background in an image editor. In GIMP, this can be done using the Color > Color to Alpha menu.
Parâmetros de tempo
Tempo de Duração
O tempo em segundos em que cada partícula permanecerá viva. Quando a vida útil termina, uma nova partícula é criada para substituí-la.
Tempo de vida: 0.5
Tempo de vida: 4.0
Disparo Único
When enabled, a GPUParticles2D node will emit all of its particles once and then never again.
Pré processamento
Os sistemas de partículas começam com zero partículas emitidas, depois começam a emitir. Isso pode ser um inconveniente ao carregar uma cena e sistemas como uma tocha, névoa, etc. começar a emitir só no momento em que entrar. O pré-processamento é usado para permitir que o sistema processe um determinado número de segundos antes de ser realmente desenhado pela primeira vez.
Escalonamento da Velocidade
A escala de velocidade tem um valor padrão de 1 e é usada para ajustar a velocidade de um sistema de partículas. Diminuir o valor tornará as partículas mais lentas, enquanto aumentar o valor tornará as partículas muito mais rápidas.
Explosividade
Se o tempo de vida for 1 e houver 10 partículas, isso significa que uma partícula será emitida a cada 0,1 segundos. O parâmetro de explosividade altera isso e força as partículas a serem emitidas todas juntas. Os intervalos são:
0: Emite partículas em intervalos regulares (valor padrão).
1: Emite todas as partículas simultaneamente.
Valores no meio também são permitidos. Esse recurso é útil para criar explosões ou explosões repentinas de partículas:
Aleatoriedade
Todos os parâmetros físicos podem ser randomizados. Os valores aleatórios variam de 0 a 1. A fórmula para randomizar um parâmetro é:
initial_value = param_value + param_value * randomness
FPS Fixado
Essa configuração pode ser usada para definir o sistema de partículas para renderizar em um FPS fixo. Por exemplo, alterar o valor para 2 fará com que as partículas sejam renderizadas a 2 quadros por segundo. Observe que isso não desacelera o próprio sistema de partículas.
Delta Fractal
Isso pode ser usado para ativar ou desativar o Fract Delta.
Parâmetros de desenho
Visibility Rect (Retângulo de Visibilidade)
O retângulo de visibilidade controla a visibilidade das partículas na tela. Se esse retângulo estiver fora da janela de exibição, o mecanismo não renderizará as partículas na tela.
As propriedades W e H do retângulo controlam respectivamente sua Largura e sua Altura. As propriedades X e Y controlam a posição do canto superior esquerdo do retângulo, em relação ao emissor de partículas.
You can have Godot generate a Visibility Rect automatically using the toolbar above the 2d view. To do so, select the GPUParticles2D node and Click Particles > Generate Visibility Rect. Godot will simulate the Particles2D node emitting particles for a few seconds and set the rectangle to fit the surface the particles take.
Você pode controlar a duração da emissão com a opção Tempo de geração (seg). O valor máximo é de 25 segundos. Se você precisar de mais tempo para suas partículas se moverem, você pode alterar temporariamente a duração do pré-processamento no nó Particles2D.
Coordenadas Locais
Por padrão, esta opção está ativada e significa que o espaço para o qual as partículas são emitidas é relativo ao nó. Se o nó for movido, todas as partículas são movidas com ele:
Se desativado, as partículas serão emitidas para o espaço global, o que significa que, se o nó for movido, as partículas já emitidas não serão afetadas:
Ordem de Desenho
Isso controla a ordem na qual as partículas individuais são desenhadas. Índice significa que as partículas são desenhadas de acordo com sua ordem de emissão (padrão). Lifetime significa que eles são desenhados em ordem de vida restante.
ParticleProcessMaterial settings
Direção
Esta é a direção básica na qual as partículas emitem. O padrão é Vector3(1, 0, 0) que faz com que as partículas emitam para a direita. No entanto, com as configurações de gravidade padrão, as partículas irão direto para baixo.

Para que essa propriedade seja perceptível, você precisa de uma velocidade inicial maior que 0. Aqui, definimos a velocidade inicial como 40. Você notará que as partículas emitem para a direita e depois descem devido à gravidade.
Espalhar
Este parâmetro é o ângulo em graus que será adicionado aleatoriamente em qualquer direção à base Direction. Uma propagação de 180 emitirá em todas as direções (+/- 180). Para que o spread faça qualquer coisa, o parâmetro "Initial Velocity" deve ser maior que 0.

Planicidade
Esta propriedade só é útil para partículas 3D.
Gravidade
A gravidade aplicada a todas as partículas.
Velocidade Inicial
Velocidade inicial é a velocidade na qual as partículas serão emitidas (em pixels/seg). A velocidade pode mais tarde ser modificada pela gravidade ou outras acelerações (conforme descrito mais adiante).
Velocidade Angular
A velocidade angular é a velocidade angular inicial aplicada às partículas.
Spin Velocity (Velocidade de Giro)
A velocidade de rotação é a velocidade na qual as partículas giram em torno de seu centro (em graus/seg).
Velocidade Orbital
A velocidade da órbita é usada para fazer as partículas girarem em torno de seu centro.
Aceleração Linear
A aceleração linear aplicada a cada partícula.
Aceleração Radial
Se esta aceleração for positiva, as partículas são aceleradas para longe do centro. Se negativo, eles são absorvidos por ele.
Aceleração Tangencial
Essa aceleração usará o vetor tangente ao centro. Combinando com aceleração radial pode fazer bons efeitos.
Amortecimento
Damping aplica fricção às partículas, forçando-as a parar. É especialmente útil para faíscas ou explosões, que geralmente começam com uma alta velocidade linear e param quando desaparecem.
Ângulo
Determina o ângulo inicial da partícula (em graus). Este parâmetro é principalmente útil randomizado.
Escala
Determina a escala inicial das partículas.
Cor
Usado para alterar a cor das partículas que estão sendo emitidas.
Hue Variation
O valor Variation define a variação de tom inicial aplicada a cada partícula. O valor Variation Random controla a taxa de aleatoriedade da variação de tom.
Animação
Nota
Particle flipbook animation is only effective if the CanvasItemMaterial used on the GPUParticles2D or CPUParticles2D node has been configured accordingly.
To set up the particle flipbook for linear playback, set the Speed Min and Speed Max values to 1:
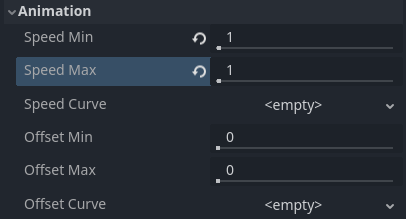
Setting up particle animation for playback during the particle's lifetime
By default, looping is disabled. If the particle is done playing before its lifetime ends, the particle will keep using the flipbook's last frame (which may be fully transparent depending on how the flipbook texture is designed). If looping is enabled, the animation will loop back to the first frame and resume playing.
Depending on how many images your sprite sheet contains and for how long your particle is alive, the animation might not look smooth. The relationship between particle lifetime, animation speed, and number of images in the sprite sheet is this:
Nota
At an animation speed of 1.0, the animation will reach the last image
in the sequence just as the particle's lifetime ends.
If you wish the particle flipbook to be used as a source of random particle textures for every particle, keep the speed values at 0 and set Offset Max to 1 instead:
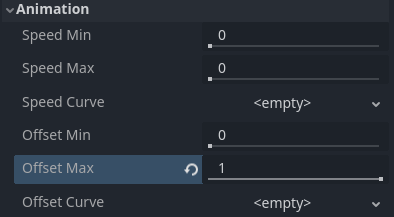
Setting up particle animation for random offset on emission
Note that the GPUParticles2D node's Fixed FPS also affects animation playback. For smooth animation playback, it's recommended to set it to 0 so that the particle is simulated on every rendered frame. If this is not an option for your use case, set Fixed FPS to be equal to the effective framerate used by the flipbook animation (see above for the formula).
Formas de Emissão
ParticleProcessMaterials allow you to set an Emission Mask, which dictates the area and direction in which particles are emitted. These can be generated from textures in your project.
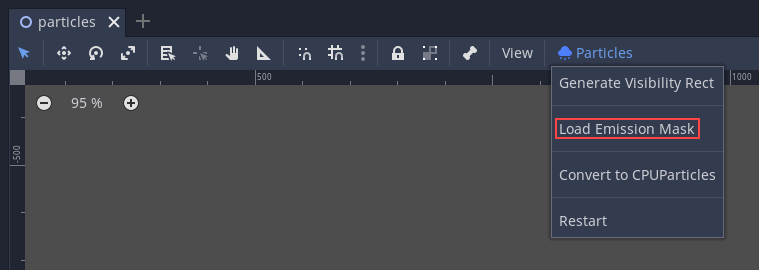
Ensure that a ParticleProcessMaterial is set, and the GPUParticles2D node is selected. A "Particles" menu should appear in the Toolbar:

Abra-a e selecione "Load Emission Mask" (Carregar Máscara de Emissões):
Em seguida, selecione qual textura você deseja usar como sua máscara:
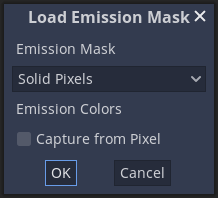
Uma caixa de diálogo com várias configurações aparecerá.
Máscara de Emissão
Três tipos de máscaras de emissão podem ser gerados a partir de uma textura:
Pixels Sólidos: Partículas surgirão de qualquer área da textura, excluindo áreas transparentes.
Pixels da borda: as partículas serão geradas nas bordas externas da textura.
Pixels de borda direcionados: semelhantes aos pixels de borda, mas adicionam informações extras à máscara para dar às partículas a capacidade de emitir para longe das bordas. Observe que uma
velocidade inicialprecisará ser definida para utilizar isso.
Cores de Emissão
Capture from Pixel fará com que as partículas herdem a cor da máscara em seus pontos de geração.
Once you click "OK", the mask will be generated and set to the ParticleProcessMaterial, under the Emission Shape section:
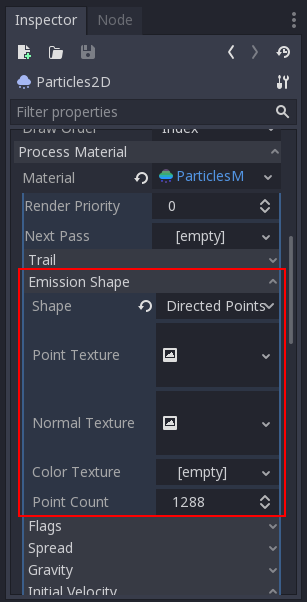
Todos os valores nesta seção foram gerados automaticamente pelo menu "Load Emission Mask", portanto, geralmente não de deve mexer em nada.
Nota
Uma imagem não deve ser adicionada a Point Texture ou Color Texture diretamente. O menu "Load Emission Mask" deve ser sempre utilizado em seu lugar.