Up to date
This page is up to date for Godot 4.2.
If you still find outdated information, please open an issue.
Programando o jogador
Nesta lição, adicionaremos movimento e animação do jogador e o configuraremos para detectar colisões.
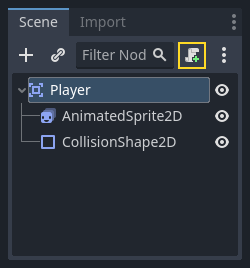
Para isso, precisamos adicionar algumas funcionalidades que não conseguimos em um nó embutido, então adicionaremos um script. Clique no nó Player e depois clique no botão "Adicionar Script":
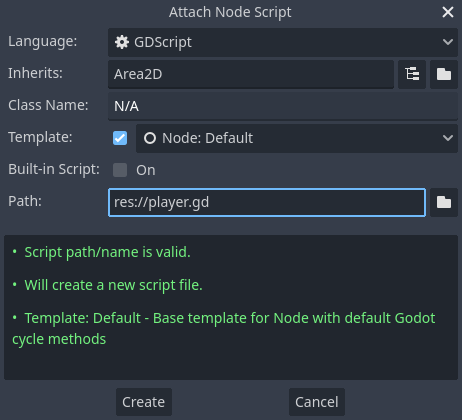
Na janela de configurações do script, você pode deixar as configurações padrão inalteradas. Basta clicar em "Criar":
Nota
Se você estiver criando um script em C# ou em outras linguagens, selecione a linguagem no menu suspenso Idioma antes de clicar em Criar.
Nota
Se é a primeira vez que você se depara com GDScript, por favor, leia :ref:`doc_scripting`antes de continuar.
Comece declarando as variáveis membro que este objeto irá precisar:
extends Area2D

@export var speed = 400 # How fast the player will move (pixels/sec).
var screen_size # Size of the game window.
using Godot;

public partial class Player : Area2D
{
    [Export]
    public int Speed { get; set; } = 400; // How fast the player will move (pixels/sec).

    public Vector2 ScreenSize; // Size of the game window.
}
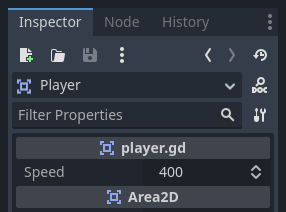
Usar a palavra-chave export na primeira variável, speed, nos permite definir seu valor pelo Inspetor. Isto pode ser útil para os valores que você deseja ser capaz de ajustar do mesmo jeito que se faz com as propriedades internas de um nó. Clique no nó Jogador e você verá que a propriedade agora aparece na seção "Variáveis de Script" do Inspetor. Lembre-se, se você modificar o valor aqui, ele irá sobrepor o valor que está escrito no roteiro.
Aviso
If you're using C#, you need to (re)build the project assemblies whenever you want to see new export variables or signals. This build can be manually triggered by clicking the Build button at the top right of the editor.

Your player.gd script should already contain
a _ready() and a _process() function.
If you didn't select the default template shown above,
create these functions while following the lesson.
A função _ready() é chamada quando um nó entra na árvore de cena, que é uma boa hora para descobrir o tamanho da janela do jogo:
func _ready():
    screen_size = get_viewport_rect().size
public override void _Ready()
{
    ScreenSize = GetViewportRect().Size;
}
Agora podemos usar a função _process() para definir o que o jogador fará. _process() é chamada a cada quadro, então usaremos isso para atualizar os elementos de nosso jogo que esperamos que mudem frequentemente. Para o jogador, precisamos fazer o seguinte:
Verificar as entradas.
Movimentar na direção desejada.
Reproduzir a animação apropriada.
Primeiro, precisamos verificar as entradas – o jogador está pressionando uma tecla? Para este jogo, temos 4 entradas de direção para verificar. Ações de entrada são definidas nas Configurações do Projeto na aba "Mapa de entrada". Nela você pode definir eventos personalizados e atribuir diferentes teclas, eventos de mouse ou outras entradas para eles. Para este jogo, vamos mapear as teclas de seta do teclado para as quatro direções.
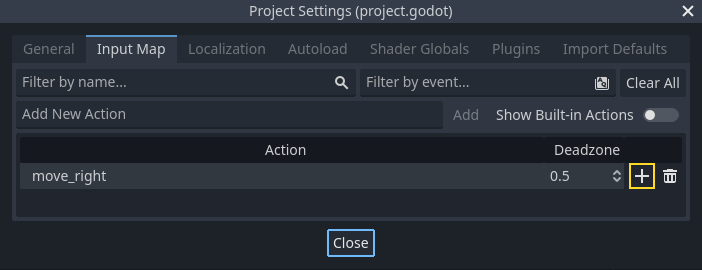
Clique em Projeto -> Configurações do Projeto para abrir a janela das configurações do projeto e clique na aba Mapa de Entrada, no topo. Digite "mover_direita" na barra do topo e clique no botão "Adicionar" para adicionar a ação mover_direita.

We need to assign a key to this action. Click the "+" icon on the right, to open the event manager window.
The "Listening for Input..." field should automatically be selected. Press the "right" key on your keyboard, and the menu should look like this now.
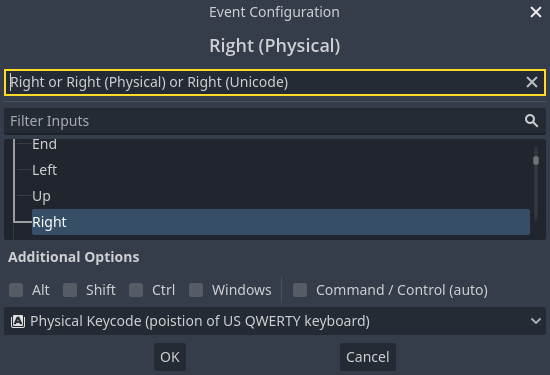
Select the "ok" button. The "right" key is now associated with the move_right action.
Repita estes passos para adicionar três outros mapeamentos:
mover_esquerdamapeado para a tecla seta para esquerda.mover_cimamapeado para tecla seta para cima.E
mover_baixomapeado para tecla seta para baixo.
Sua aba de mapa de entrada deveria se parecer com isto:

Clique no botão "Fechar" para fechar as configurações de projeto.
Nota
Nós mapeamos apenas uma tecla para cada ação de entrada, mas você pode mapear múltiplas teclas, botões de joystick ou botões de mouse para a mesma ação de entrada.
Você pode detectar se uma tecla é pressionada usando Input.is_action_pressed(), que retorna true (verdadeiro) se é pressionada ou false (falso) em caso contrário.
func _process(delta):
    var velocity = Vector2.ZERO # The player's movement vector.
    if Input.is_action_pressed("move_right"):
        velocity.x += 1
    if Input.is_action_pressed("move_left"):
        velocity.x -= 1
    if Input.is_action_pressed("move_down"):
        velocity.y += 1
    if Input.is_action_pressed("move_up"):
        velocity.y -= 1

    if velocity.length() > 0:
        velocity = velocity.normalized() * speed
        $AnimatedSprite2D.play()
    else:
        $AnimatedSprite2D.stop()
public override void _Process(double delta)
{
    var velocity = Vector2.Zero; // The player's movement vector.

    if (Input.IsActionPressed("move_right"))
    {
        velocity.X += 1;
    }

    if (Input.IsActionPressed("move_left"))
    {
        velocity.X -= 1;
    }

    if (Input.IsActionPressed("move_down"))
    {
        velocity.Y += 1;
    }

    if (Input.IsActionPressed("move_up"))
    {
        velocity.Y -= 1;
    }

    var animatedSprite2D = GetNode<AnimatedSprite2D>("AnimatedSprite2D");

    if (velocity.Length() > 0)
    {
        velocity = velocity.Normalized() * Speed;
        animatedSprite2D.Play();
    }
    else
    {
        animatedSprite2D.Stop();
    }
}
Iniciamos definindo a velocidade como sendo (0, 0) - por padrão o jogador não deve estar se movendo. Então nós verificamos cada entrada e adicionamos/subtraímos da velocidade para obter a direção resultante. Por exemplo, se você segurar direita e baixo ao mesmo tempo, o vetor resultante velocidade será (1, 1). Neste caso, já que estamos adicionando um movimento vertical e um horizontal, o jogador iria se mover mais rápido do que se apenas se movesse horizontalmente.
Podemos evitar isso se normalizarmos o vetor da velocidade, o que significa que podemos definir seu comprimento (módulo) para 1 e multiplicar pela intensidade da velocidade desejada. Isso resolve o problema de movimentação mais rápida nas diagonais.
Dica
Se você nunca usou matemática vetorial antes, ou precisa refrescar a memória, você pode ver uma explicação do uso de vetores no Godot em Matemática vetorial. É bom conhecê-la, mas não será necessário para o resto deste tutorial.
We also check whether the player is moving so we can call play() or
stop() on the AnimatedSprite2D.
Dica
$ is shorthand for get_node(). So in the code above,
$AnimatedSprite2D.play() is the same as
get_node("AnimatedSprite2D").play().
In GDScript, $ returns the node at the relative path from the
current node, or returns null if the node is not found. Since
AnimatedSprite2D is a child of the current node, we can use
$AnimatedSprite2D.
Agora que temos uma direção de movimento, podemos atualizar a posição do jogador. Podemos também usar clamp() para impedir que ele saia da tela. Clamp (limitar) um valor significa restringi-lo a um determinado intervalo. Adicione o seguinte código ao final da função ``_process``(tenha certeza de que não está recuado para o else):
position += velocity * delta
position = position.clamp(Vector2.ZERO, screen_size)
Position += velocity * (float)delta;
Position = new Vector2(
    x: Mathf.Clamp(Position.X, 0, ScreenSize.X),
    y: Mathf.Clamp(Position.Y, 0, ScreenSize.Y)
);
Dica
O parâmetro delta na função _process() se refere à duração do frame - a quantidade de tempo que o frame anterior levou para ser completado. Usando este valor você se certifica que seu movimento será constante, mesmo quando a taxa de quadros sofrer alterações.
Clique em "Rodar Cena" (F6, Cmd + R no macOS) e confira se consegue mover o jogador pela tela em todas as direções.
Aviso
Se encontrar um erro no painel "Depurador" que diz
Tentativa de chamar a função 'play' na base 'instance null' em uma instância nula ( Attempt to call function 'play' in base 'null instance' on a null instance)
this likely means you spelled the name of the AnimatedSprite2D node
wrong. Node names are case-sensitive and $NodeName must match
the name you see in the scene tree.
Selecionado as Animações
Now that the player can move, we need to change which animation the
AnimatedSprite2D is playing based on its direction. We have the "walk" animation,
which shows the player walking to the right. This animation should be flipped
horizontally using the flip_h property for left movement. We also have the
"up" animation, which should be flipped vertically with flip_v for downward
movement. Let's place this code at the end of the _process() function:
if velocity.x != 0:
    $AnimatedSprite2D.animation = "walk"
    $AnimatedSprite2D.flip_v = false
    # See the note below about boolean assignment.
    $AnimatedSprite2D.flip_h = velocity.x < 0
elif velocity.y != 0:
    $AnimatedSprite2D.animation = "up"
    $AnimatedSprite2D.flip_v = velocity.y > 0
if (velocity.X != 0)
{
    animatedSprite2D.Animation = "walk";
    animatedSprite2D.FlipV = false;
    // See the note below about boolean assignment.
    animatedSprite2D.FlipH = velocity.X < 0;
}
else if (velocity.Y != 0)
{
    animatedSprite2D.Animation = "up";
    animatedSprite2D.FlipV = velocity.Y > 0;
}
Nota
As atribuições boolianas no código acima são um encurtamento comum para programadores. Já que estamos fazendo um teste de comparação (booliana) e também atribuindo um valor booliano, é possível fazer os dois ao mesmo tempo. Compare este código a atribuição booliana encurtada para uma linha acima:
if velocity.x < 0:
    $AnimatedSprite2D.flip_h = true
else:
    $AnimatedSprite2D.flip_h = false
if (velocity.X < 0)
{
    animatedSprite2D.FlipH = true;
}
else
{
    animatedSprite2D.FlipH = false;
}
Execute a cena novamente e verifique se as animações estão corretas em cada uma das direções.
Dica
Um erro comum aqui é digitar os nomes das animações de forma errada. O nome das animações no painel SpriteFrames deve ser igual ao que foi digitado no código. Se você nomeou a animação "Caminhada" você também deve usar a letra maiúscula "C" no código.
Quando tiver certeza de que a movimentação está funcionando corretamente, adicione esta linha à _ready() para que o jogador fique oculto no início do jogo:
hide()
Hide();
Preparando para colisões
Nós queremos que o Jogador detecte quando é atingido por um inimigo, mas nós não fizemos nenhum inimigo ainda! Não tem problema, porque nós iremos utilizar a funcionalidade de sinal do Godot para fazer com que funcione.
Adicione o seguinte no topo do script. Se você estiver usando o GDScript, adicione-o após extends Area2D. Se você estiver usando C#, adicione-o depois de public partial class Player : Area2D:
signal hit
// Don't forget to rebuild the project so the editor knows about the new signal.

[Signal]
public delegate void HitEventHandler();
Isto define um sinal personalizado chamado "hit" (atingir) que faremos com que nosso jogador emita (envie) ao colidir com um inimigo. Iremos utilizar Area2D para detectar a colisão. Selecione o nó Jogador e clique na aba "Nó" (ao lado da aba "Inspetor") para ver a lista de sinais que o jogador pode emitir:
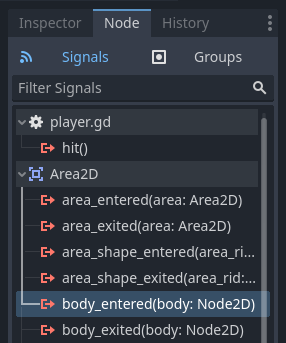
Notice our custom "hit" signal is there as well! Since our enemies are going to
be RigidBody2D nodes, we want the body_entered(body: Node2D) signal. This
signal will be emitted when a body contacts the player. Click "Connect.." and
the "Connect a Signal" window appears.
Godot will create a function with that exact name directly in script for you. You don't need to change the default settings right now.
Aviso
If you're using an external text editor (for example, Visual Studio Code), a bug currently prevents Godot from doing so. You'll be sent to your external editor, but the new function won't be there.
In this case, you'll need to write the function yourself into the Player's script file.

Note the green icon indicating that a signal is connected to this function; this does not mean the function exists, only that the signal will attempt to connect to a function with that name, so double-check that the spelling of the function matches exactly!
Next, add this code to the function:
func _on_body_entered(body):
    hide() # Player disappears after being hit.
    hit.emit()
    # Must be deferred as we can't change physics properties on a physics callback.
    $CollisionShape2D.set_deferred("disabled", true)
private void OnBodyEntered(Node2D body)
{
    Hide(); // Player disappears after being hit.
    EmitSignal(SignalName.Hit);
    // Must be deferred as we can't change physics properties on a physics callback.
    GetNode<CollisionShape2D>("CollisionShape2D").SetDeferred(CollisionShape2D.PropertyName.Disabled, true);
}
Cada vez que um inimigo atinge o jogador, o sinal será emitido. Precisamos desativar a colisão do jogador para que não acione o sinal hit mais de uma vez.
Nota
Desativar o formato de colisão da área pode causar um erro se ocorrer no meio do processamento de colisão do motor de jogo. Usar set_deferred() fala para o Godot aguardar para desabilitar a forma até que seja seguro fazê-lo.
A última peça é adicionar uma função que possamos chamar para reiniciar/reconfigurar o jogador quando começarmos um novo jogo.
func start(pos):
    position = pos
    show()
    $CollisionShape2D.disabled = false
public void Start(Vector2 position)
{
    Position = position;
    Show();
    GetNode<CollisionShape2D>("CollisionShape2D").Disabled = false;
}
Com o jogador funcionando, vamos trabalhar com o inimigo na próxima lição.