Up to date
This page is up to date for Godot 4.2.
If you still find outdated information, please open an issue.
Usando AnimationTree
Introdução
With AnimationPlayer, Godot has one of the most flexible animation systems that you can find in any game engine. The ability to animate almost any property in any node or resource, as well as having dedicated transform, bezier, function calling, audio and sub-animation tracks, is pretty much unique.
However, the support for blending those animations via AnimationPlayer is relatively limited, as only a fixed cross-fade transition time can be set.
AnimationTree is a new node introduced in Godot 3.1 to deal with advanced transitions.
It supersedes the ancient AnimationTreePlayer, while adding a huge amount of features and flexibility.
Criando uma AnimationTree
Antes de começar, é preciso deixar claro que um nó AnimationTree não contém suas próprias animações. Em vez disso, ele usa animações contidas em um nó AnimationPlayer. Dessa forma, você pode editar suas animações (ou importá-las de uma cena 3D) como de costume e, em seguida, usar esse nó extra para controlar a reprodução.
A maneira mais comum de usar o AnimationTree é em uma cena 3D. Ao importar suas cenas de um formato de troca 3D, elas geralmente virão com animações incorporadas (várias ou divididas de uma grande na importação). No final, a cena Godot importada conterá as animações em um nó AnimationPlayer.
Como você raramente usa cenas importadas diretamente no Godot (elas são instanciadas ou herdadas), é possível colocar o nó AnimationTree em sua nova cena que contém a cena importada. Depois disso, aponte o nó AnimationTree para o AnimationPlayer que foi criado na cena importada.
É assim que isso é feito na demonstração do Jogo de Tiro em Terceira Pessoa , para referência:
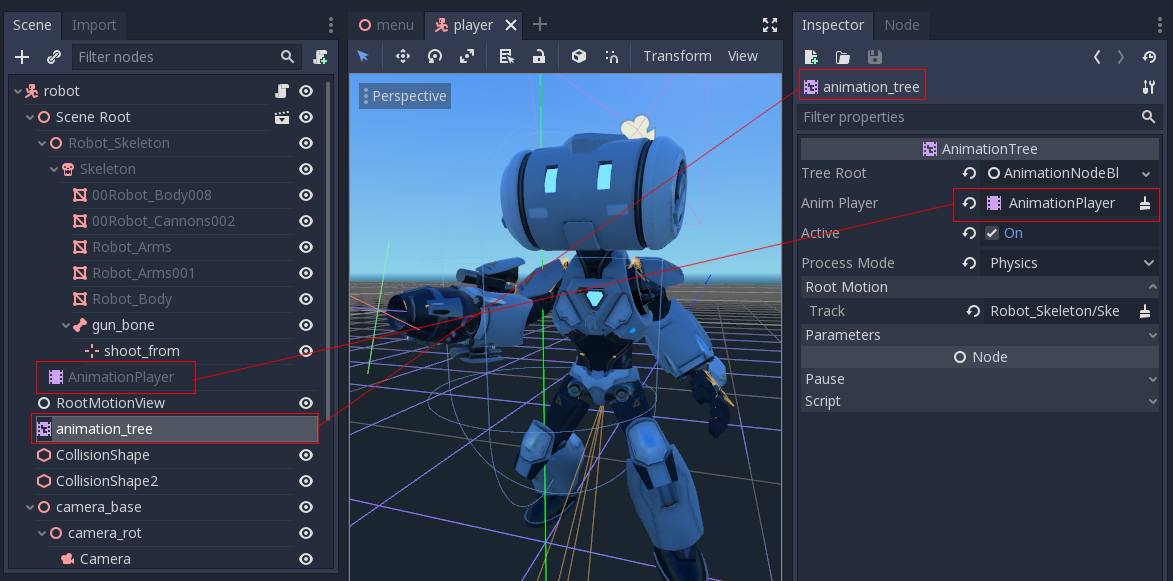
A new scene was created for the player with a CharacterBody3D as root. Inside this scene, the original .dae (Collada) file was instantiated
and an AnimationTree node was created.
Criando uma árvore
Há três tipos principais de nós que podem ser usados em AnimationTree:
Animation nodes, which reference an animation from the linked
AnimationPlayer.Nós Animation Root, que são usados para misturar subnós.
Nós Animation Blend, que são usados em
AnimationNodeBlendTreecomo combinação de gráfico único por meio de várias portas de entrada.
Para definir um nó raiz em AnimationTree, há alguns tipos disponíveis:

AnimationNodeAnimation: Seleciona uma animação da lista e a reproduz. Esse é o nó raiz mais simples e geralmente não é usado diretamente como raiz.AnimationNodeBlendTree: Contém muitos nós do tipo blend, como mix, blend2, blend3, one shot, etc. Essa é uma das raízes mais usadas normalmente.AnimationNodeStateMachine: Contém vários nós-raiz como filhos em um gráfico. Cada nó é usado como um estado , e fornece várias funções para alternar entre estados.AnimationNodeBlendSpace2D: Permite colocar nós raiz em um espaço de mesclagem 2D. Controle a posição da mescla em 2D para misturar várias animações.AnimationNodeBlendSpace1D: Versão simplificada do acima (1D).
Árvore (Tree) de mistura
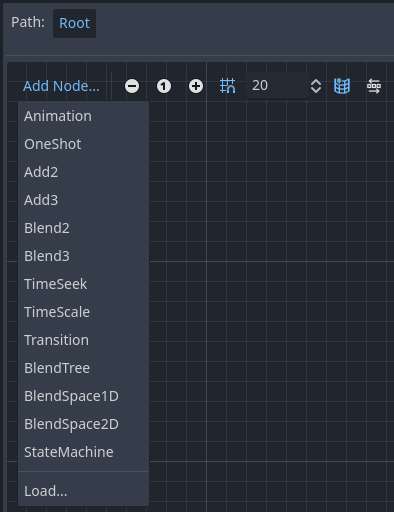
Um AnimationNodeBlendTree pode conter nós raiz e regulares usados para combinação. Os nós são adicionados ao gráfico a partir de um menu:
Todas as árvores de mesclagem contêm um nó Output por padrão, e algo deve ser conectado a ele para que as animações sejam reproduzidas.
A maneira mais fácil de testar essa funcionalidade é conectar um nó Animation diretamente a ele:
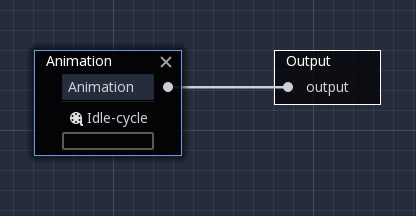
Isso simplesmente reproduzirá a animação. Certifique-se de que o AnimationTree esteja ativo para que algo realmente aconteça.
A seguir, uma breve descrição dos nós disponíveis:
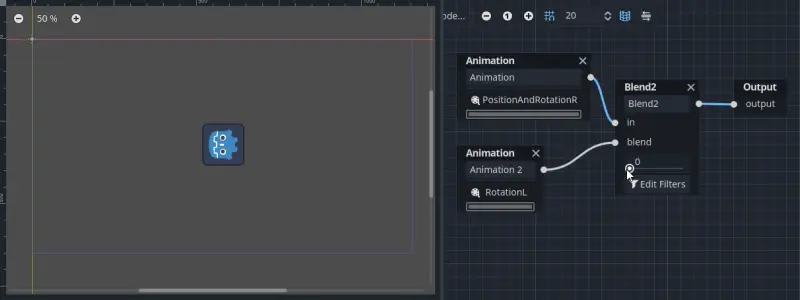
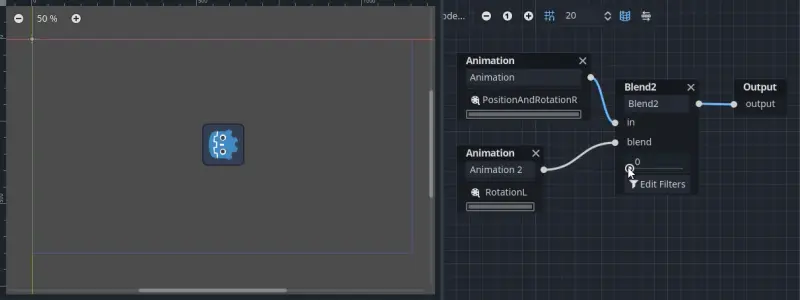
Blend2 / Blend3
Esses nós combinam duas ou três entradas com um valor de combinação especificado pelo usuário:
Para mesclagens mais complexas, é recomendável usar espaços de mesclagem.
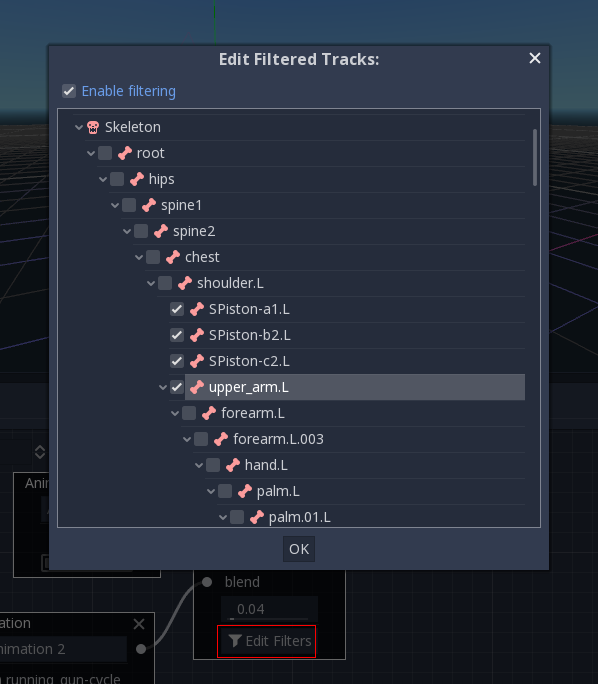
A mesclagem também pode usar filtros, ou seja, você pode controlar individualmente quais faixas passam pela função de mesclagem. Isso é muito útil para colocar animações em camadas umas sobre as outras.
OneShot
Esse nó executará uma subanimação e retornará assim que for concluído. É possível personalizar os tempos de mesclagem para o fading in e o fading out, bem como os filtros.
After setting the request and changing the animation playback, the one-shot node automatically clears the request on the next process frame by setting its request value to AnimationNodeOneShot.ONE_SHOT_REQUEST_NONE.
# Play child animation connected to "shot" port.
animation_tree.set("parameters/OneShot/request", AnimationNodeOneShot.ONE_SHOT_REQUEST_FIRE)
# Alternative syntax (same result as above).
animation_tree["parameters/OneShot/request"] = AnimationNodeOneShot.ONE_SHOT_REQUEST_FIRE

# Abort child animation connected to "shot" port.
animation_tree.set("parameters/OneShot/request", AnimationNodeOneShot.ONE_SHOT_REQUEST_ABORT)
# Alternative syntax (same result as above).
animation_tree["parameters/OneShot/request"] = AnimationNodeOneShot.ONE_SHOT_REQUEST_ABORT

# Get current state (read-only).
animation_tree.get("parameters/OneShot/active"))
# Alternative syntax (same result as above).
animation_tree["parameters/OneShot/active"]
// Play child animation connected to "shot" port.
animationTree.Set("parameters/OneShot/request", (int)AnimationNodeOneShot.OneShotRequest.Fire);

// Abort child animation connected to "shot" port.
animationTree.Set("parameters/OneShot/request", (int)AnimationNodeOneShot.OneShotRequest.Abort);

// Get current state (read-only).
animationTree.Get("parameters/OneShot/active");
TimeSeek
Esse nó pode ser usado para fazer com que um comando de busca ocorra em qualquer subfilho do gráfico de animação. Use esse tipo de nó para reproduzir um Animation desde o início ou em uma determinada posição de reprodução dentro do AnimationNodeBlendTree.
After setting the time and changing the animation playback, the seek node automatically goes into sleep mode on the next process frame by setting its seek_request value to -1.0.
# Play child animation from the start.
animation_tree.set("parameters/TimeSeek/seek_request", 0.0)
# Alternative syntax (same result as above).
animation_tree["parameters/TimeSeek/seek_request"] = 0.0

# Play child animation from 12 second timestamp.
animation_tree.set("parameters/TimeSeek/seek_request", 12.0)
# Alternative syntax (same result as above).
animation_tree["parameters/TimeSeek/seek_request"] = 12.0
// Play child animation from the start.
animationTree.Set("parameters/TimeSeek/seek_request", 0.0);

// Play child animation from 12 second timestamp.
animationTree.Set("parameters/TimeSeek/seek_request", 12.0);
TimeScale
Allows scaling the speed of the animation (or reverse it) connected to the in input via the scale parameter. Setting the scale to 0 will pause the animation.
Transição
Very simple state machine (when you don't want to cope with a StateMachine node). Animations can be connected to the outputs and transition times can be specified.
After setting the request and changing the animation playback, the transition node automatically clears the request on the next process frame by setting its transition_request value to an empty string ("").
# Play child animation connected to "state_2" port.
animation_tree.set("parameters/Transition/transition_request", "state_2")
# Alternative syntax (same result as above).
animation_tree["parameters/Transition/transition_request"] = "state_2"

# Get current state name (read-only).
animation_tree.get("parameters/Transition/current_state")
# Alternative syntax (same result as above).
animation_tree["parameters/Transition/current_state"]

# Get current state index (read-only).
animation_tree.get("parameters/Transition/current_index"))
# Alternative syntax (same result as above).
animation_tree["parameters/Transition/current_index"]
// Play child animation connected to "state_2" port.
animationTree.Set("parameters/Transition/transition_request", "state_2");

// Get current state name (read-only).
animationTree.Get("parameters/Transition/current_state");

// Get current state index (read-only).
animationTree.Get("parameters/Transition/current_index");
BlendSpace2D
BlendSpace2D é um nó para realizar a combinação avançada em duas dimensões. Os pontos são adicionados a um espaço bidimensional e, em seguida, uma posição pode ser controlada para determinar a mesclagem:
The ranges in X and Y can be controlled (and labeled for convenience). By default, points can be placed anywhere (right-click on the coordinate system or use the add point button) and triangles will be generated automatically using Delaunay.
Também é possível desenhar os triângulos manualmente, desativando a opção auto triangle, embora isso raramente seja necessário:

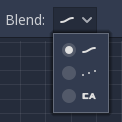
Por fim, é possível alterar o modo de mesclagem. Por padrão, a mesclagem ocorre interpolando pontos dentro do triângulo mais próximo. Ao lidar com animações 2D (quadro a quadro), talvez você queira mudar para o modo Discrete. Como alternativa, se você quiser manter a posição de reprodução atual ao alternar entre animações discretas, há um modo Carry. Esse modo pode ser alterado no menu Blend:
BlendSpace1D
Isso é semelhante aos espaços de mesclagem 2D, mas em uma dimensão (portanto, triângulos não são necessários).
StateMachine(Máquina de Estados)
Esse nó atua como uma máquina de estado com nós raiz como estados. Os nós raiz podem ser criados e conectados através de linhas. Os estados são conectados através de Transitions, que são conexões com propriedades especiais. As transições são unidirecionais, mas duas podem ser usadas para se conectar em ambas as direções.
Existem muitos tipos de transições:
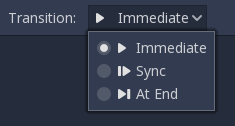
Imediato: Mudará para o próximo estado imediatamente. O estado atual terminará e se misturará ao início do novo.
Sync: Mudará para o próximo estado imediatamente, mas buscará o novo estado na posição de reprodução do estado antigo.
At End: Aguardará o término da reprodução do estado atual e, em seguida, alternará para o início da animação do próximo estado.
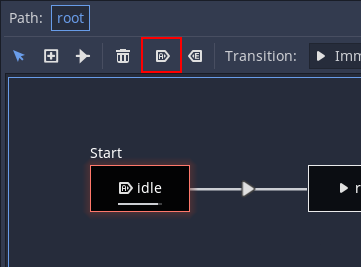
As transições também têm algumas propriedades. Clique em qualquer transição e ela será exibida no painel do inspetor:
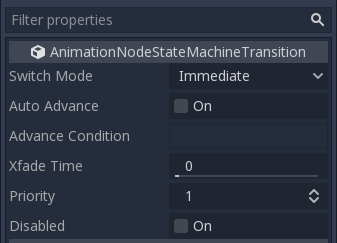
Switch Mode é o tipo de transição (veja acima), ele pode ser modificado após a criação aqui.
O Auto Advance ativará a transição automaticamente quando esse estado for atingido. Isso funciona melhor com o modo de switch At End.
Advance Condition (Condição de avanço) ativará o avanço automático quando essa condição for definida. Esse é um campo de texto personalizado que pode ser preenchido com um nome de variável. A variável pode ser modificada a partir do código (mais sobre isso adiante).
Xfade Time é o tempo para cruzar entre este estado e o próximo.
Priority(Prioridade) é usada em conjunto com a função
travel()do código (mais sobre isso posteriormente). As transições de prioridade mais baixa têm preferência ao percorrer a árvore.Disabled(Desativado) alterna a desativação desta transição (quando desativada, não será usada durante a mudança ou avanço automático).
For better blending
In Godot 4.0+, in order for the blending results to be deterministic (reproducible and always consistent), the blended property values must have a specific initial value. For example, in the case of two animations to be blended, if one animation has a property track and the other does not, the blended animation is calculated as if the latter animation had a property track with the initial value.
When using Position/Rotation/Scale 3D tracks for Skeleton3D bones, the initial value is Bone Rest.
For other properties, the initial value is 0 and if the track is present in the RESET animation,
the value of its first keyframe is used instead.
For example, the following AnimationPlayer has two animations, but one of them lacks a Property track for Position.
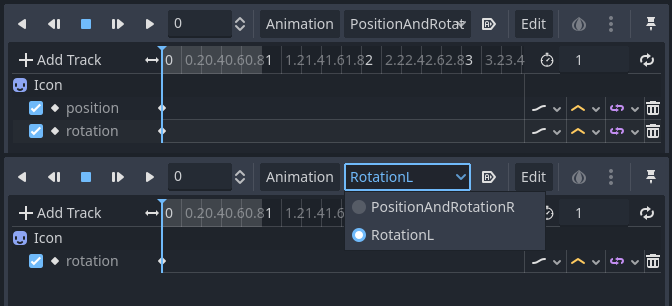
This means that the animation lacking that will treat those Positions as Vector2(0, 0).
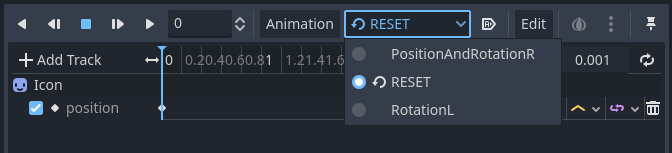
This problem can be solved by adding a Property track for Position as an initial value to the RESET animation.
Nota
Be aware that the RESET animation exists to define the default pose when loading an object originally.
It is assumed to have only one frame and is not expected to be played back using the timeline.
Also keep in mind that the Rotation 3D tracks and the Property tracks for 2D rotation with Interpolation Type set to Linear Angle or Cubic Angle will prevent rotation of more than 180 degrees from the initial value as blended animation.
This can be useful for Skeleton3Ds to prevent the bones penetrating the body when blending animations. Therefore, Skeleton3D's Bone Rest values should be as close to the midpoint of the movable range as possible. This means that for humanoid models, it is preferable to import them in a T-pose.
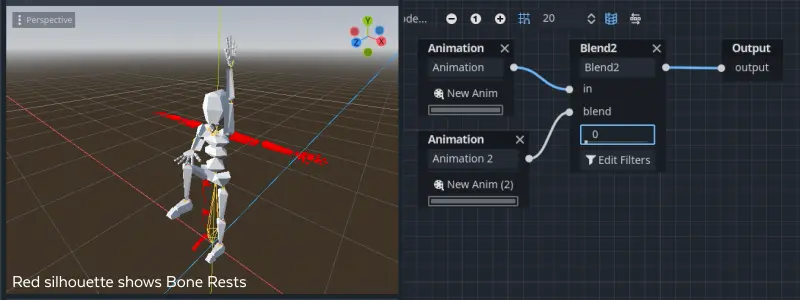
You can see that the shortest rotation path from Bone Rests is prioritized rather than the shortest rotation path between animations.
If you need to rotate Skeleton3D itself more than 180 degrees by blend animations for movement, you can use Root Motion.
Root motion(Movimento de raiz)
Ao trabalhar com animações em 3D, uma técnica popular é a de os animadores usarem o osso raiz do esqueleto para dar movimento ao restante do esqueleto. Isso permite animar os personagens de forma que os passos realmente correspondam ao piso abaixo. Também permite a interação precisa com objetos durante as cenas.
Ao reproduzir a animação no Godot, é possível selecionar esse osso como a faixa de movimento raiz . Ao fazer isso, a transformação do osso será cancelada visualmente (a animação permanecerá no lugar).
Depois disso, o movimento real pode ser recuperado por meio da API AnimationTree como uma transformação:
# Get the motion delta.
animation_tree.get_root_motion_position()
animation_tree.get_root_motion_rotation()
animation_tree.get_root_motion_scale()

# Get the actual blended value of the animation.
animation_tree.get_root_motion_position_accumulator()
animation_tree.get_root_motion_rotation_accumulator()
animation_tree.get_root_motion_scale_accumulator()
// Get the motion delta.
animationTree.GetRootMotionPosition();
animationTree.GetRootMotionRotation();
animationTree.GetRootMotionScale();

// Get the actual blended value of the animation.
animationTree.GetRootMotionPositionAccumulator();
animationTree.GetRootMotionRotationAccumulator();
animationTree.GetRootMotionScaleAccumulator();
This can be fed to functions such as CharacterBody3D.move_and_slide to control the character movement.
Há também um nó de ferramenta, RootMotionView, que pode ser colocado em uma cena e funcionará como um piso personalizado para seu personagem e suas animações (esse nó é desativado por padrão durante o jogo).
Controlando por código
Depois de criar a árvore e visualizá-la, a única pergunta que resta é "Como tudo isso é controlado por código?".
Keep in mind that the animation nodes are just resources and, as such, they are shared between all instances using them.
Setting values in the nodes directly will affect all instances of the scene that uses this AnimationTree.
This is generally undesirable, but does have some cool use cases, e.g. you can copy and paste parts of your animation tree,
or reuse nodes with a complex layout (such as a state machine or blend space) in different animation trees.
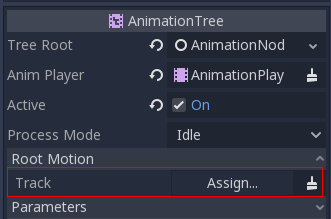
The actual animation data is contained in the AnimationTree node and is accessed via properties.
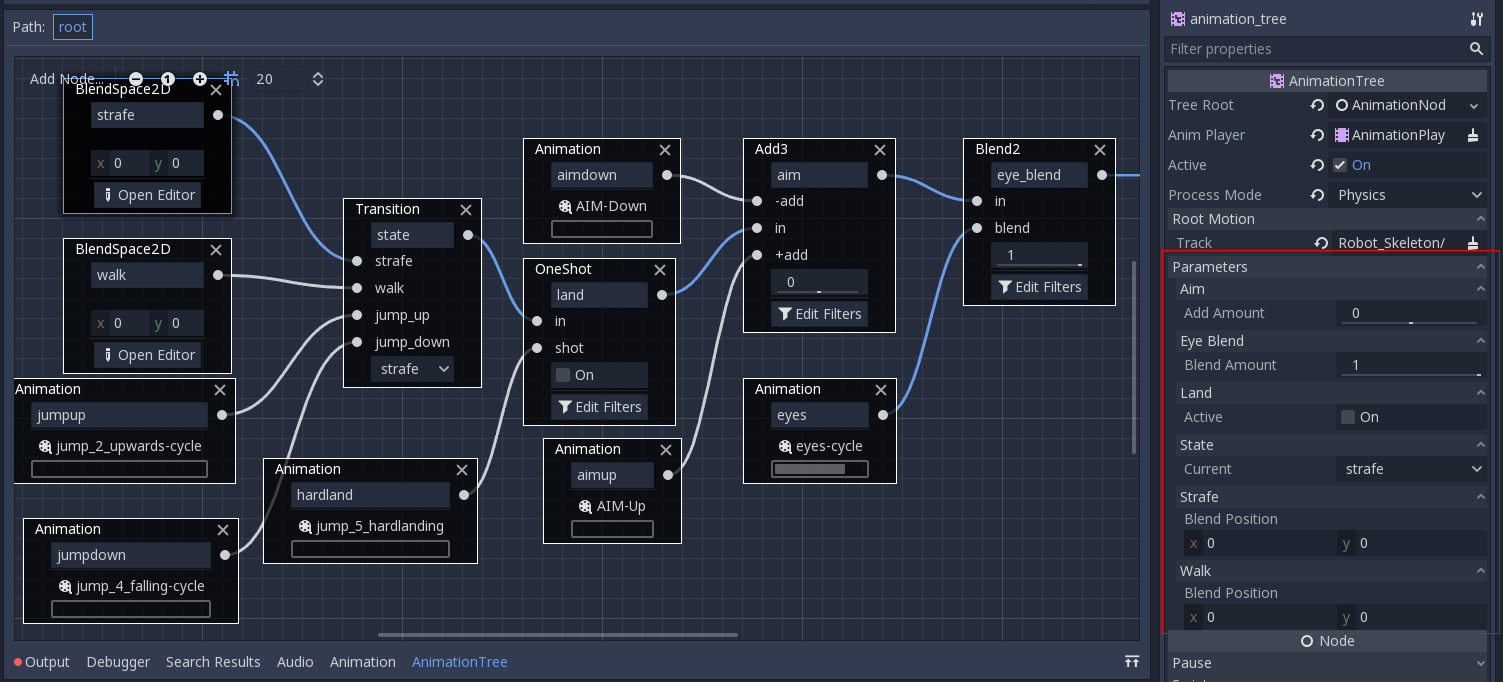
Check the "Parameters" section of the AnimationTree node to see all the parameters that can be modified in real-time:
This is handy because it makes it possible to animate them from an AnimationPlayer, or even the AnimationTree itself,
allowing the realization of very complex animation logic.
To modify these values from code, the property path must be obtained. This is done easily by hovering the mouse over any of the parameters:

Which allows setting them or reading them:
animation_tree.set("parameters/eye_blend/blend_amount", 1.0)
# Simpler alternative form:
animation_tree["parameters/eye_blend/blend_amount"] = 1.0
animationTree.Set("parameters/eye_blend/blend_amount", 1.0);
State machine travel
One of the nice features in Godot's StateMachine implementation is the ability to travel. The graph can be instructed to go from the
current state to another one, while visiting all the intermediate ones. This is done via the A* algorithm.
If there is no path of transitions starting at the current state and finishing at the destination state, the graph teleports to the destination state.
To use the travel ability, you should first retrieve the AnimationNodeStateMachinePlayback
object from the AnimationTree node (it is exported as a property).
var state_machine = animation_tree["parameters/playback"]
AnimationNodeStateMachinePlayback stateMachine = (AnimationNodeStateMachinePlayback)animationTree.Get("parameters/playback");
Once retrieved, it can be used by calling one of the many functions it offers:
state_machine.travel("SomeState")
stateMachine.Travel("SomeState");
The state machine must be running before you can travel. Make sure to either call start() or choose a node to Autoplay on Load.