Up to date
This page is up to date for Godot 4.2.
If you still find outdated information, please open an issue.
Usando Area2D
Introdução
A Godot oferece uma série de objetos de colisão para proporcionar tanto a detecção de colisão quanto a resposta. Tentar decidir qual deles usar para seu projeto pode ser confuso. Você pode evitar problemas e simplificar o desenvolvimento se entender como cada um deles funciona e quais são seus prós e contras. Neste tutorial, veremos o nó Area2D e mostraremos alguns exemplos de como ele pode ser utilizado.
Nota
This document assumes you're familiar with Godot's various physics bodies. Please read Introdução à física first.
O que é uma área?
An Area2D defines a region of 2D space. In this space you can detect other CollisionObject2D nodes overlapping, entering, and exiting. Areas also allow for overriding local physics properties. We'll explore each of these functions below.
Propriedades da área
Areas have many properties you can use to customize their behavior.
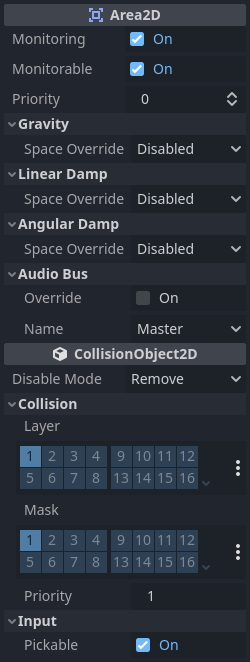
The Gravity, Linear Damp, and Angular Damp sections
are used to configure the area's physics override behavior.
We'll look at how to use those in the Area influence section below.
Monitoring and Monitorable are used to enable and disable the area.
The Audio Bus section allows you to override audio in the area, for example to
apply an audio effect when the player moves through.
Note that Area2D extends CollisionObject2D, so it
also provides properties inherited from that class.
The Collision section of CollisionObject2D is where you configure the
area's collision layer(s) and mask(s).
Detecção de sobreposição
Perhaps the most common use of Area2D nodes is for contact and overlap detection. When you need to know that two objects have touched, but don't need physical collision, you can use an area to notify you of the contact.
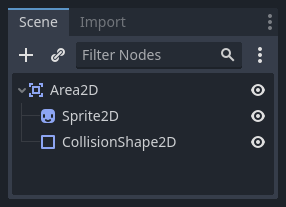
For example, let's say we're making a coin for the player to pick up. The coin is not a solid object - the player can't stand on it or push it - we just want it to disappear when the player touches it.
Here's the node setup for the coin:
To detect the overlap, we'll connect the appropriate signal on the Area2D. Which
signal to use depends on the player's node type. If the player is another area,
use area_entered. However, let's assume our player is a CharacterBody2D
(and therefore a CollisionObject2D type), so we'll connect the
body_entered signal.
Nota
If you're not familiar with using signals, see Usando sinais for an introduction.
extends Area2D

func _on_coin_body_entered(body):
    queue_free()
using Godot;

public partial class Coin : Area2D
{
    private void OnCoinBodyEntered(PhysicsBody2D body)
    {
        QueueFree();
    }
}
Now our player can collect the coins!
Alguns outros exemplos de uso:
Areas are great for bullets and other projectiles that hit and deal damage, but don't need any other physics such as bouncing.
Use a large circular area around an enemy to define its "detect" radius. When the player is outside the area, the enemy can't "see" it.
"Security cameras" - In a large level with multiple cameras, attach areas to each camera and activate them when the player enters.
Veja o Seu primeiro jogo 2D para um exemplo de utilização da Area2D em um jogo.
Área de influência
The second major use for area nodes is to alter physics. By default, the area
won't do this, but you can enable this with the Space Override property. When
areas overlap, they are processed in Priority order (higher priority areas are
processed first). There are four options for override:
Combine - The area adds its values to what has been calculated so far.
Replace - The area replaces physics properties, and lower priority areas are ignored.
Combine-Replace - The area adds its gravity/damping values to whatever has been calculated so far (in priority order), ignoring any lower priority areas.
Replace-Combine - The area replaces any gravity/damping calculated so far, but keeps calculating the rest of the areas.
Using these properties, you can create very complex behavior with multiple overlapping areas.
The physics properties that can be overridden are:
Gravity - Gravity's strength inside the area.
Gravity Direction - This vector does not need to be normalized.
Linear Damp - How quickly objects stop moving - linear velocity lost per second.
Angular Damp - How quickly objects stop spinning - angular velocity lost per second.
Ponto de gravidade
The Gravity Point property allows you to create an "attractor". Gravity in the
area will be calculated towards a point, given by the Point Center property.
Values are relative to the Area2D, so for example using (0, 0) will attract
objects to the center of the area.
Exemplos
The example project attached below has three areas demonstrating physics override.
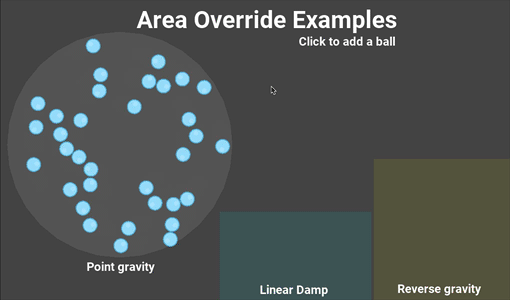
You can download this project here: area_2d_starter.zip